New Request and Request Detail
- 16 Feb 2024
- 7 Minutes to read
- Contributors


- Print
New Request and Request Detail
- Updated on 16 Feb 2024
- 7 Minutes to read
- Contributors
- Print
Article summary
Did you find this summary helpful?
Thank you for your feedback!
Each request carries a summary of information and settings that can be displayed and possibly edited or written in the request detail. In order to create a new request in the application, it is necessary to bring up the form for creating a new request in the left menu. There are several forms in the application for creating a new request, it is recommended to use only the hd_ticket_new.aspx or hd_write_frame.aspx form. The hd_ticket_new.aspx form already has the ability to be set via controls unlike hd_write_frame.aspx and the hd_write_frame.aspx form displays a tree structure of objects for selection unlike hd_ticket_new.aspx.

New request

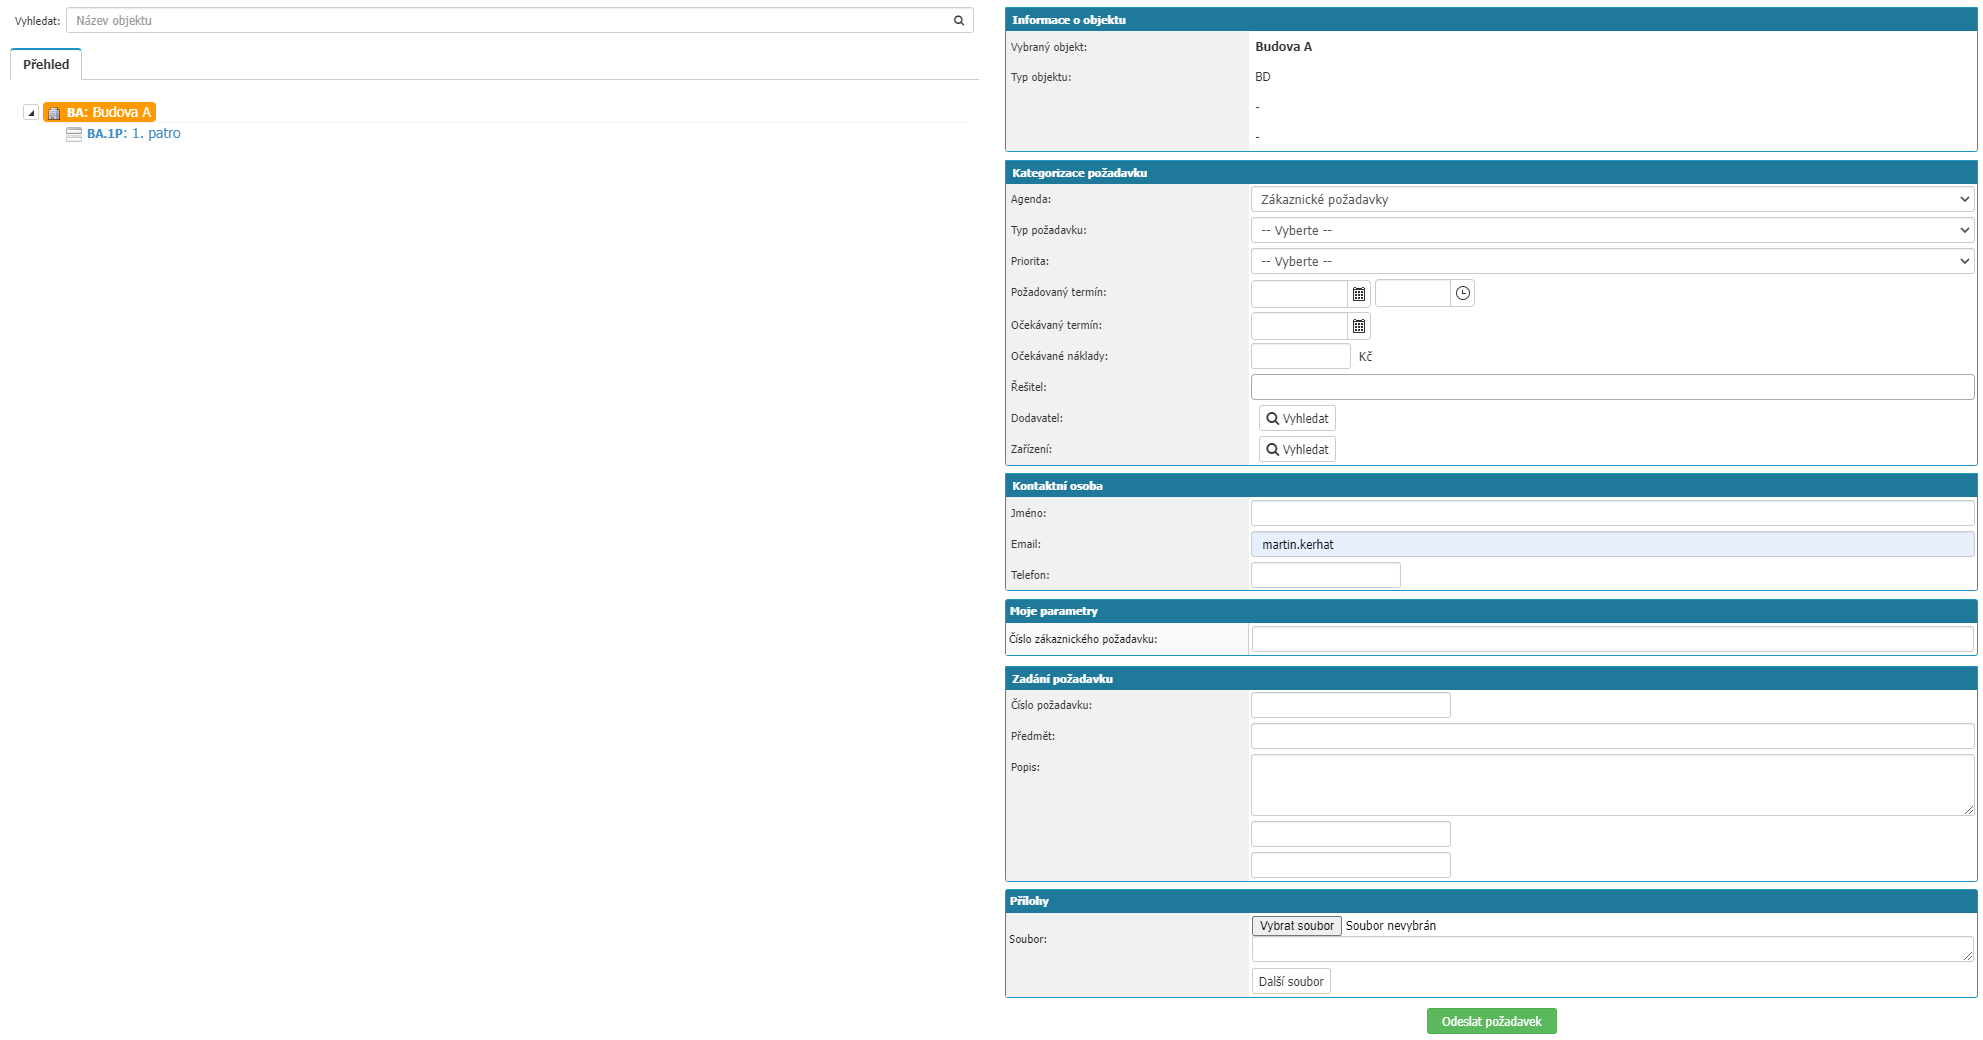
In the basic settings of the application, the sections Request Categorization, Request Entry and Attachments are in the new request.
Request Categorization

- Agenda - selection of the agenda under which the request is written to the application. The agenda determines other settings and what workflow will be for the request. The option is mandatory
- Request type - possibility to further categorize the request in the application. The option is determined according to the settings of the Task Types dial and its relation to agendas.
- Priority - selection of the request priority. The option is determined according to the settings of the Priority dial and its link to agendas.
Entering a request

- Subject - field for entering the subject of the request. The field is mandatory.
- Description - a field to describe the request. The field is mandatory.
Attachments

In the section you can add files as an attachment to the request. The Select File option will open the file selection window. You can write a note to the file. The option Additional file opens the option to add another file to the request.

Save the request via the options above Save and New - the option saves the request to the application and opens the option for the user to create a new request. Save Request - option saves the request to the application and immediately opens the detail of the request.
Controls

Other options for setting up a new request can be found under Controls.
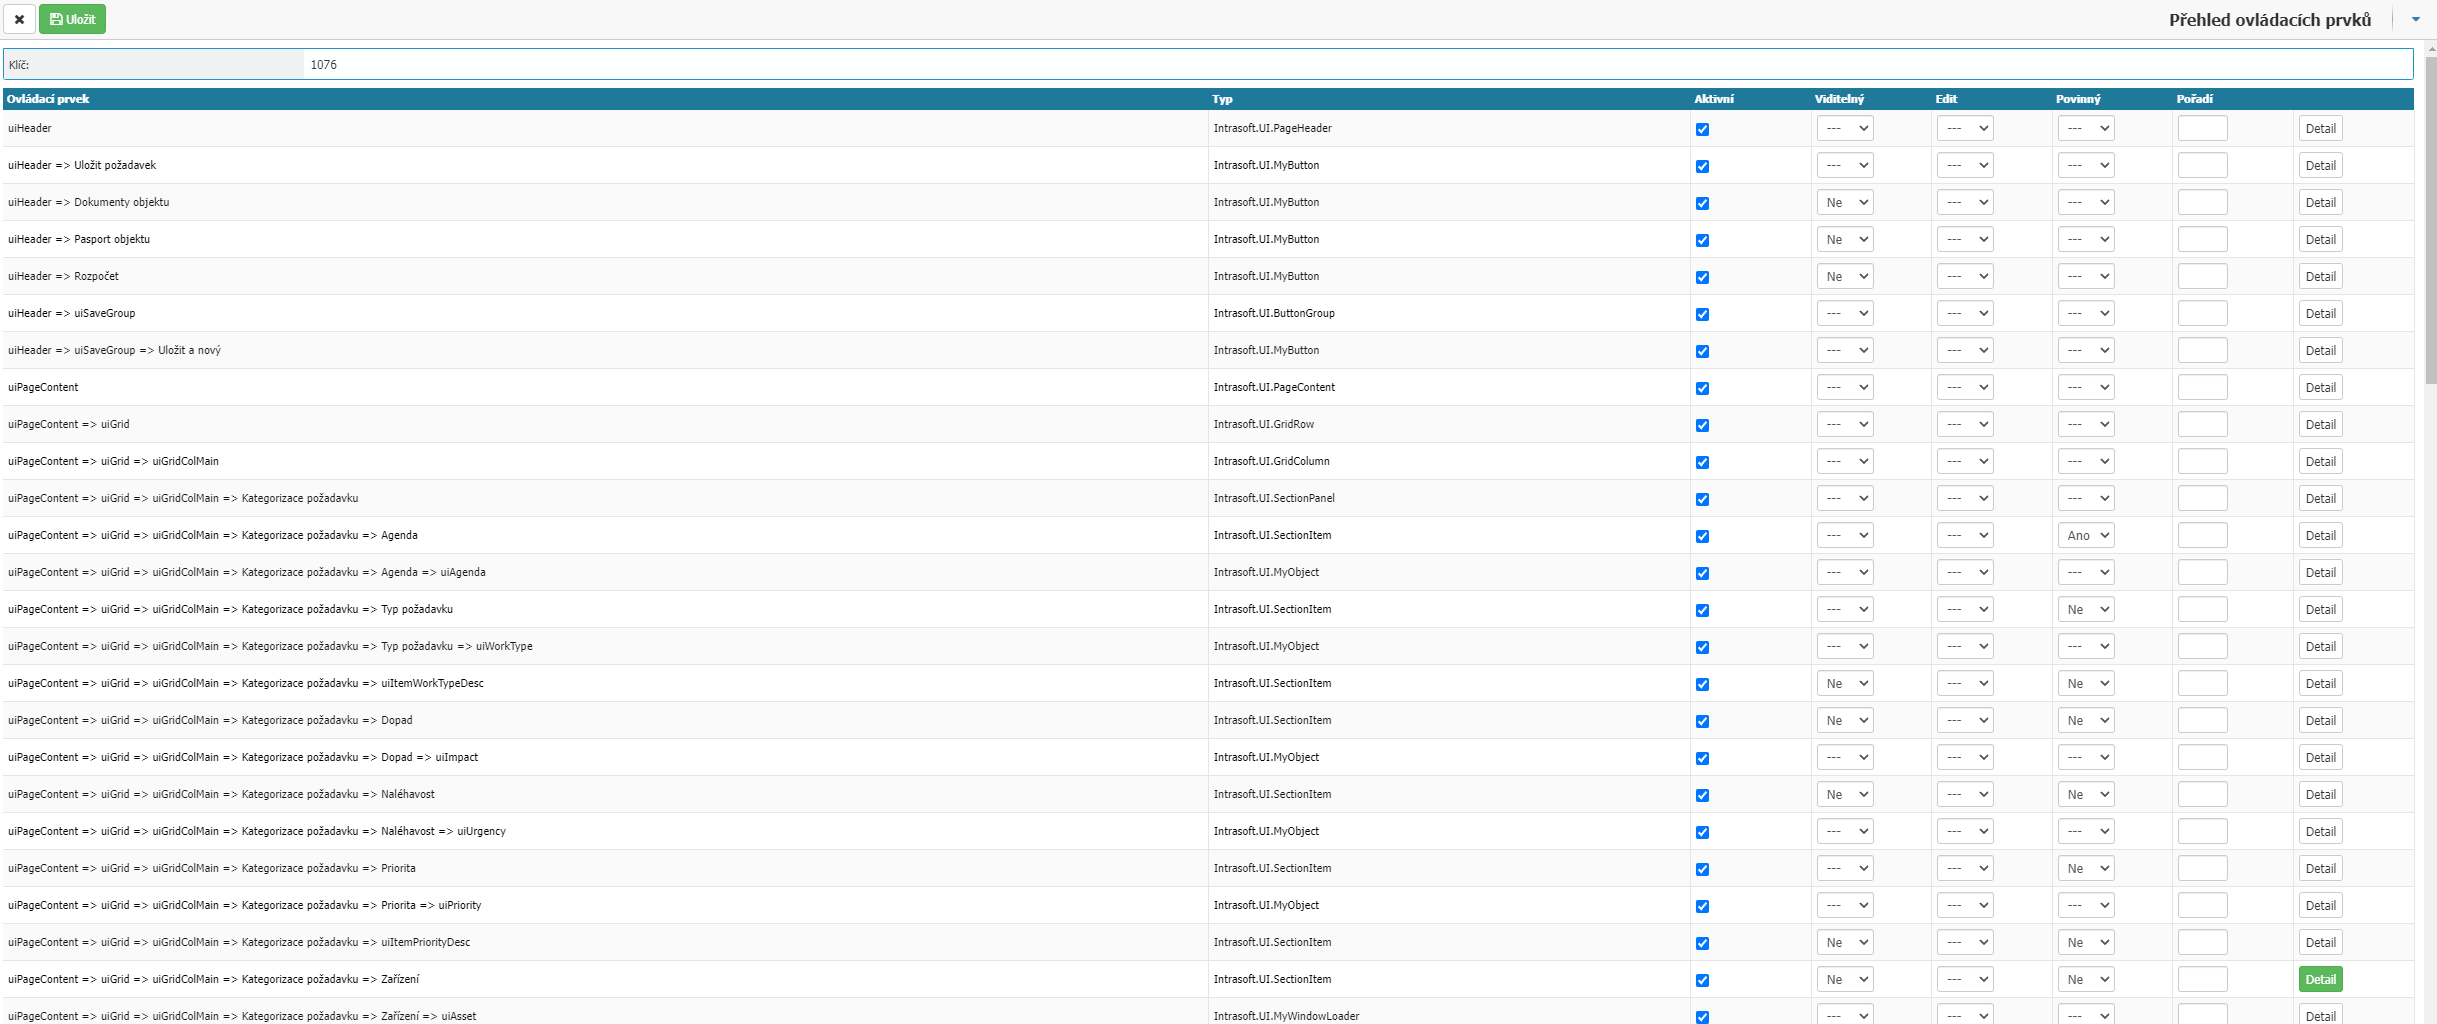
Here you set what should be visible and what should be a mandatory option when creating a new request. The controls are only available for the form hd_ticket_new.aspx and hd_review.aspx. You can set values for each control:
- Active - select whether the control is active.
- Visible - option whether the control is visible, option to set Yes/No or leave it at default setting where some controls are visible in the default setting and others are not.
- Edit - option whether the control is editable, option to set Yes/No or leave in default setting, where some controls are visible in basic setting and others are not.
- Mandatory - option whether the control is mandatory, option to set Yes/No or leave in default setting, where some controls are mandatory in basic setting others vice versa.
- Order - option to set the order in which the options should be displayed in the section. They recommend numbering in tens where the smallest number will be the highest.
- Detail - option allows you to set a specific item to only selected agendas, groups and users.
Request Detail
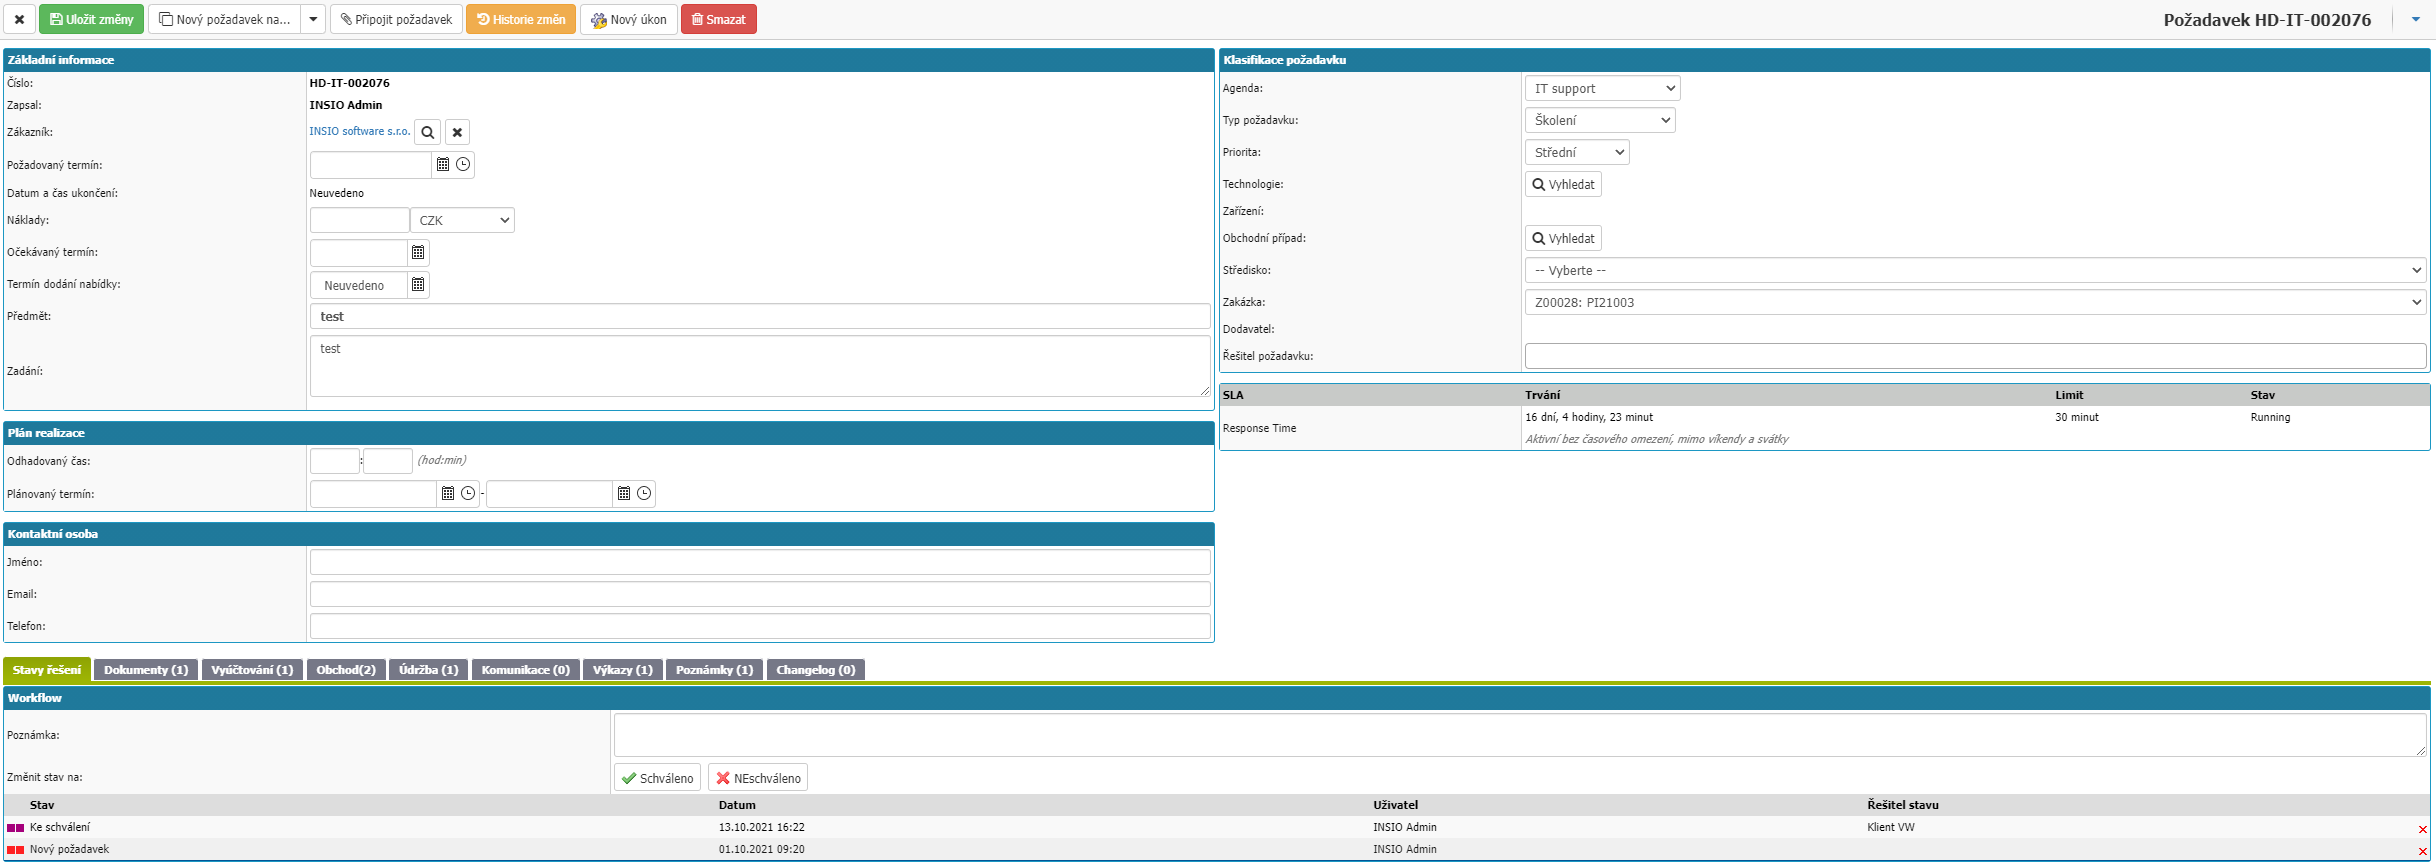
The setting options and values are dependent on the agenda settings. Detail is divided into Basic Information, Execution Plan, Contact Person, Request Classification and into Solution Status, Documents, Billing, Orders, Sales, Maintenance, Communications, Reports, Notes and Changelog tabs. The visibility of each section or tab and the fields within them is configurable in the agenda settings on the Helpdesk module.
Basic information
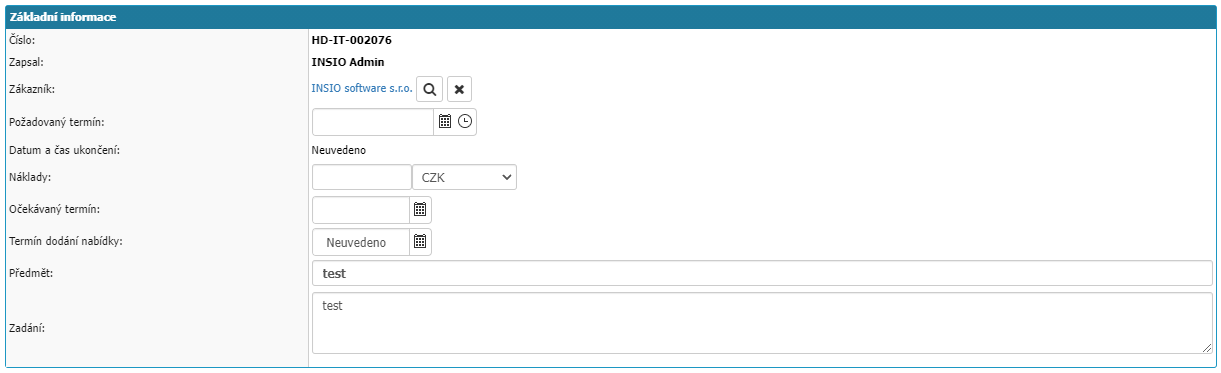
- Number - request number generated by the application according to the Record Numbering setting in Agenda.
- Enrolled - the user who entered the request into the application.
- Customer - partner from the partner's codebook to which the request is linked.
- Required deadline - the deadline by which the request should be resolved.
- Cost - the cost associated with the request. Option to enter value and select currency.
- Expected date - the date when the request is expected to be resolved.
- Subject - the subject of the request entered by the user when creating the request.
- Request - the request entered by the user when creating the request.
Execution Plan

- estimated time - estimated time for request execution.
- Scheduled time - the planned date for the request to be implemented.
Contact person

Option to fill in a contact person for the request, you can enter Name, Email and Phone.
Request Classification
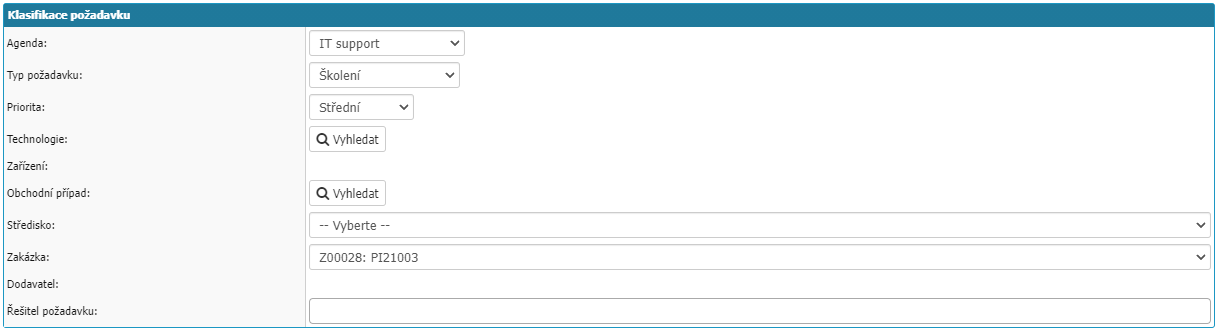
- Agenda - request agenda.
- Request type - more detailed categorization of the request in the application. The option is determined according to the settings of the Task Types dial and its relation to the agendas.
- Priority - priority of the request. The option is determined according to the settings of the Priority dial and its link to agendas.
- Object - the option to assign an object from the overview of objects in the application to the given request.
- Technology - option to assign a technology from the technology tree in the application to the request.
- Device - option to assign a device from the device overview in the application to the given request.
- Contract - option to assign a device from the device overview in the application to the given request.
- Business cases - option to assign business cases from the business case overview in the application to the request.
- Centre - option to assign a centre from the centre directory to the request.
- Order - option to assign an order from the order codebook to the request.
- Product - option to assign a product from the product codebook to the request.
- Activity - option to assign an activity from the activity codebook to the request.
- Supplier - option to assign a partner from the partner list to the request.
- Guarantor - option to select a user as a guarantor of the request. You can set the selection of available users in Administrative menu > Workflow > Workflow solvers.
- Request solver - option to assign specific users who are responsible for solving the request. Users selected here do not become solvers in the workflow.
SLA

The section shows the set SLA and its expiration.
Solution states

In the tab you can find the workflow of the request.
Documents

In the tab you can find all attachments to the request and the option to upload the attachment to the request.
- Attachment Type - option to categorize the attachment for the request. You can set the options in Administration menu > Attachment types.
- Description - option to write a description of the attachment.
- Select File - opens a window to select the file you want to upload as an attachment.
To save the attachment to the request, after selecting the file, you need to confirm with the Save Changes option at the top of the request detail.
Billing

In the tab you have the option to create a billing for the request. In the tab overview, you can see the bills already assigned to the request, and you can open the detail of the selected bill via the magnifying glass option. Select New to create a new billing and open the Billing Detail. In order for the New Billing option to be functional you must have set up the Returning Agendas in the Agenda Settings, the billing needs an agenda from the Sales > Billing Support module.
Sales

In the tab you will find the option to connect and create an Offer or Opportunity. Use the magnifying glass option on the connected Offers/Opportunities to open their detail. Selecting New Offer/Opportunity opens the detail for creating an Offer/Opportunity.
Maintenance

The tab contains all the actions that have been created via the New Action option at the top in the details of the request. You can use the magnifying glass option to open the detail of that task. In order to create a follow-up action from a helpdesk request, you must have a Follow-up action set in the agenda settings in the Service > Work Actions module.
Communication

The tab displays all email communication belonging to the request. You can use the New Email option to send an email from the request that will be automatically linked to the request in the application. For the correct functioning of sending and receiving emails in Helpdesk requests it is necessary to have an email box set up in the application, to have an email box assigned in the agenda settings in the Helpdesk module and to match incoming emails to existing requests or to create new requests from incoming emails it is necessary to set up the Helpdesk Automail service in Administrative menu > System > Services (WinServices).
Reports

In the tab, you can find the statements of work for the given request. To be able to report, the HR module must be active and set up. Use the New Record option to open a window to record the event in the employee's calendar.
Notes

In the tab you have the option to write a note about the request. The note is not a note in the workflow and the tab itself is enabled with other permissions, this allows you to have e.g. internal notes also in the customer Helpdesk where customers have access to the workflow.
Changelog

In the tab you will find the New record option for writing changes resulting from the given request. All these entries are available in change_log_list.aspx which you can output to the left menu for the user.
Was this article helpful?