Authorisations, permits, access control
- 01 Feb 2024
- 8 Minutes to read
- Contributors

- Print
Authorisations, permits, access control
- Updated on 01 Feb 2024
- 8 Minutes to read
- Contributors
- Print
Article summary
Did you find this summary helpful?
Thank you for your feedback!
In order to determine for different users (or roles, groups of users) which records they can see in the system, which records they can edit and which actions they can perform, we work in INSIO with permissions, permissions, allowed workflow states and allowed actions.
We assign permissions, permissions and allowed workflow states to users, or roles or groups. If we create a setting that is or can later be shared by several users, we recommend that we manage this setting through roles (or groups) and only assign individual users to these roles (or groups).
Allowed actions are set separately in the details of each agenda. The settings of the permitted actions are then only valid for the documents belonging to the agenda. The list of permitted actions in the agenda settings depends on the selected module.
Permissions and actions
These are the basis for controlling access to records and determining which actions the user can perform in the application. Permissions are distinguished according to their behavior:
Classical
- They grant a right, valid in general.
Negotiable.
- Or limitative - they restrict or prohibit something
Workflow-related actions
- are valid only if other conditions are met, namely:
- In the agenda settings, Allowed actions tab, the workflow states for which the action is allowed are defined.
- A specific document of the agenda is currently in one of the states for which the action is enabled
- are valid only if other conditions are met, namely:
Permission - if the user has been granted limiting permissions, defines for which records the limitation does not apply.
Permitted workflow states - this setting defines the list of individual workflow states that the user is allowed to set (select) within the system on documents.
Permitted actions - for permissions related to workflow, specifies in which agenda and in which workflow state the permission can be used
Permissions and actions
The list of permissions is available directly in the system in the menu System -> List of permissions and actions.
The list can be filtered by individual modules. In this overview there is also a short title, which in most cases also replaces the description.
The Permissions marked with a red triangle are negation permissions - they forbid something.

Permissions marked with a cog (actions) are linked to the workflow. This means that it is not enough that the user has the permission. This permission must be enabled in the workflow states (Agendas -> Enabled actions). This way we can specify that "read notes" is available in all workflow states, but "write notes" is only available in states where (in this case) a helpdesk request is open and not closed. The interplay with Enabled Actions is described further below.

Permission
Permissions are defined in the system for the following attributes:
- Agenda
- Centers
- Objects
- Technologies
- Partners
- User attributes
Through these attributes, you can (in combination with limit permissions) control who sees what in the system.
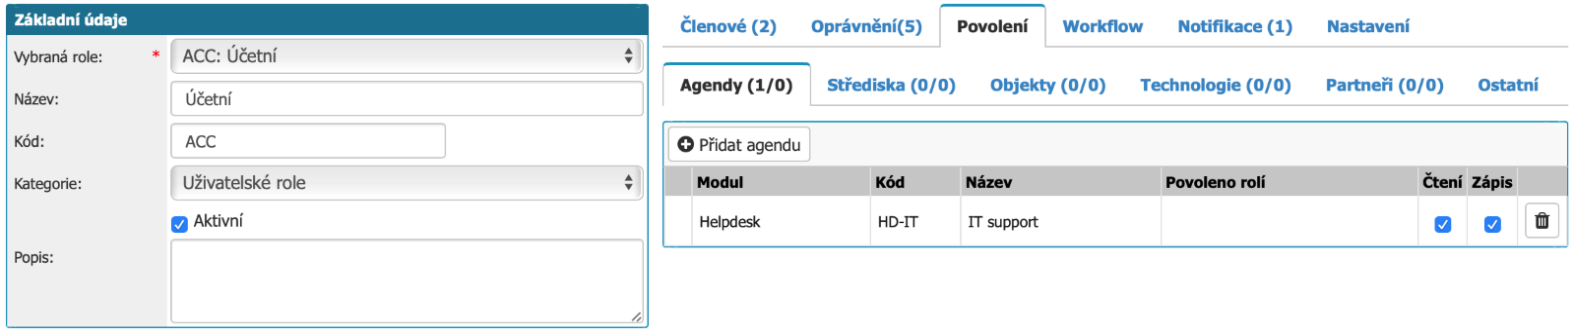
Example - the following helpdesk agendas are in the system:
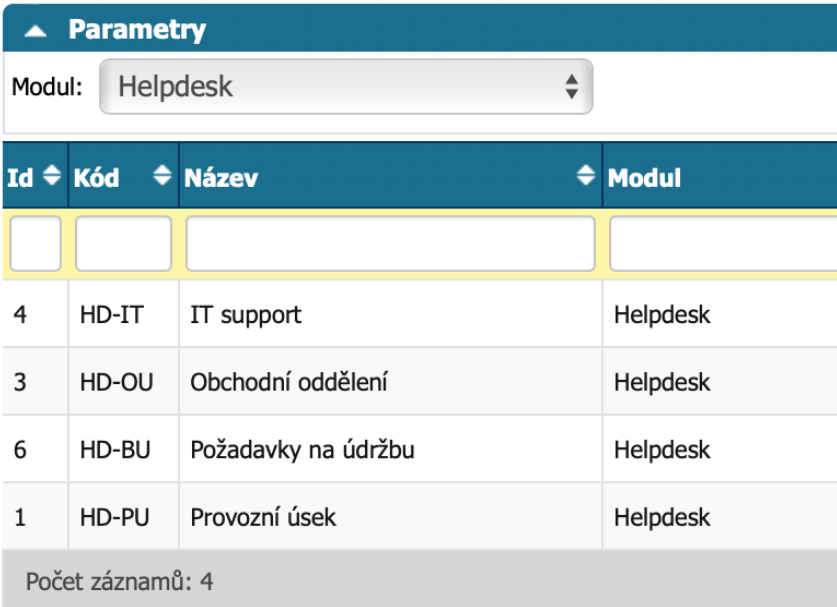
We want to make it so that the accountant can make IT requests (in case her IT equipment breaks down), but she should not see other agendas. Therefore, we will add the limiting permission Helpdesk.Access.Access.LimitByAgenda to the Helpdesk.Access and HelpdeskWrite permissions and select only the IT support agenda in Permissions - this will allow her to write requests to this agenda:
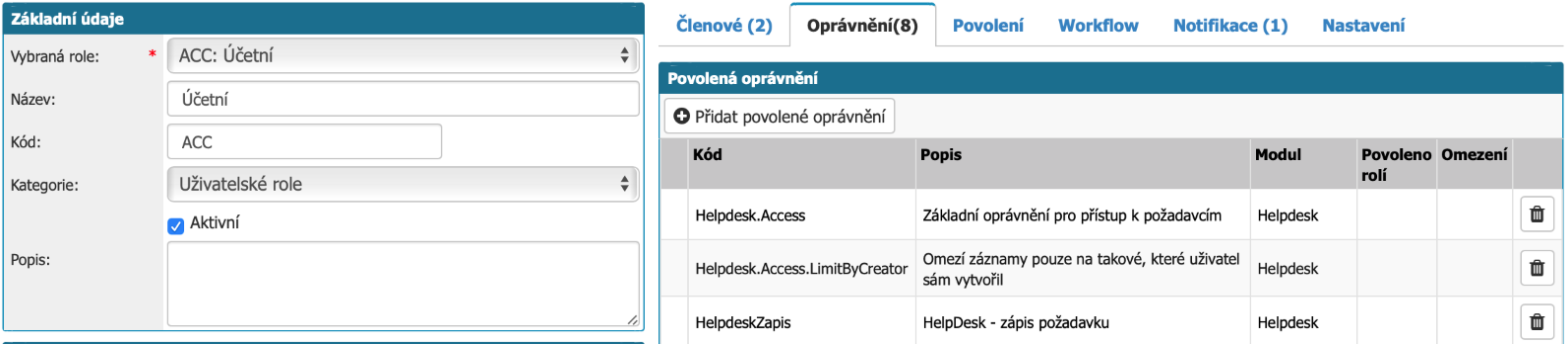
But beware, when the accountant views the summary of requests, we want to make sure that she only sees her requests. The ones she entered. We don't want her to see the entire IT request queue. We can achieve this in the permission settings by further restricting the reading of requests by writer (Helpdesk.Access.LimitByCreator):
Allowed workflow states
In order for a user to change the workflow to any state within a document, they must have that state among their Allowed workflow states. This can again be accomplished by assigning the Enabled workflow state directly to the user in their account, or the user can inherit it through membership in a role/group that has this state enabled. (The available state change options in the document are also subject to the workflow process settings that are assigned to the agenda to which the document belongs. The workflow process settings are discussed in Workflow - Subsequent and Previous States.)
Allowed actions, linking permissions to workflow
As mentioned above, there are permissions that are tied to workflow. If a user has such permissions, it does not mean that it works for him. This is further determined by the combination of the workflow state the document is in and the permissions (Allowed Actions) in the workflow states defined in the agenda.
The best way to explain this is with an example: if you create an invoice and save it, you should still be able to edit it. Saving is just a confirmation of the changes made. After creation, the invoice is in the default workflow state, let's call it "Invoice Edit". When we have the invoice ready, we confirm this with a follow-up workflow state e.g. "Invoice blocked". At this point, when the invoice is blocked, there should be nothing left to edit. On the other hand, at the moment when the invoice is blocked, another function should appear, namely the possibility to send the blocked invoice by email. How to make it right?
To create and edit an invoice, the user must have InvoiceIssued.Access and InvoiceIssued.Edit permissions.
To be able to email an invoice from the system, the user must have the InvoiceIssued.SendMail permission
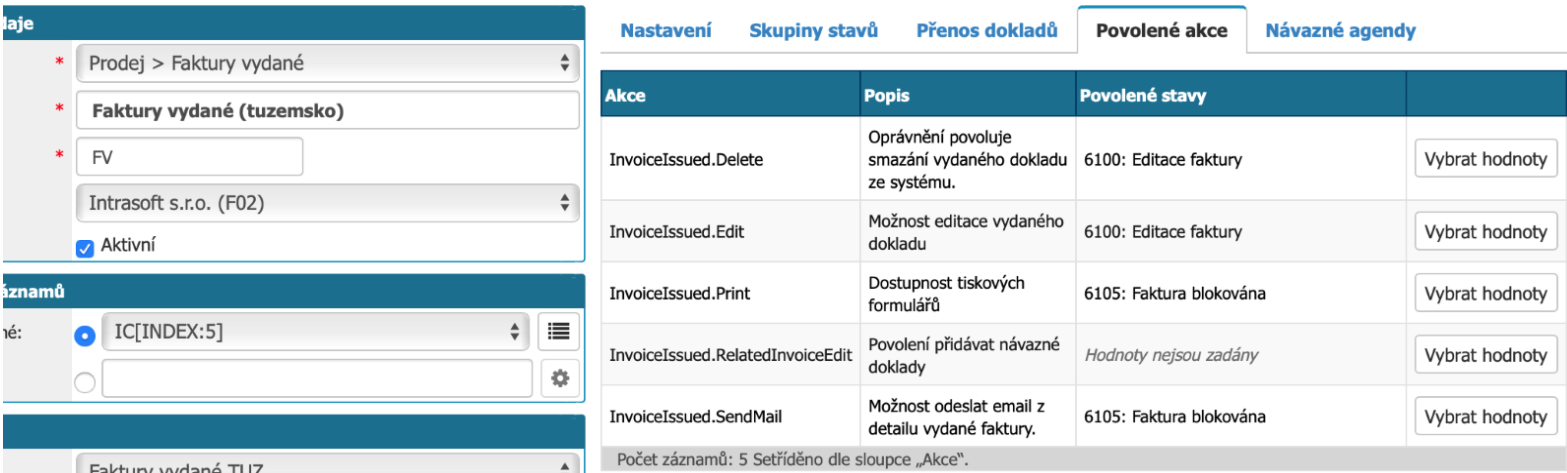
If both permissions are present, then look in the agenda settings on the "Allowed Actions" tab. Here you will see a list of permissions that are relevant to the agenda type (in this case Sales > Invoices Issued) and in the "Allowed States" column are the workflow states in which the permission (or action) is applicable. You can set your own values using the "Select values" button.
Access control to records
This section contains a general description and the logic that is used in each module to control access to records in the system. This controls which records in the system the user can see and which ones the user cannot access.
In November 2019 (application version 4.21), a new access permission system (permissions of type {PrefixModule}.Access) was put into operation, which is more flexible and replaces the original permission system (HelpdeskCteni, OrderCteni, etc.).
If the {PrefixModule}.Access permission is used (on a role or user), the accesses of the affected users will be controlled according to this new concept. Otherwise, they will continue to follow the old logic. This makes it possible to migrate roles (and the users in them) to the new permission logic incrementally.
Old permission type
We will only briefly describe the old permissions logic for completeness. We do not recommend using it for new installations and configurations.
The original permission logic requires that all other relevant criteria (permissions on agendas, objects, etc.) be defined in addition to the base permission (HelpdeskCteni, OrdersCteni, etc.), otherwise the user will not see any records.
This is a fundamental difference from the new logic where full access is limited by limiting permissions:
New permission type
A new basic permission is added for each module, named {PrefixModule}.Access, e.g. Helpdesk.Access (for access to helpdesk requests), InvoiceReceived.Access (invoices received).
This is a basic permission without which the user cannot access any record in the module.
If the user has ONLY this permission (e.g. Helpdesk.Access), he/she will have access to ALL records in the module (in the case of the helpdesk, all requests).
Restricting access to records
It is possible to restrict user access to records using additional permissions. The great advantage of this concept is that you will be able to specify for each role (or group of users) which Permissions should be used to control access to records:
{PrefixModule}.Access.LimitByAgenda
- Limits records by the Agendas the user has Permissions to.
{PrefixModule}.Access.LimitByEntity
- Limits records by Entity that the user has Permission to.
- Permissions per Entity is now only set on the role or group for the basic permissions that grant access (i.e. in the Permissions tab for a specific permission) via the "Entity" button.
{PrefixModule}.Access.LimitByCenter
- Limits records by Centers that the user has Permission to OR is a Center Manager.
{PrefixModule}.Access.LimitByProject
- Limits records by Orders for which the user is listed as an Order Manager OR has Permission to the Order Group containing the order on the invoice.
{PrefixModule}.Access.LimitByObject
- Limits records by Objects that the user has Permission to OR is an Object Manager.
{PrefixModule}.Access.LimitByPartner
- Limits records to those where the supplier (customer) is a company that the user has set up in the user account, or to which the user has Permission.
{PrefixModule}.Access.LimitByCreator
- Limits records to only those that the user has created.
Combination of multiple limit permissions
These limitation rights can be combined, in which case they are cumulative or result in more (stricter) restrictions.
Contracting authority
{PrefixModule}.Access.RevokeCreator
If the user is the requester, they will always see such a record by definition, no matter how it is subsequently categorized. Thus, no constraints are taken into account. This permission will suppress this behavior and the user will not see their records.
Solver in workflow
{PrefixModule}.Access.ForFormerSolvers
If the user becomes a solver in the workflow, no constraints are taken into account and the user will always see the record. If the record is subsequently passed to another solver, the user stops seeing the record. If you want to force a user who has become a solver even once in a certain workflow state (e.g. an approver, a request or invoice has been forwarded to him for review, for comments, etc.) to see such a record forever, just add the permissions mentioned above.
Visibility of documents only in certain workflow states
Further restriction of document visibility can be achieved by setting the values "Disable document visibility in states" and "Enable document visibility only in states" in the Role detail and Workflow tab.
Restricting visibility to overview only
{PrefixModule}.Access.ListOnly
In certain situations, we want to give the user permissions to the overview only and prevent access to the record detail. In this case, you will use the permissions listed.
ATTENTION:
In the original (or still current) permissions mechanism for received invoices, users commonly saw records that did not have a specified centre and supplier. In the target state, this will not work this way.
Was this article helpful?