
Processes in individual modules or agendas are defined via workflow. Each document is linked to a specific agenda and each agenda has just one process set. Each process has one initial state from which all subsequent states are derived. The workflow is always linked to a specific module. Since one workflow can be used in several agendas, it is set in detail only agendas which workflow it will follow and which of the states will be the default.
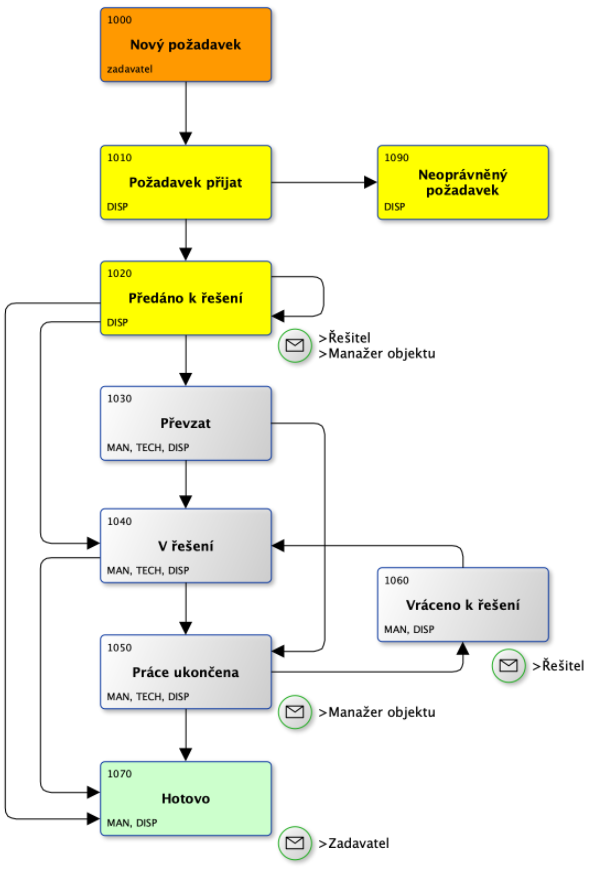
The figure below shows an example of a simple helpdesk request workflow, including the specification of roles that have permission to enter specific states and the notifications that are defined in each state.
In the application you will find the possibility to set up and list existing workflows Administration menu > System > Workflow

List of modules to which workflows are set
- Traveling orders
- Enumerators > Partners
- Helpdesk
- Intranet > Reservations
- Key holding
- Assets
- Purchase > Invoices Received
- Purchase > Purchase Orders
- Purchase > Cash Receipts
- Trade > Offers
- Trade > Business Opportunities
- Business > Events Calendar
- Mail > Inbox
- Mail > Mail sent
- Sales > Invoices issued
- Projects > Contract Budgets
- Projects > Contracts
- Document Publications
- Sales > Billing documents
- Projects > Contract Budgets
- Projects > Contracts
- Document Publications
- Service > Work assignments
- Service > Maintenance Equipment
- Stock > Transfers
- Warehouse > Receipts
- Warehouse > Receipts
- Contracts
Overview

The overview shows all workflows in the application. You can filter by module and by column:
- Id - workflow ID.
- Module - module to which the workflow was set.
- Name - the name of the workflow.
- Agencies - number of agendas that use the workflow.
- Description - description of the workflow for better orientation.
- Column - option for editing workflow settings.
The Escalation option opens the settings escalation.

The Solver option in the workflow allows you to define a user group that will be offered during a workflow state transition if the defined conditions are met. The New Record option sets new rules and solvers for the state transition.
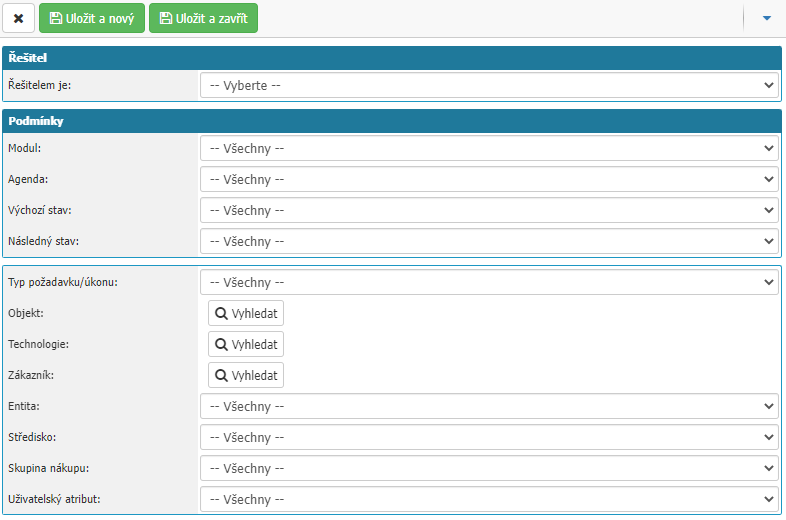
- Solver is - option to select who becomes the solver, user or group (role). In the case of Group (role) selection, it is possible to set whether to offer to select a specific solver the users contained in that role.
- Agenda - condition on the agenda in the document.
- Default state - selection of the default state.
- Next state - selection of the subsequent state.
- Request/Action Type - selection of the type of request that will be the condition for the selection of the given solver.
- Object - selection of the object that will be the condition for the selection of the given solver.
- Technology - selection of the technology that will be a condition for the selection of the given solver.
- Customer - selection of the partner which will be a condition for the selection of the given solver.
- Entity - selection of the entity which will be a condition for the selection of the given solver.
- Center - selection of the center which will be a condition for the selection of the given investigator.
- Purchase Group - selection of the purchase group which will be a condition for the selection of the given solver.
- User Attribute - the option to select the value of the user attribute that will be a condition for selecting the given solver.
New record

The option opens a dialog for setting up a new workflow.
Process Workflow

In this section you can set Module, Name, Description.
- ** Module - selection of the module in which the workflow will be used. Required option.
- Name - naming of the workflow. Required.
- Description - option to describe the workflow, for better orientation.
After filling in the basic settings, it is necessary to save the workflow by selecting the option in the header, then other settings options will become available.
Workflow states
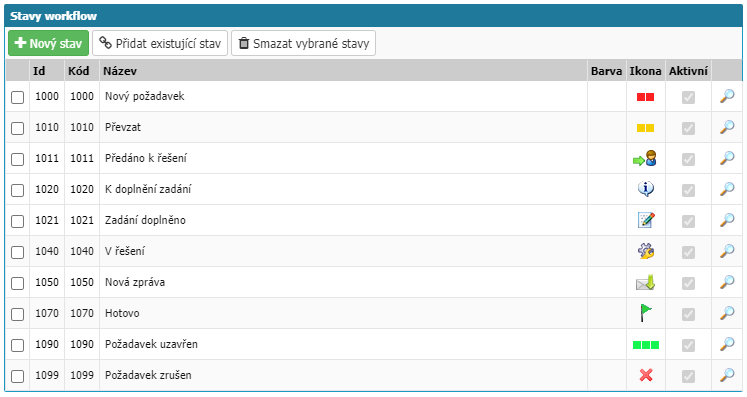
In this section you can find an overview of the states used by the workflow and the options for working with the states.
- New State - Creates a new state to be assigned to the workflow. Setting up a new state is done in the Workflow State Detail, Subsequent States, and Previous States sections.
- Add Existing State - Option to add an existing state from another workflow.
- Delete selected states - option to delete selected states from the workflow. If the selected state is only used in one workflow and has never been written to the system, that state will be deleted from the system completely. If the state is in another workflow, the state will be deleted only in the selected workflow. If the state has already been entered in a document and is only entered in the selected workflow, such state will be deleted from the workflow but not from the system, i.e. the workflow state ID will already be taken in the system and it will not be possible to recreate the state with the same ID.
To edit the settings of an existing workflow state, you can click the name of a specific state or the magnifying glass icon to the far right of a specific state.

If you use two states in two or more different workflows, then the state transition rule settings are propagated across all workflows where the states are used.
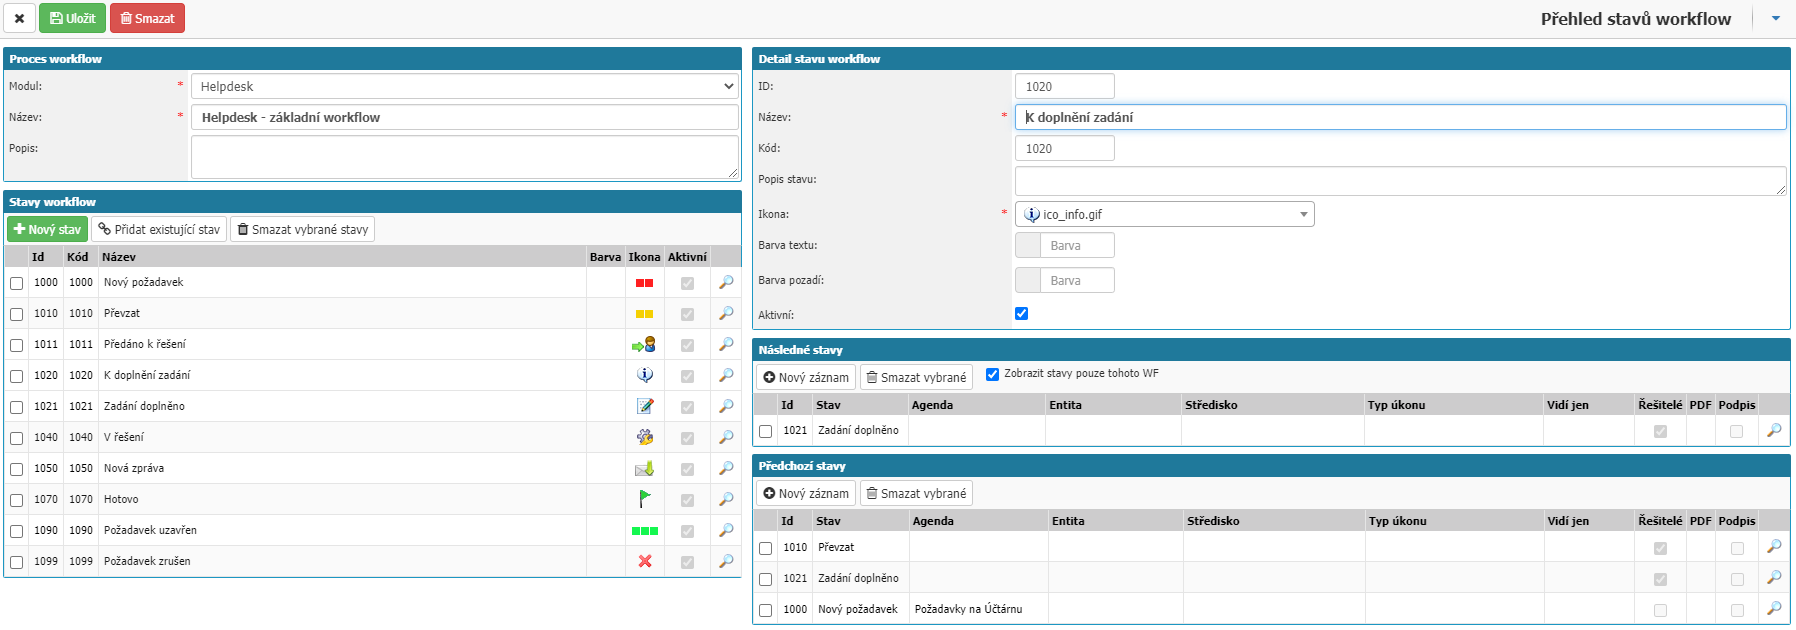
Workflow status detail

The section contains basic status settings.
- ID - numeric identifier of the status. In most cases it is set the same as the Code. If left blank, it will be automatically filled in by the system.
It is recommended to start by numbering in tens and to reserve a standard 100-position series of four-digit natural numbers (1000-9999) for the process. We usually number the first state of the workflow with the first number in the series, so for example 1200: New request. For the last state, we do not recommend using the last number in the series (1299), but keep the spacing - use, for example, 1270: Done. It may happen that with the introduction of the operation you want to add another status, which you mark as final and this gives you space to enter e.g. 1280: Closed and invoiced. And you may also eventually determine that you want to have two final states and name the second one 1290: Cancelled. Same with the states between the start and end - for the V state of the solution we would use a state ID of, say, 1250. This will still give you plenty of space and IDs available for inserting other states both before and after this state.
- Status name - the name of the status, e.g. "New request", "In progress", "Closed"...
- Code - numeric identifier of the status, just like ID. In operational modules (in reports and details), individual statuses are normally displayed in the "Code: Name" format. In reports in the filtering section, they are then sorted by the "Code" field, which is usually the same as the ID in the vast majority of cases. If you do not fill it in, the system assigns the value from the ID automatically.
- Status description - is displayed as a hint after hovering the mouse over the selection of this status in the details of a particular document.
- Icon - option to select an icon that will be displayed for the status in the document reports and also in the document detail for specific status buttons. The correct icon will greatly simplify clarity and become a useful mnemonic aid. Icons are not supported in the INSIO mobile app.
- Text color - the ability to select the text color. This setting is only used for the INSIO mobile app.
- Background color - option to select the background color. This setting is used only for the INSIO mobile app.
- Active - if the option is left blank, the given status will not be offered to users in the workflow. The option is tied directly to the state, so the setting will be reflected in all workflows where the given workflow state is located.
Subsequent and Previous states
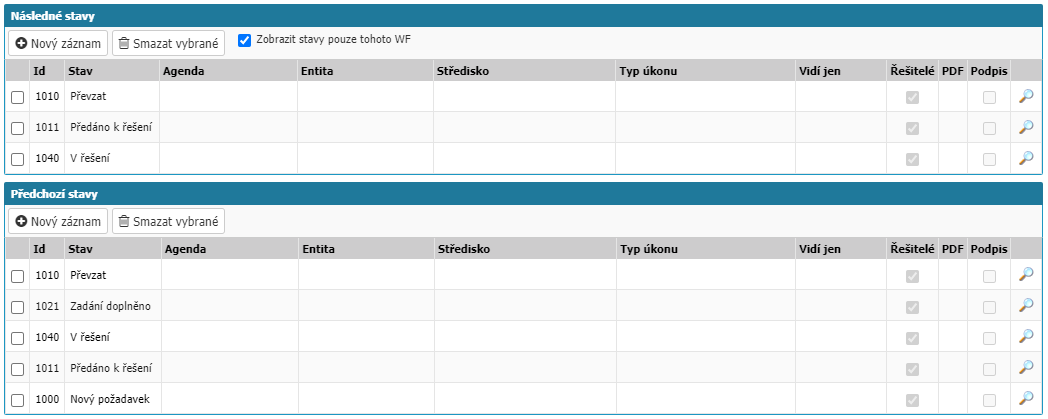
This section sets the transitions between the individual states in the workflow and what should happen during the transition to the next state. After selecting New Record, the Defining Subsequent States dialog box opens with setting options. The Delete option deletes the selected state transitions.
To edit the settings of an existing transition, you can click on the state name in the list or the magnifying glass icon on the far right of the lists.
Definition of subsequent states
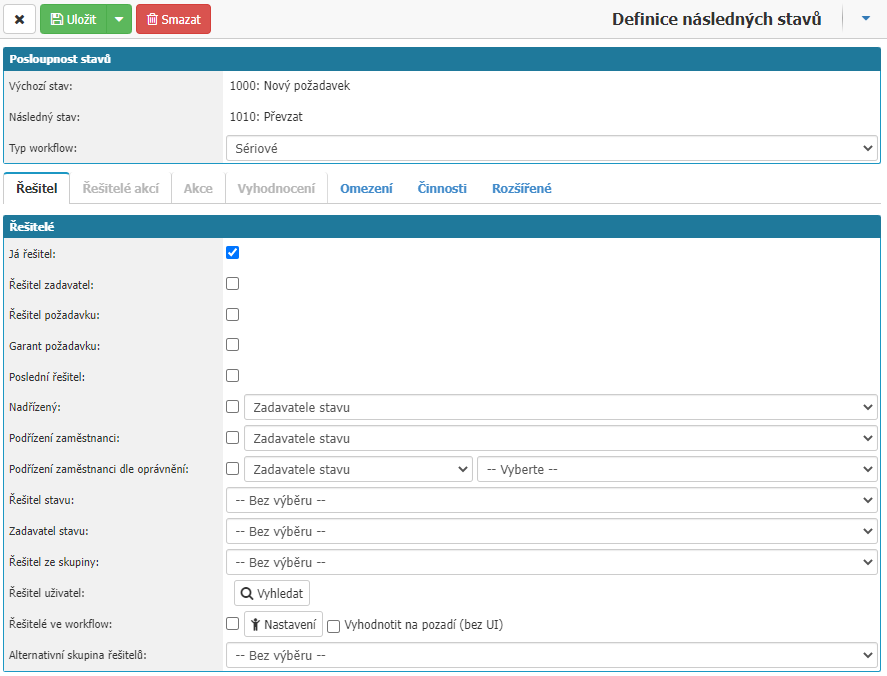
Sequence of states
- Default state - selection of the default state, in case you have selected New record from the subsequent states section, this value will already be pre-populated with the state you are setting and cannot be changed.
- Next State - the state option that the user will be able to select when the workflow on the document is currently in the state that is specified in the Default State option. If you selected New Record via the Previous States section, this value will already be pre-populated with the state you are setting and will not be able to be changed.
- Workflow Type - the option to select whether the transition is between Serial or Parallel states.
Solver
- Me solver - sets the user who selected the subsequent state as the solver of the subsequent state.
- Solver submitter - sets the user who entered the document/request into the application as the solver of the subsequent state.
- Last solver - sets the user who was the last solver in the workflow as the solver.
- Supervisor - sets the solver to the supervisor in the organizational structure according to the additional setting: the supervisor of the status submitter, the supervisor of the last solver or the supervisor of the last solver.
- Subordinate Employees - sets the solver as a subordinate in the organizational structure according to the additional setting: subordinate of the status requester, subordinate of the last solver or subordinate of the last solver.
- Subordinate employees according to permissions - set by a subordinate solver in the organizational structure according to additional settings: Subordinate of the status requester, Subordinate of the last solver or Subordinate of the last solver and according to the permissions in the organizational structure, list of available permissions: DochazkaCteni; DochazkaEmailStatus; DochazkaEmailEvents; DochazkaOdmenyCteni; DochazkaOdmenyZapis; HrWagesCteni; HrUvazkyCteni; PostIncoming.Solver; PostOutgoing.Solver.
- Status Solver - sets the solver to the user who was the solver of the most recent occurrence of the selected status within the workflow of the document.
- Solver of the condition - sets the solver to the user who was the originator of the most recent occurrence of the selected condition within the workflow of the document.
- Solver from group - the user will be offered a selection of users from the selected group, the user can select only one solver.
- Solver user - sets the selected user as the solver. The setting does not bypass the permissions setting, so if the user does not have permissions to the module, agenda... he will not be able to access the document even if he is a solver in the workflow.* Solvers in workflow - possibility to set the solver to user, group/role, according to the combination of constraints on the values: request/task type, object, technology, customer, entity, centre, purchase group and user attribute. This setting can be used to extend the rules according to which a specific user is selected as a solver, or the setting allows to select all users belonging to the selected role/group as a solver of the subsequent state. In the case of role/group selection and thus assigning multiple users to a single workflow state, this is not a parallel workflow, only any user that has been assigned can solve the state.
Action solvers
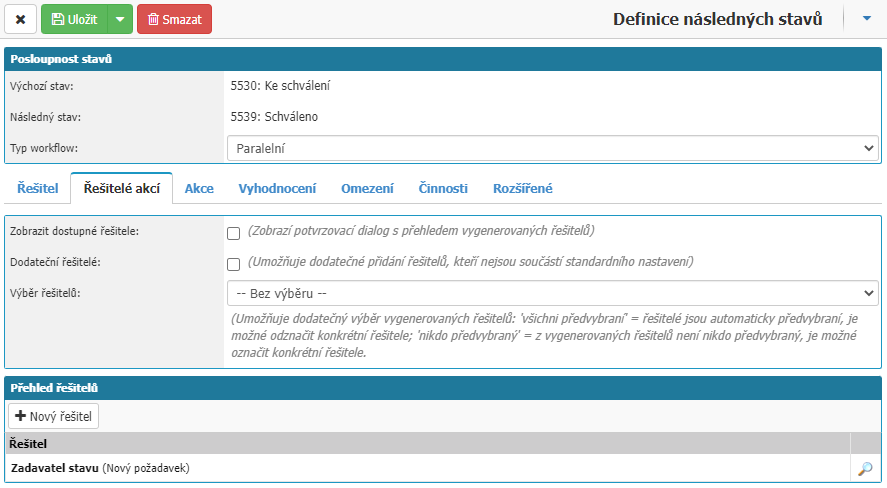
The settings section is available for Workflow type parallel. Parallel workflow type is used to handle situations where we need to have statements/confirmations/rejections from multiple users in the workflow for a single transition that can change based on set rules, such as the center for an invoice or the document type.
- Show available solvers - option to let the user see a window with generated users who will be solvers of actions.
- Additional solvers - option to let the user who enters the workflow transition into the parallel transition to manually add an additional user between the action solvers.
- Solver Selection - Allows additional selection of generated solvers: all preselected = solvers are automatically preselected, specific solvers can be deselected; no preselected = no one is preselected from the generated solvers, specific solvers can be marked.
Overview of solvers
This section displays all solvers of actions in the parallel transition workflow, when you open a solver via the Magnifier option, the condition settings for that solver action are displayed. You can select a user as an action solver via the New solver option.
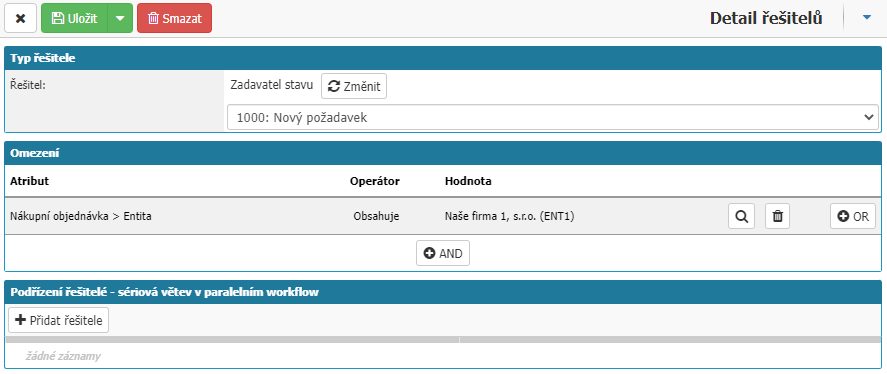
In the solver type section, we set who becomes the solver of the action in the given workflow transition
- Solver - the option to select one of the following options:
- Sponsor
- Writer.
- Solver is the user who enters the workflow state.
- Last solver
- Solver of the state - here you will see the option to select the workflow state from which you want to select the solver
- State Submitter - this will display the option to select the workflow state from which we want to select the solver
- User - here you will see the option to select a specific user in the application.
- Select from group - here you will see the option to select a specific group in the application.
- Select from defined solvers - here you will see the option to set the Solvers in the workflow
- Center Manager
- Contract Manager
- Order manager by billing
- Object Manager
- Deputy object manager
- Facility Manager
- Record Resolver (request, service action)
- Request Guardian
- Responsible persons - here you can select specific responsible persons
- Recipient of mail
- Mail recipient's subordinates
- Supervisor - here you will see the option to select which user in the workflow the application will search for a supervisor. It is possible to select from Status Sender, Last Resolver and Last Resolver.
- Subordinate Employees - here you can select which user in the workflow the application will search for subordinates
- Subordinate employees (by permission) -
- Organizational Structure Positions - here you will see the option to select a position in the organizational structure
- User defined solvers from record detail
Restrictions

in the section you can set the conditions that must be met for the action solver to be assigned in the workflow, if no constraints are set, the solver is always assigned. With the AND option we can create a new constraint rule. In the new window you set the rule, via the Attribute option you can select one of the following options:
- Agenda
- Total price without VAT
- Total price excluding VAT in entity currency
- Document number
- Technology type
- Entity
- User attribute values
- Internal Description
- Name
- Currency
- Purchase Order
- Purchase Order > Agenda
- Purchase Order > Total price excluding VAT
- Purchase Order > Total price excluding VAT in entity currency
- Purchase order > Total invoice price excluding VAT in entity currency
- Purchase Order > Entity
- Purchase Order > User Attribute Values
- Purchase Order > Internal Description
- Purchase Order > Currency
- Purchase Order > Object
- Purchase Order > Object > Object Manager
- Purchase Order > Object > Object Manager
- Purchase Order > Object > Deputy Object Manager
- Purchase Order > Items > Total price of items by centre in entity currency
- Purchase Order > Items > Dimension values 1/2/3/4/5 of all items
- Purchase Order > Difference between purchase order and invoice in entity currency
- Purchase Order > Purchase Group
- Purchase Order > Center
- Purchase Order > Centre > Centre Manager
- Purchase Order > Purchaser
- Purchase Order > Purchase Order
- Purchase Order > Purchase Order > Purchase Order Manager
- Purchase Order > Order > Order Trader
- Purchase Order > Order > Centre
- Purchase Order > Order > Centre > Centre Manager
- Purchase Order > Order > Order Technician
- Document Name
- Object
- Object > Object Manager
- Object > Facility Manager
- Object > Deputy Object Manager
- Partner
- Items > Total absolute price of items by centre in entity currency
- Items > Total price of items by centre in entity currency
- Items > Dimension values 1/2/3/4/5 of all items
- Document description
- Difference between order and invoice in entity currency
- Purchase group
- Centre
- Centre > Centre Manager
- Document type
- Request type
- Message type
- Requester
- Order
- Order > Order Manager
- Order > Order Trader
- Order > Centre
- Contract > Centre > Centre Manager
- Order > Contract Technician
The options in the selection depend on the selected module in the workflow.
After selecting the attribute, next select Operator:
- Blank value - the action solver is selected whenever the attribute is an empty value
- = - the action solver will be selected whenever the attribute is equal to the selected value
- Contains an arbitrary value - the action solver will be selected whenever the attribute is not an empty value
- Contains - the action solver will be selected whenever the attribute contains any of the selected values
- Contains - solver action will be selected whenever the attribute does not contain one or more of the selected values
- Regular Expression - the possibility of using REGEX.
- WildCard - option to use WildCard character.
Subordinate solvers - serial branch in parallel workflow
We can include other action solvers in the section, but they comment on actions only after the superordinate solver in the setup has commented.
For example, if you are dealing with order approval, in a way where only the manager approves the order and only after a certain amount it is necessary for the director to approve it, you can set the manager as the action solver and then in his settings set a subordinate solver of the director where we set a condition for the total amount of the order.
Events
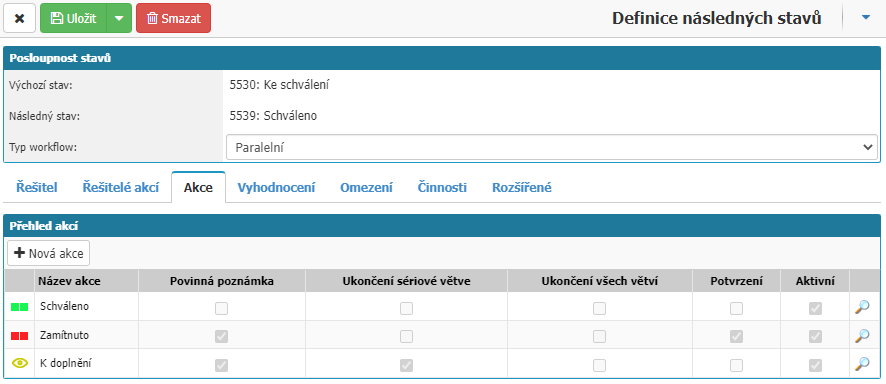
In this section, we will set up the individual actions that will be available to the solvers and on the basis of which we will then evaluate the workflow transition. The New Action option opens a window for setting a new action, or the magnifying glass for an already created action opens a window for editing it.
New action
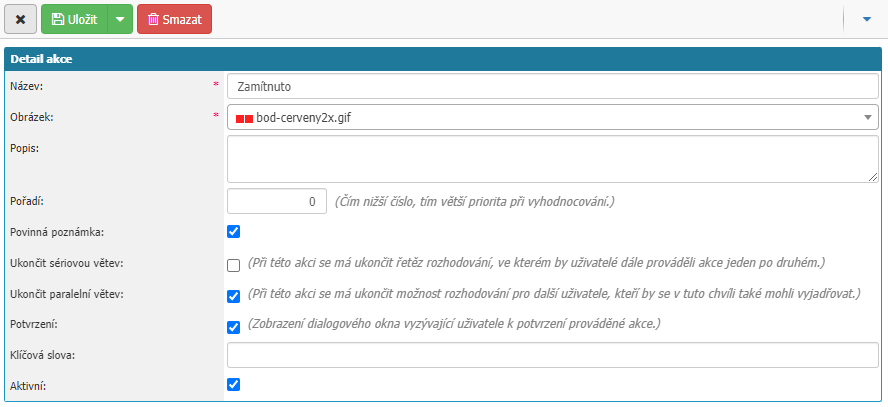
- Name - field for entering the name of the action. The action is then displayed to solvers as a workflow status in the document and the name is displayed to users. Required value.
- Image - select the image to be displayed for the action in the workflow to the users. Required value.
- Description - option to write a description of the action to facilitate administration by other administrators.
- Order - option to set the order in which the action will be displayed. The order is set as a numeric value, where the system then displays the action with the lowest number first.
- Mandatory note - option sets that user must write a note otherwise system will not allow him to select the action.
- End Serial Branch - option sets that if the user selects the action, the subordinate solvers under the given solver are no longer expressed.
- End Parallel Branch - option sets that if the user selects the given action, the decision making for other users who could also express themselves at this moment is already finished and the evaluation is already proceeding.
- Confirm - this option displays a dialog box for the user to confirm the selection of the action.
- Active - option to indicate whether the action is active.
Evaluation
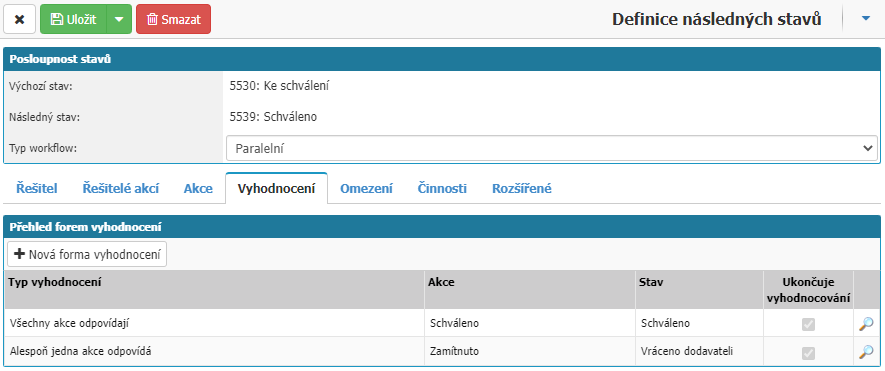
In this section, we set the workflow rules that occur when the action conditions are met. Selecting New Evaluation Form opens a window for setting up a new evaluation of actions. Selecting the Magnifying glass, for an existing evaluation, opens a window for editing the evaluation.

- If - setting the condition, selecting from All actions match, At least one action matches, None of the actions match, No solver.
- Action - select the action to which the If option will apply.
- Set State - selection of the workflow state that will be set if the If condition is met for the selected action.
After evaluating the parallel workflow and setting the workflow state that is defined here, the solver is set according to the setting that is set in the Solver at transition from the state that the parallel workflow is in to the state that is set in the Evaluation section of the Set State attribute.
For example, we set the parallel workflow type for an order between the Approved state and the Approved state. In the evaluation, we also set the option for Rejected, that if at least one solver has selected Rejected for the action, the subsequent state of Unapproved occurs. Then, to assign a solver to the Disapproved state, we need to create a given transition between the Approved and Disapproved states in the workflow settings.
In the transition settings, we will leave the workflow type as serial and set who will become the solver in the Solver section.
In the case of the solver setting, if we set the evaluation that all users have selected the Approved action will set us to the Approved state, we can already use the existing transition between these states which is set as a parallel workflow type. In this transition you set the solver in the solver section.
- Evaluation order - option to set the evaluation priority, the lower the number, the higher the evaluation priority.
- Thus evaluation is done - option that will end the evaluation if the condition is met and no more action is pending from other action solvers who have not had time to comment or were as a subordinate action solver.
- Set Previous State - an option that causes the workflow, when a state is selected in the Subsequent State field, to set the state that was in the workflow for the document before the state that is selected in the Default State field. This option is used when it is necessary to allow users to return to a previous state in the workflow.
- Mandatory Note - on a given transition, the user will be forced to fill in a note for the workflow.
- Select Solver - allows users to select the solver of the subsequent state from the list of Solvers in the workflow.
Restrictions
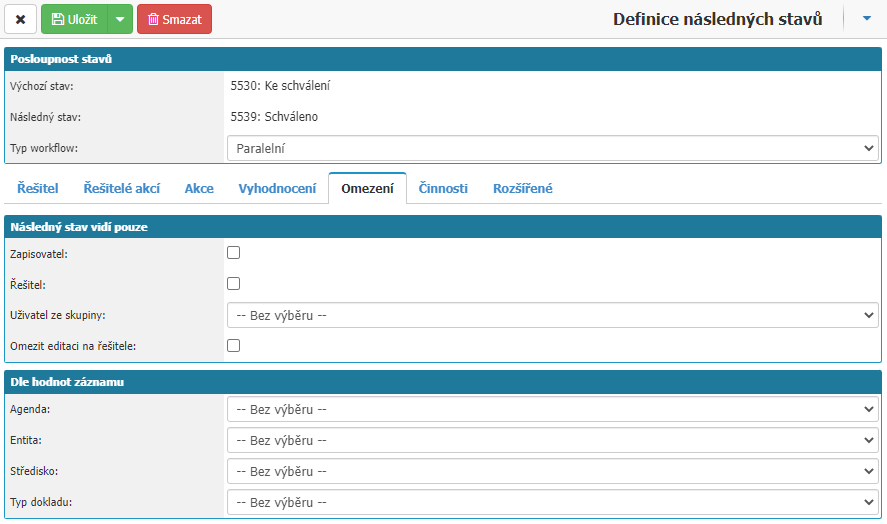
In this section you will find options to set additional conditions for which users or documents the transition will be available.
According to the record values
- Agenda - makes the workflow transition available only in the selected agenda.
- Entity - makes the workflow transition available only in the selected entity.
- Center - enables workflow transition only for the selected center.
- Activity Type/Document Type - enables workflow transition only if the same Activity Type/Document Type is selected on the document.
Activities
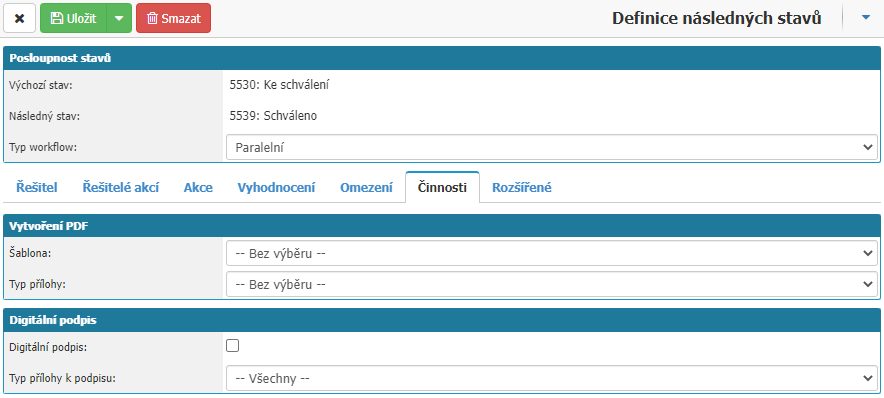
In this section you will find options for setting up automatic PDF file generation or Digital Signature during state transition. The files are inserted as an attachment in the documents tab of the document.
- Template - select the template from which the PDF file will be generated.
- Attachment Type - select to define the attachment type under which the PDF file will be saved.
- Digital Signature - the selection will ensure that the document is automatically signed with a specific type of attachment with a digital certificate that the user has uploaded in their profile. If the user does not have a password saved in the system for security reasons, the system will prompt the user to enter the password during the transition. The digitally signed file is stored in the document as another version of the attachment.
- Attachment type to be signed - select to define the type of attachment under which the digital signature will be saved.
Advanced
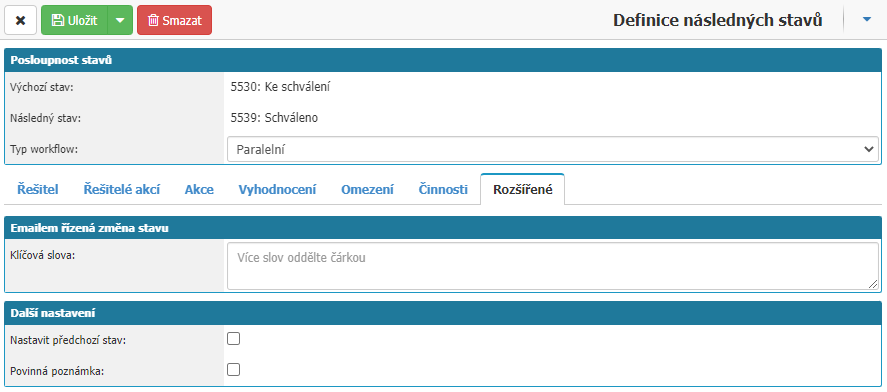
In the section you can find additional settings such as Email-driven status change.
Keywords - here we can enter words that the application will search for at the beginning of the email and if it finds them it will move the workflow state of the document to the next state. Separate multiple words with a comma. The application is case sensitive so it is necessary to list all the variants for one word, for example Yes,yes,YES.
Set previous state - option to make the application automatically set the previous state again after moving to the next state.
Mandatory note - option sets the workflow note as mandatory and it is not possible to move the workflow state without sleeping the note.
Other options for working with workflow

Cross - used to close the workflow settings window. All unsaved changes will be lost.
Save - used to save the changes made in the settings.
Delete - used to delete the workflow from the system.