Checklists are used to extend service tasks or helpdesk requests. They are usually used, for example, for routine service tasks where they contain the procedure for performing maintenance. The structure of a checklist consists primarily of so-called sections. A checklist may contain more than one section. A section contains individual checklist items, which may be simply checkboxes (if it is, for example, a routine maintenance procedure) or may be assigned attributes. The items themselves may then include a note. Another integral part of the checklist is Data Sources. Data sources refer to the origin of the information, for example it may be a measuring instrument.
To further subdivide Data Sources, Data Source Items are introduced. For example, if we have a Data source: gauge then the Data source item can be a type of gauge, for example a multimeter, pressure gauge, spirit level, etc.
To create a new checklist, press the New record button and fill in the required parameters. The checklist must also contain at least one section that contains more detailed settings.

- Name - Name of the checklist - this name will be displayed as the name of the tab in the service action/helpdesk request
- Description - Any description
- Constraints - Allows you to limit the Module, Task Type and Technology that the checklist will be displayed over.
Note: Only one checklist can always be visible for each HD request / Service action (however, it can have more sections whose visibility can be further limited). In case a given service action / HD request corresponds to the conditions of several checklists, the checklist with the lowest serial number is displayed
Sections can be created, edited and deleted in the Checklist Section Overview form by clicking on the Sections button in the top bar of the form. To create a new section, click the New Record button and fill in the required information.
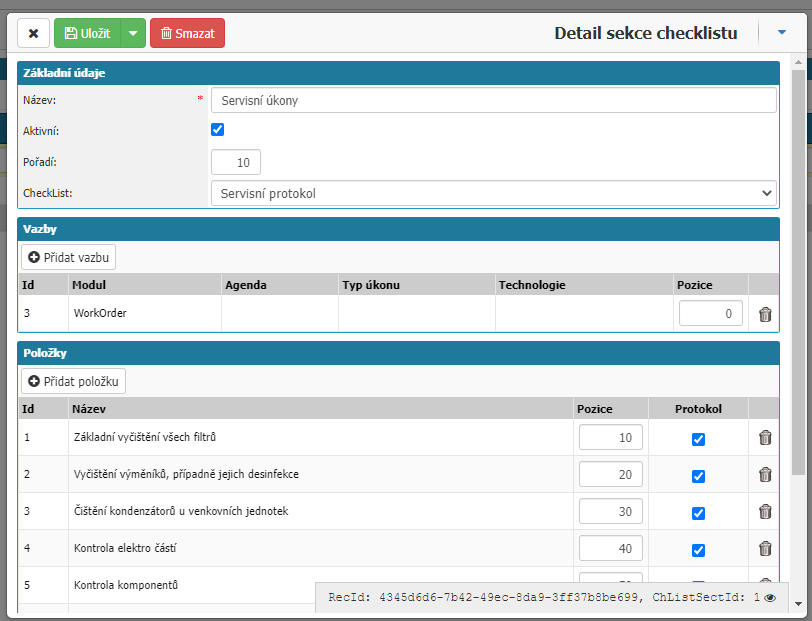
Checklist section parameters:
- Name - Section name
- Active - Allows you to limit the activity (applicability) of the section
- Order - Relative numerical position of the record in the list
- CheckList - CheckList over which the section is applied
- Bindings - Allows you to define to which modules, agendas, task types, technologies the section can be applied. It also allows the order of the binding
- Items - Allows you to assign items to the checklist that will be displayed. To create an item see below
Items have a direct link to data sources and can include attributes. Attributes are used to record the data that will be displayed under an item in a given HD request or service action. To create an item, click Items and then New Record.
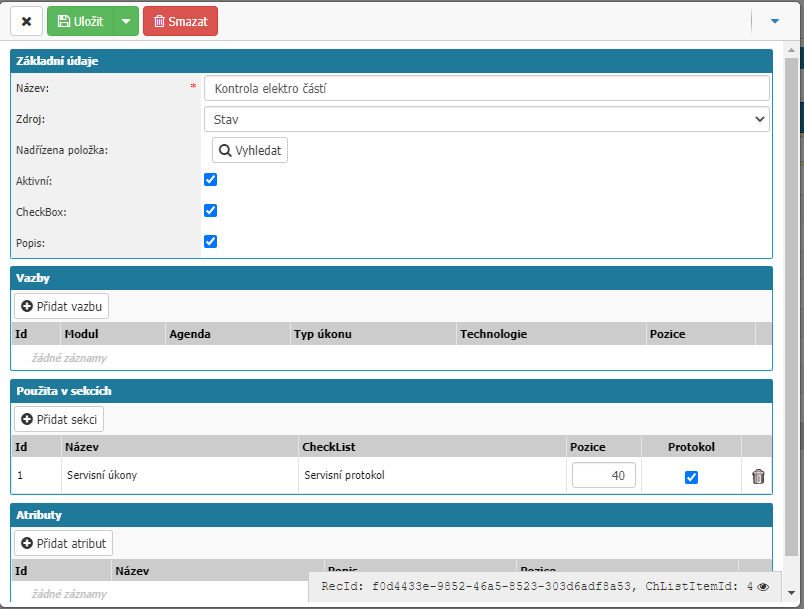
Item parameters:
- Name - Display name of the item
- Source - The source of the item. If a suitable data source is not yet specified in the application, we create it (see below).
- Subordinate items - Allows you to group items into a tree structure. Child items always take the name of the parent item (highest in the structure)
- Active - Allows you to limit the activity (applicability) of an item
- CheckBox - If the option is active, a checkbox is displayed next to the item
- Description - Allows you to write a description
- Bindings - Allows you to define to which modules, agendas, task types, technologies the section can be applied. It also allows you to specify the order of the binding.
- Add section - Allows to set in which sections the item will be applicable
- Add attributes - Attributes of the item that will be selectable in the drop down box
To create a data source, press the Data Sources button and then the New Record button.

- Name - Any string (e.g. measurement)
- Active - Allows to enable the activity (applicability) of the data source
Data sources have their own items (we understand as data source items), Data source item is created through Data source checklist overview by clicking Items and then clicking New record.
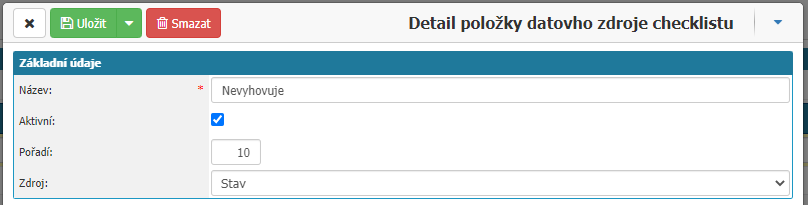
- Name - Any name (e.g. multimeter reading)
- Active - Allows you to specify the activity (applicability) of a data source item
- Rank - Relative numerical position of the data source item in the list

Setting up downstream agendas
To take advantage of all the possibilities offered by Checklists, you need to establish links between agendas. The settings of the linked agendas can be found in here.
- Document Publication - For use in generating and writing service reports, including CheckList data
- Helpdesk - For linking service requests to HD requests with Checklist.
Service Logs
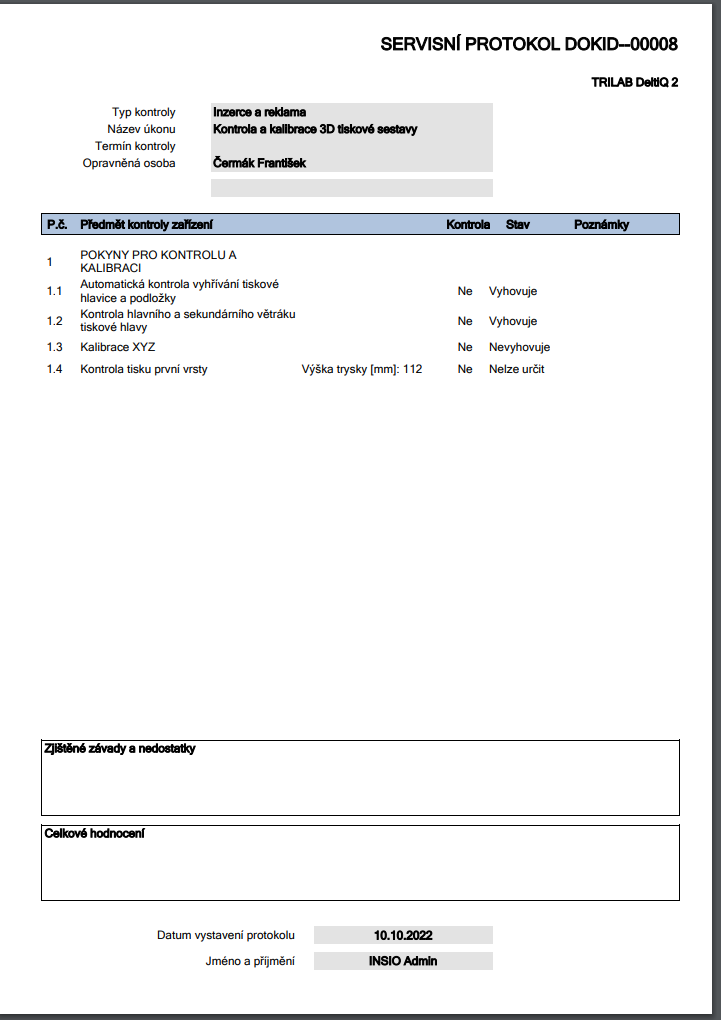
It is possible to generate so-called service logs from service actions for the device. These include not only general information taken from service requests and device details, but also information from the checklist.
The service log can be found in the service detail in the documents tab, section Service log documents.
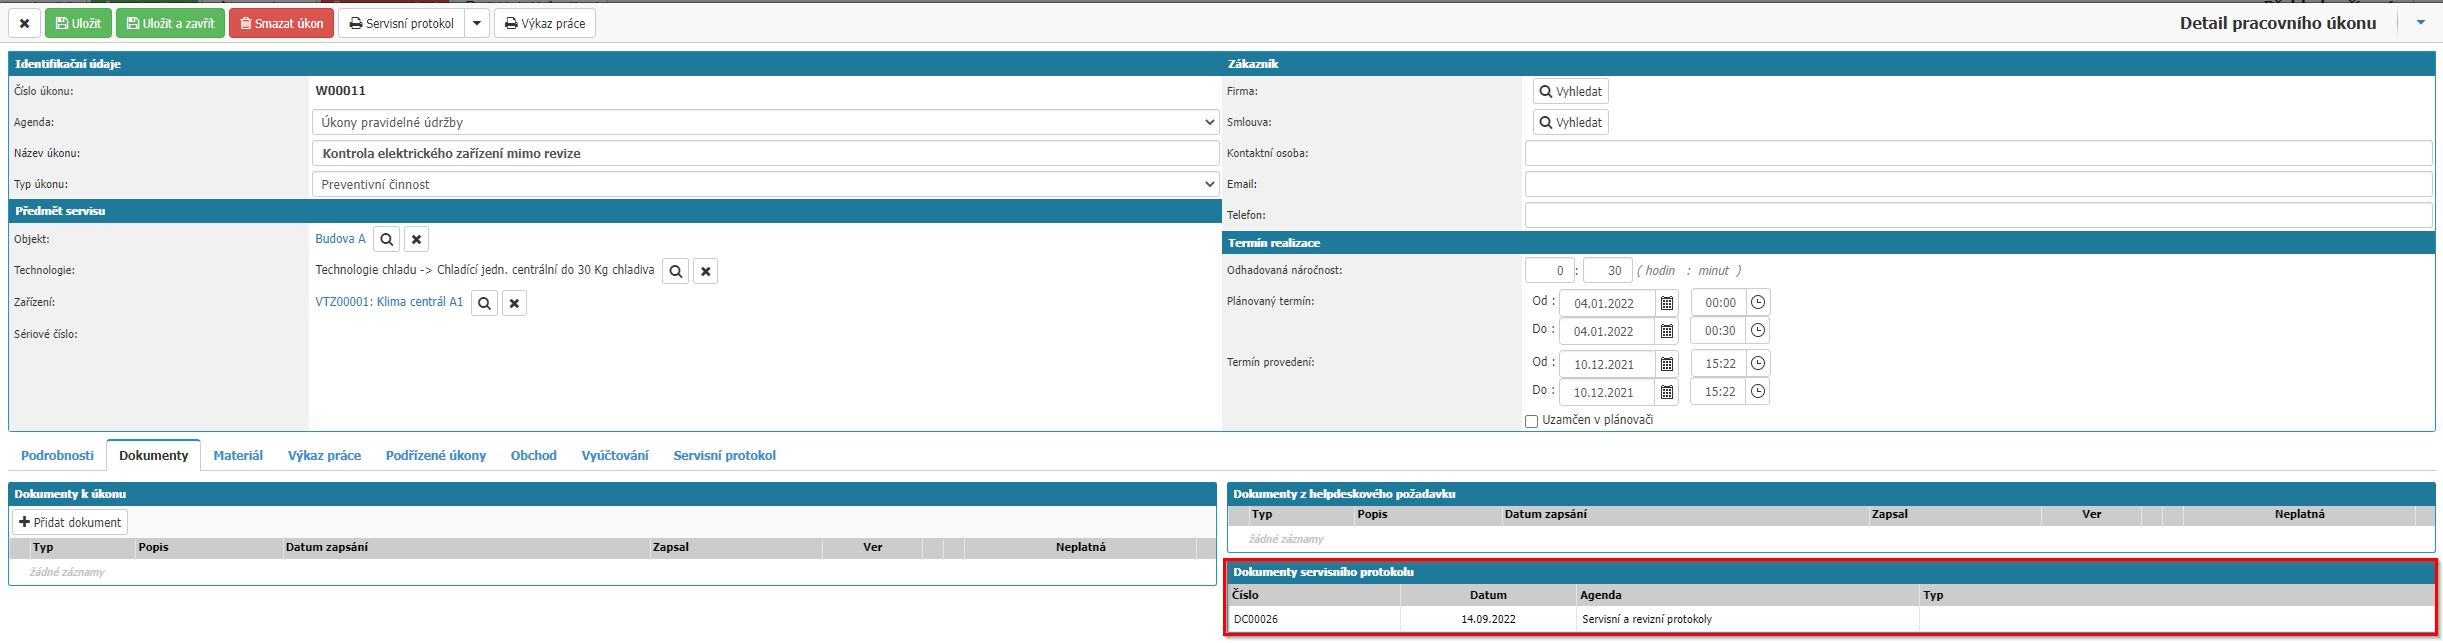
After double-clicking on a specific service log, the log details are called up. In the detail we can find the section Documents where we can open the PDF file of the service report. At the bottom of the log we find a section of items taken from the checklist.
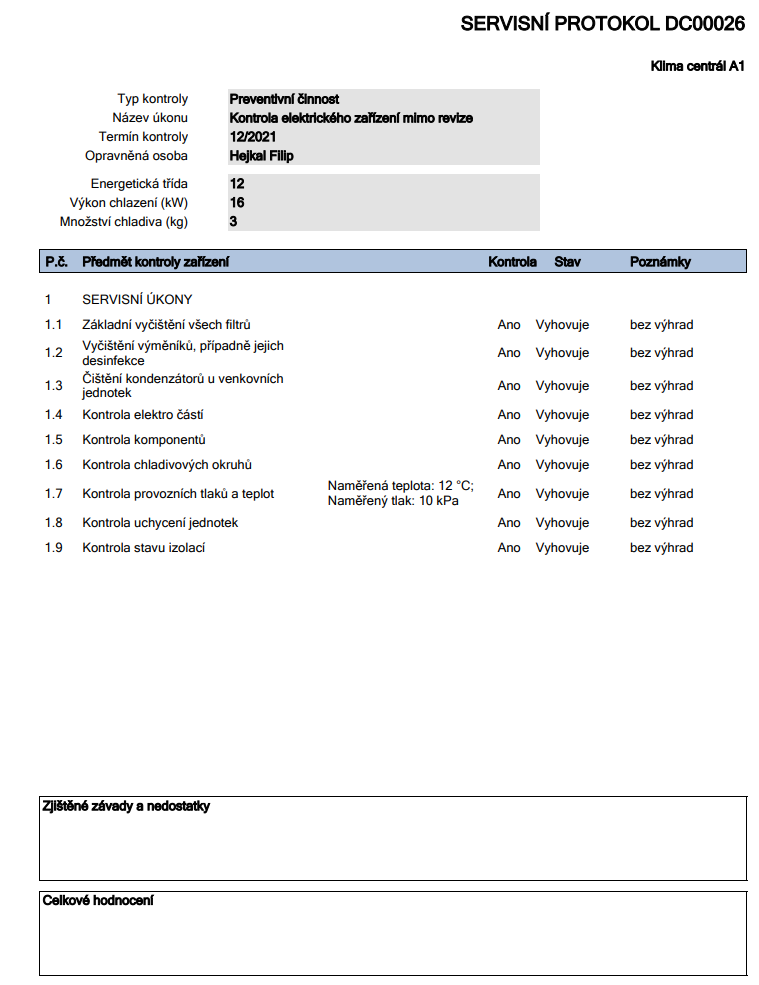
At the bottom of the service report there are also fields Defects and deficiencies found and Total evaluation. These fields are taken from the detail of the work task, from the Description / assignment and Note / Description of work fields.
For more information on documents, please see the document publication section.
Bulk Checklist Entry - Subordinate Service Tasks
If we have a bulk service job, it may be useful to default the data in the checklist to all child jobs. We can overwrite to child service actions from the bulk action detail in the checklist tab by pressing the Overwrite to child actions button.

At this point, the data in all child service actions is overwritten, so the overwrite is mainly suitable for the initial initialization of data. The service logs of all child actions can be found in the documents tab.
Example of use
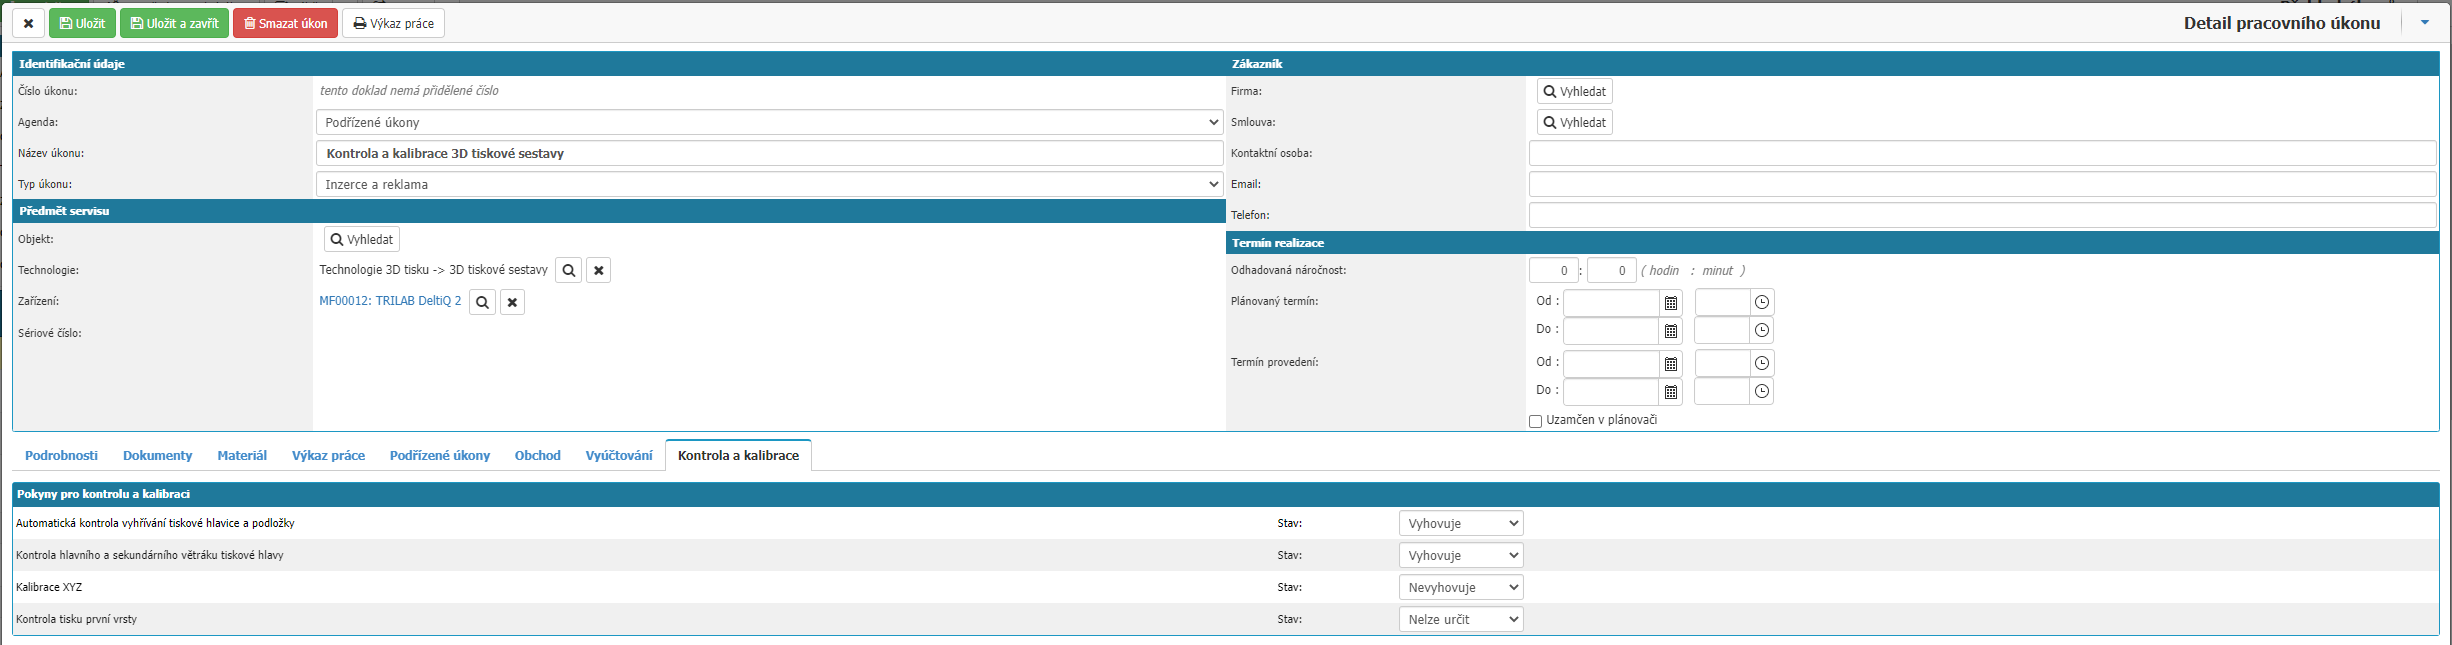
We have a 3D printing farm with a large number of printers over which regular maintenance tasks are performed. One of these tasks is regular calibration, in which we perform checking and calibration in a precise sequence.
- We run an automatic check of the printhead and pad heating.
- After this step, if there is no error, we check the functionality of the main and secondary fans of the printhead
- Calibrate the pad and XYZ calibration. In the event of an error, the height of the printhead sensor must be adjusted.
- Checking the printing of the first layer -> Adjusting the height of the PRESS - PAD.
We can see that this is a multi-point instruction, where we need to check both the actual execution and possibly also the adjustment values for each point (point 4).
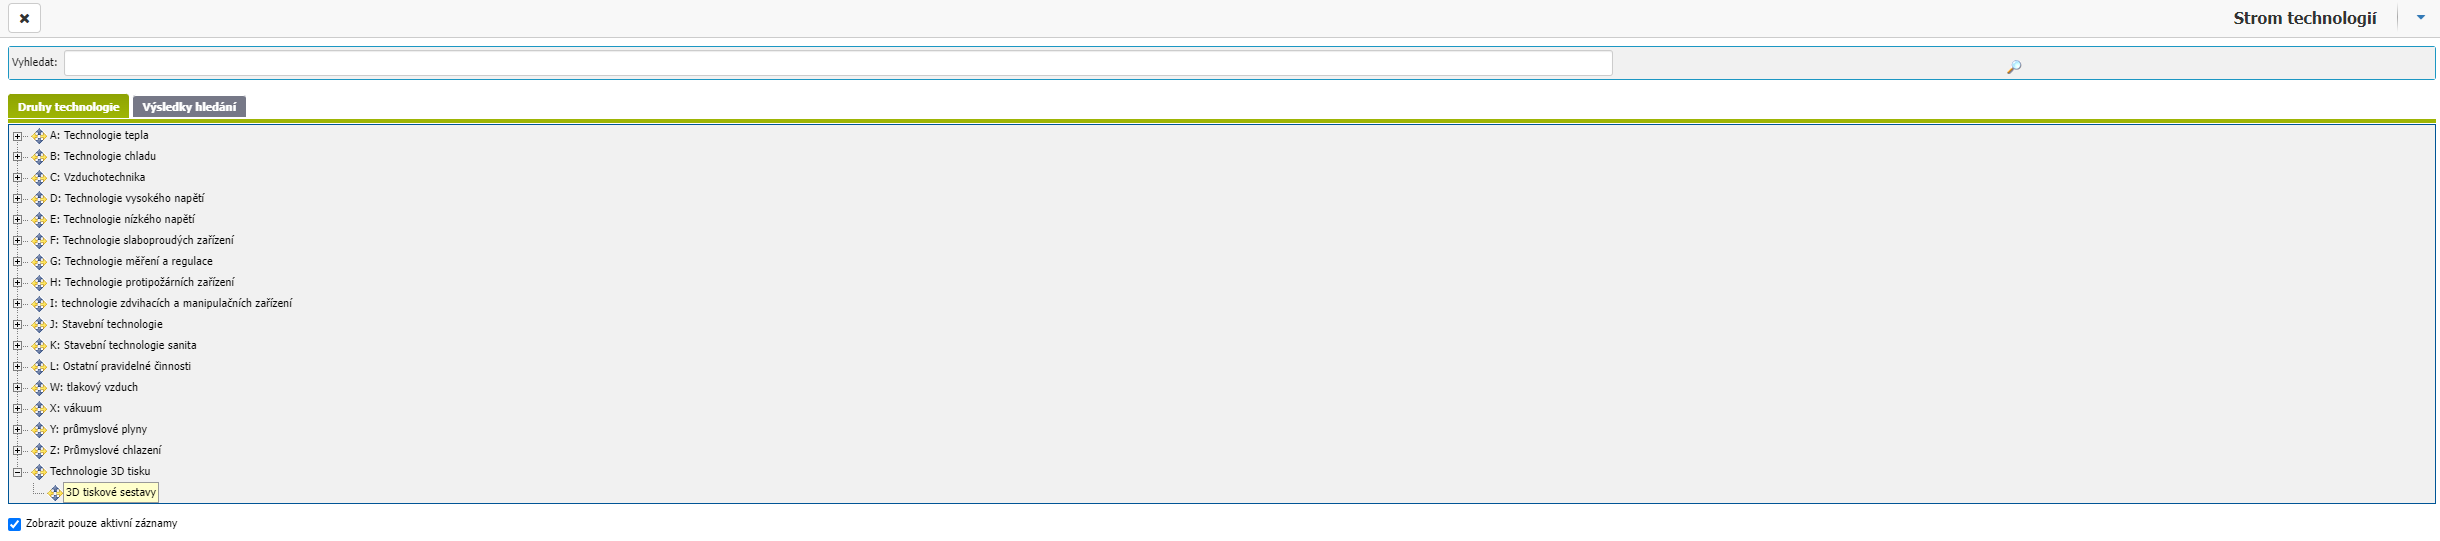
We have a technology group called 3D printing technologies with a subgroup called 3D printing assemblies. Under this subgroup are classified the individual devices for which there is a periodic maintenance task Regular check and calibration generated from the task plan. We will then create a checklist for the task performer to follow.
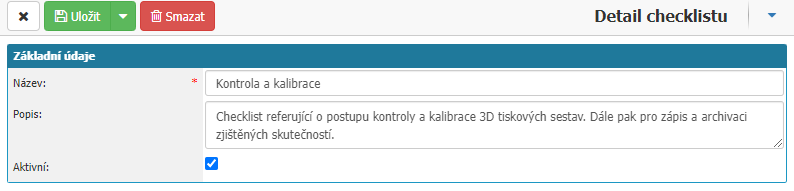
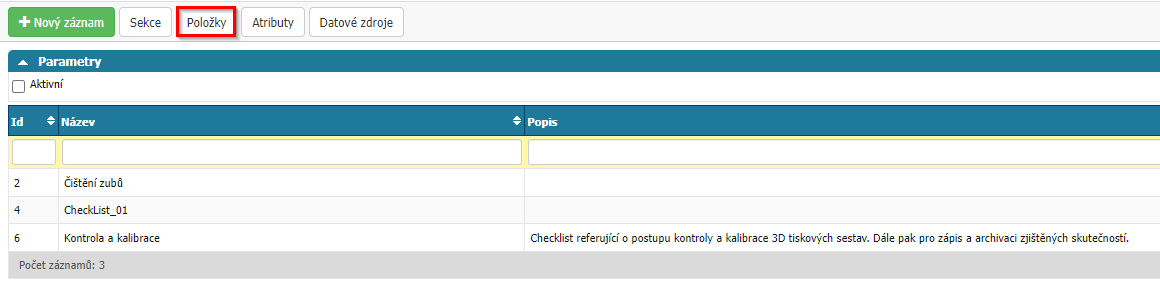
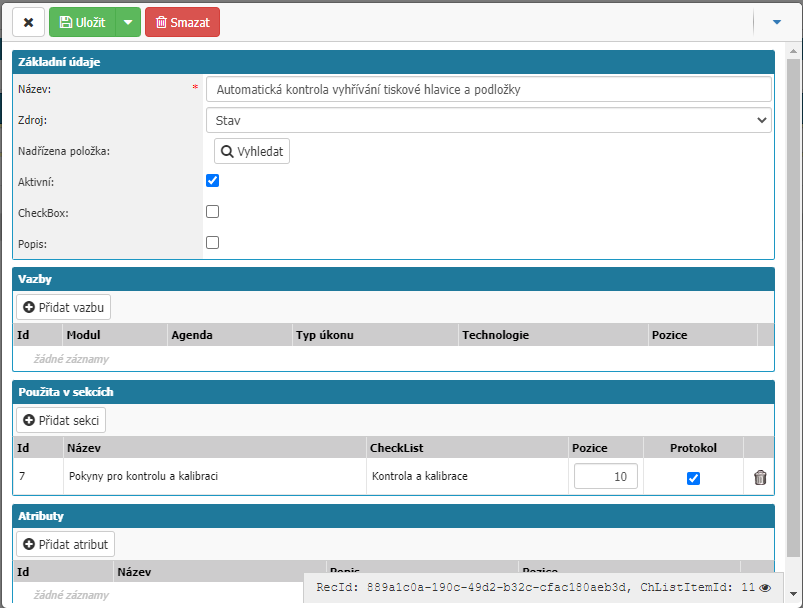
In the Administrative menu go to Checklists, which is located in the Basic dials section. We will start by creating the checklist itself, to which we will continue to add sections and other essentials. Pressing the New Record button will bring up the details of the new checklist. Fill in the name and, if necessary, the description and press Save.
After saving, the Bindings section is accessed, After pressing Add binding the binding specification window is called. Here we select Module: Service > Work Actions then Agenda under which the actions are performed, the corresponding Type of action and finally Technology: 3D printing assemblies.
Now everything is set up so that the checklist is only displayed for jobs of the given type and for the correct technology type.
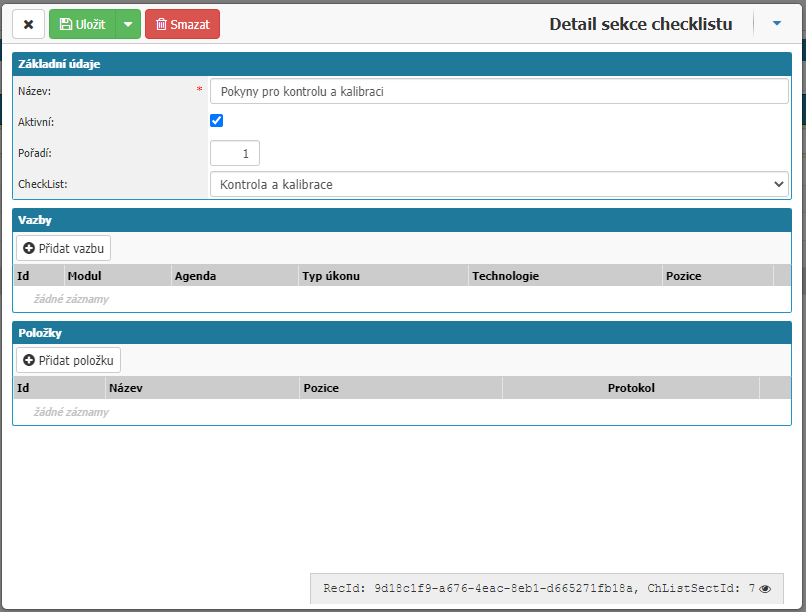
Next, we want to add a section to the checklist. We press the Section and New Record button. In the details of the new section, we will enter a title (in this case, for example, "Inspection and Calibration Instructions") and select Inspection and Calibration from the list for the Checklist field. After pressing the Save button, options for setting Bindings and assigning Items are displayed. We will not introduce bindings above the section in this case.
To assign items, items must first be defined. So let's close the section detail for now and get back to the checklist form. Before we define the items themselves, we need to introduce at least one resource. The Data Source can be thought of as a drop down box where we can select the values we define as Data Source Items. So we press the Data Source button and then the New Record button. Type in a name (in this case "Status") and press Save.
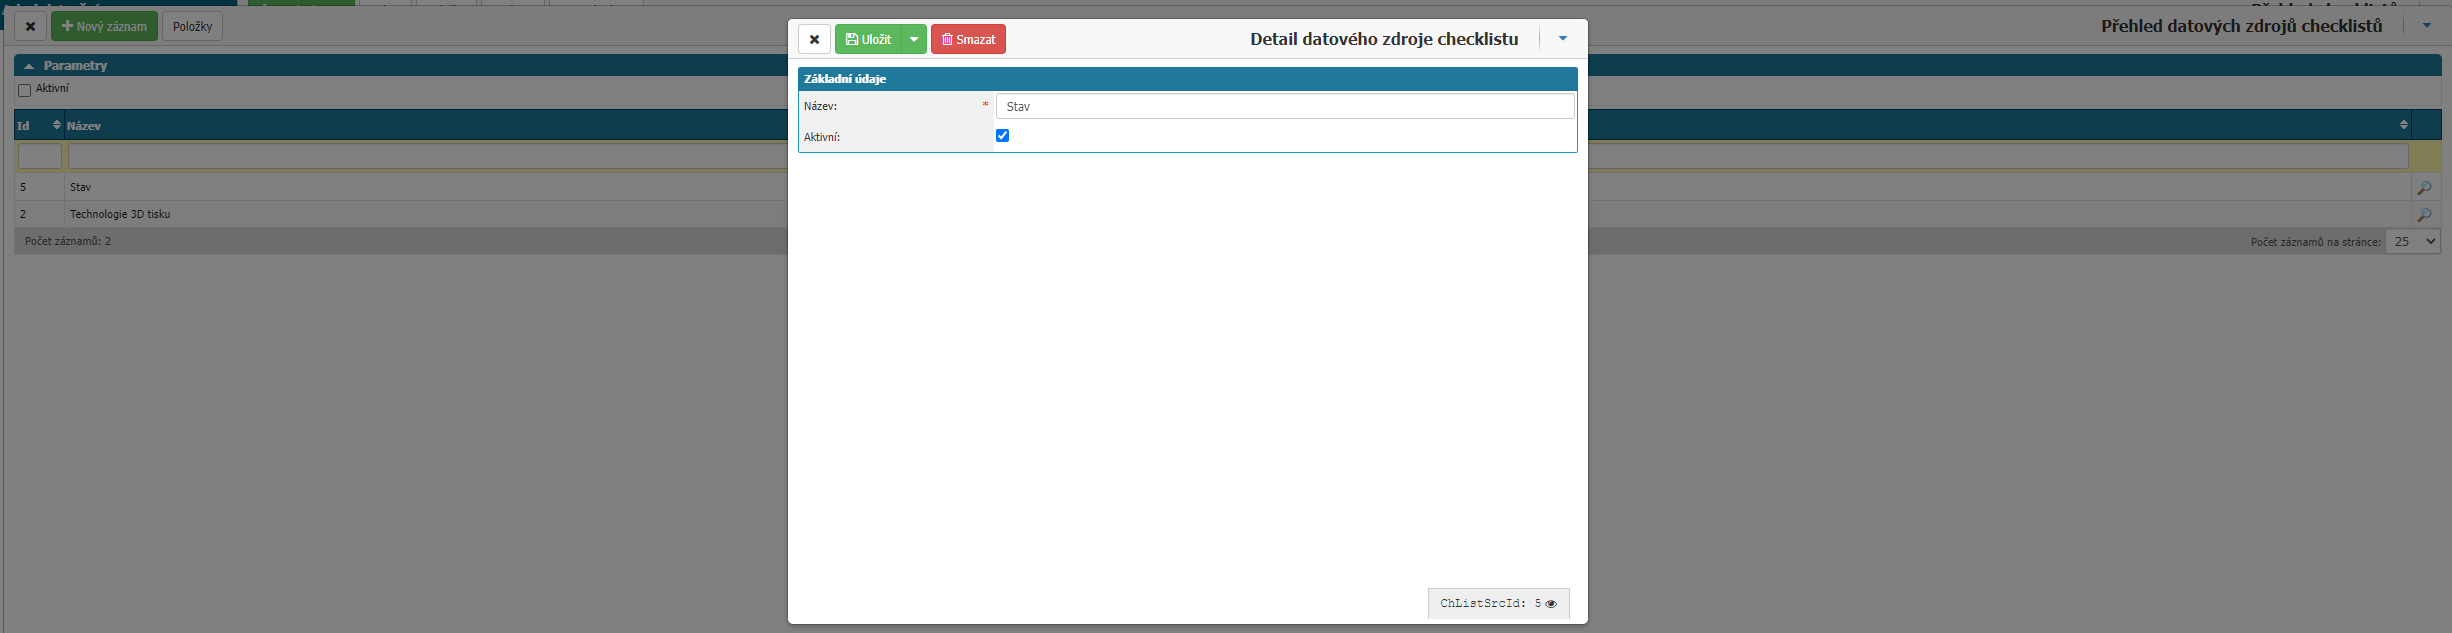
Next, we want to define the values that can be assigned to the newly created drop-down box called "State". We do this in the Data Source Overview window by clicking on the Items button. This will bring up the Checklist Data Source Item Overview form, where we click the New Record button. For this checkbox, we will define 3 data source items: Complies, Does not comply, Cannot specify. Always specify the data source as "Status".
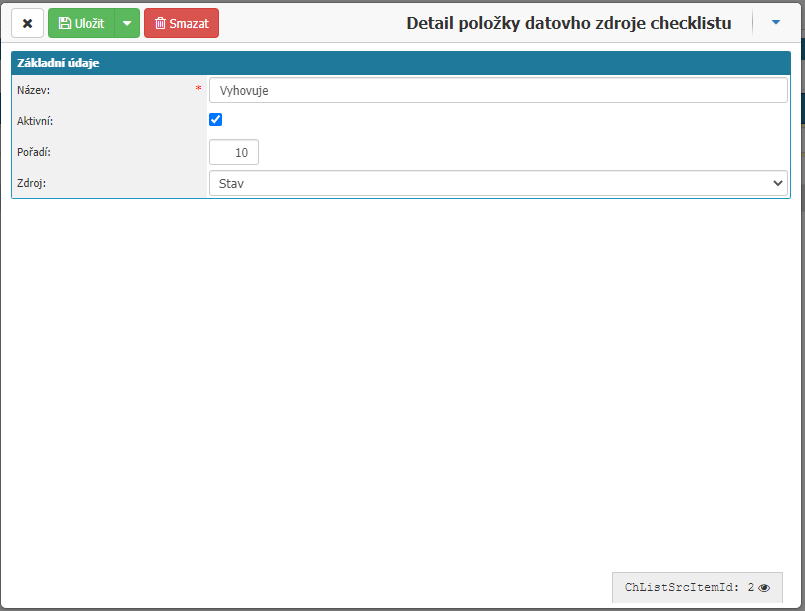
Now we are ready to create items and assign them to the checklist section. Go back to the Checklist Overview form and press the Items button.
We will create 4 items see above. Press New record, select name, source, activity and then press Add section. Select the appropriate section (belonging to the checklist being created).
Once we have all the items set up, everything should be ready to use.

If we now open one of the service actions that corresponds to constraints, we see a bar with the name of the checklist.
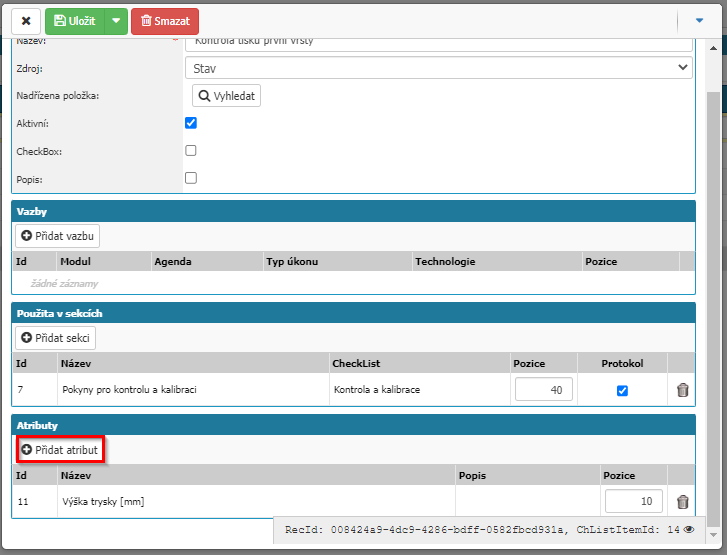
In the case of this checklist, it would be advisable to record the height of the nozzle from the pad at the last point, so that if the assembly is out of tune, it is easier to make a correction. To record such a value, use the option of creating an attribute that serves as a fill-in text field. So we return to the Service Log Overview form and press the Attributes button. Next, select New record. The name will be "Nozzle Height [mm]". Usually there is no need to specify a fixed text field length. Press Save to return to the Checklist Overview form. Here, press the Items button and select the item referring to the first layer print check. In the details of this item, press the Add Attribute button. Select the attribute we created and press Save.
If we now return to the checklist task, we can see that it is now possible to enter a value into the text field in the last step of the checklist. Let's try to fill in the values in the action and press Save.
If the downstream agenda is configured correctly, we should see a Service Log button at the top of the form. Hover over the arrow next to the button to see the advanced option. Press Documents. This will bring up the report detail, where we will find the service report in the Documents section.
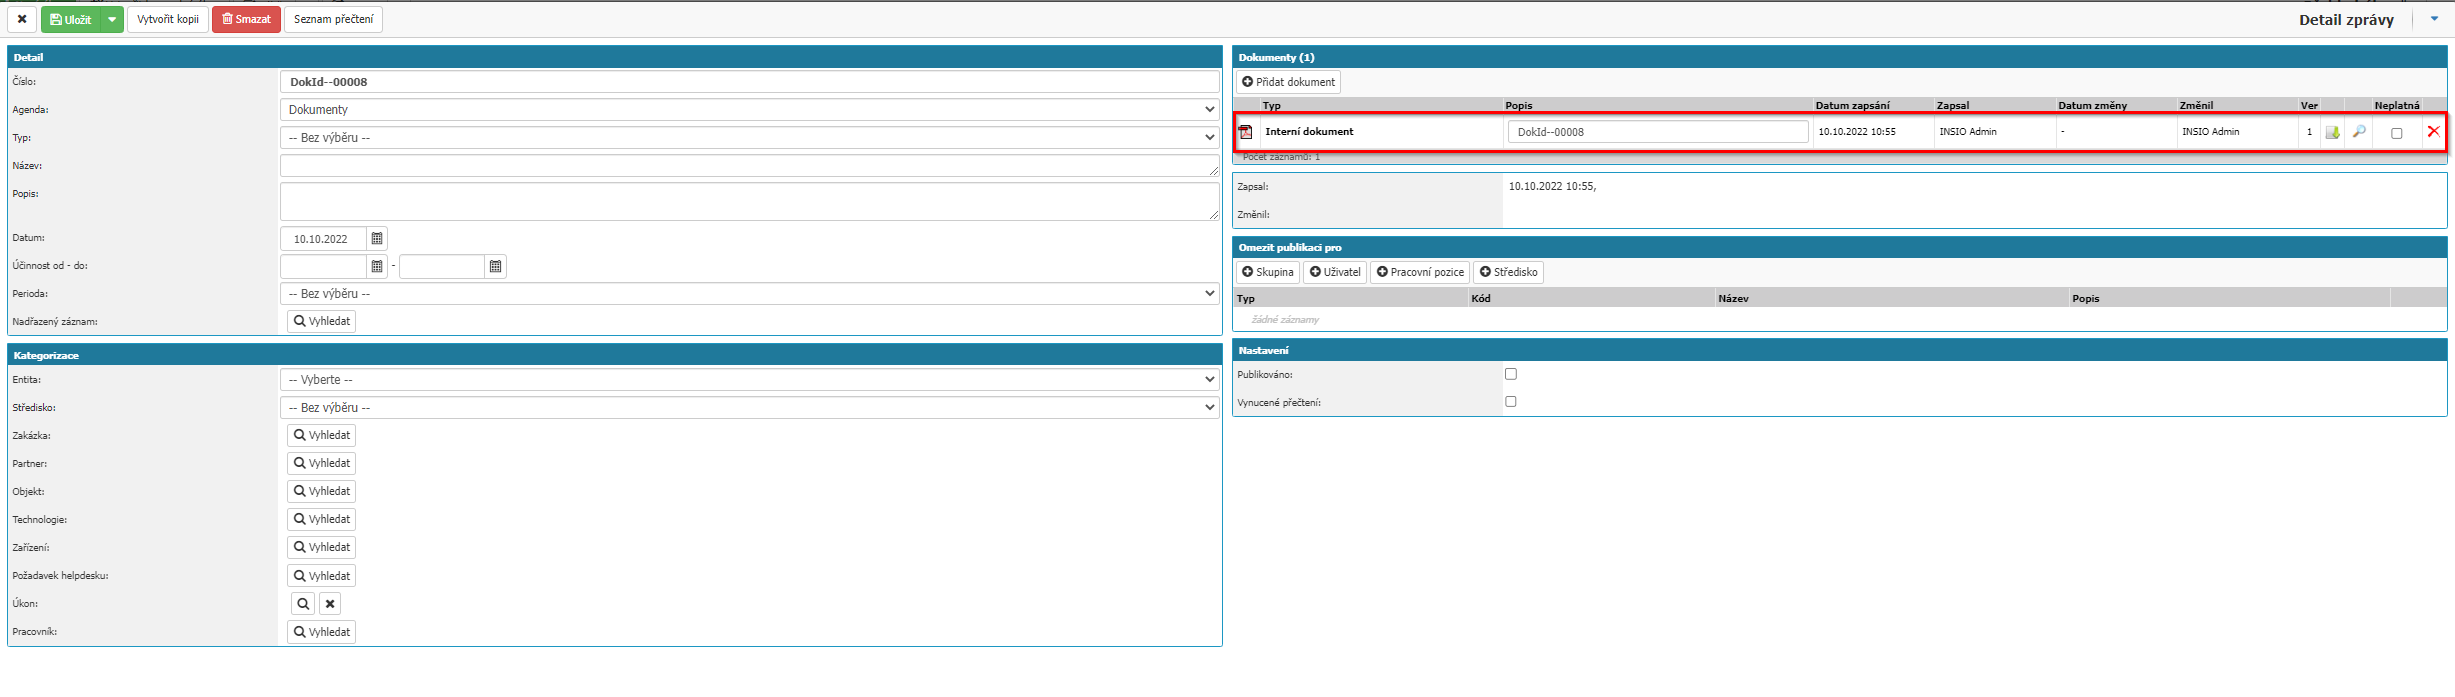
After opening the document, we can see the data from the checklist at the bottom of the document.