
The INSIO application supports integration with both classic and SQL versions of the Pohoda software. The integration setup is identical for both variants.
Configuration in the INSIO application
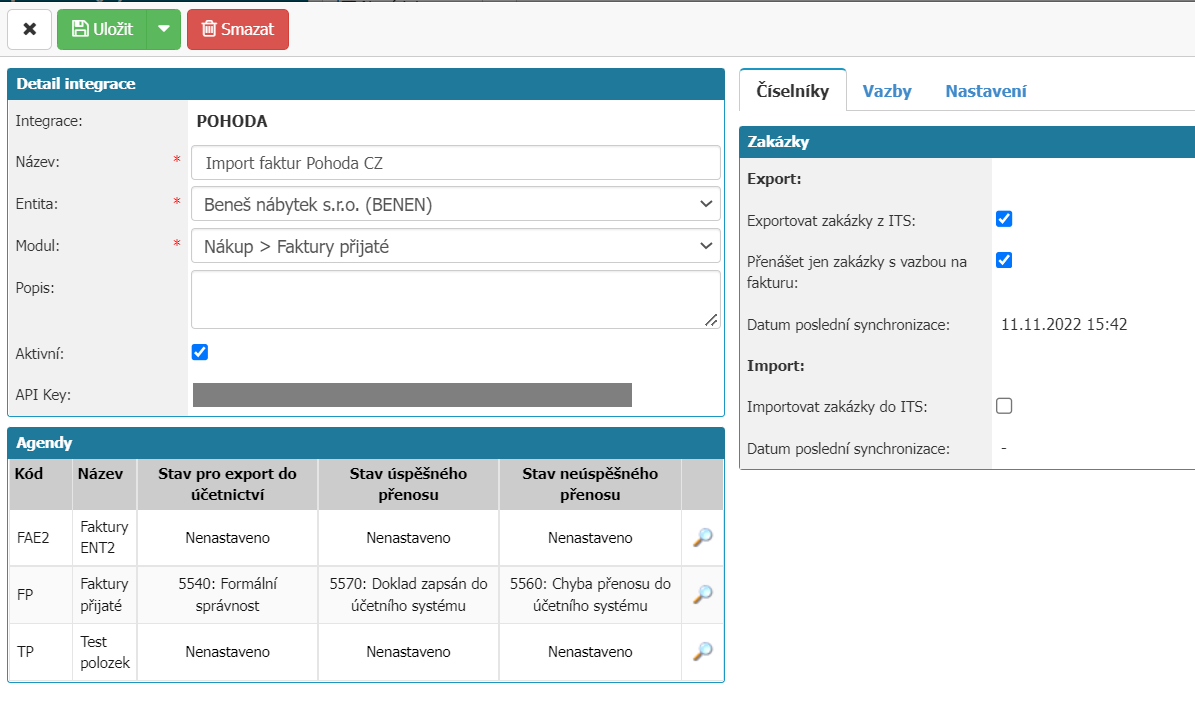
The integration settings can be found in Administration menu > System > Integration.
Create a new integration to the Pohoda system via the New Integration - Pohoda option.
Fill in the basic data:
- Name - Any text (e.g. Import of Pohoda invoices).
- Default Entity - Entity for which the received invoices will be synchronized with the Pohoda application. The integration between INSIO and Pohoda software is paired according to the selected entity.
- Module - Purchasing -> Invoices received.
- Description - Any text.
- Active - Check the option.
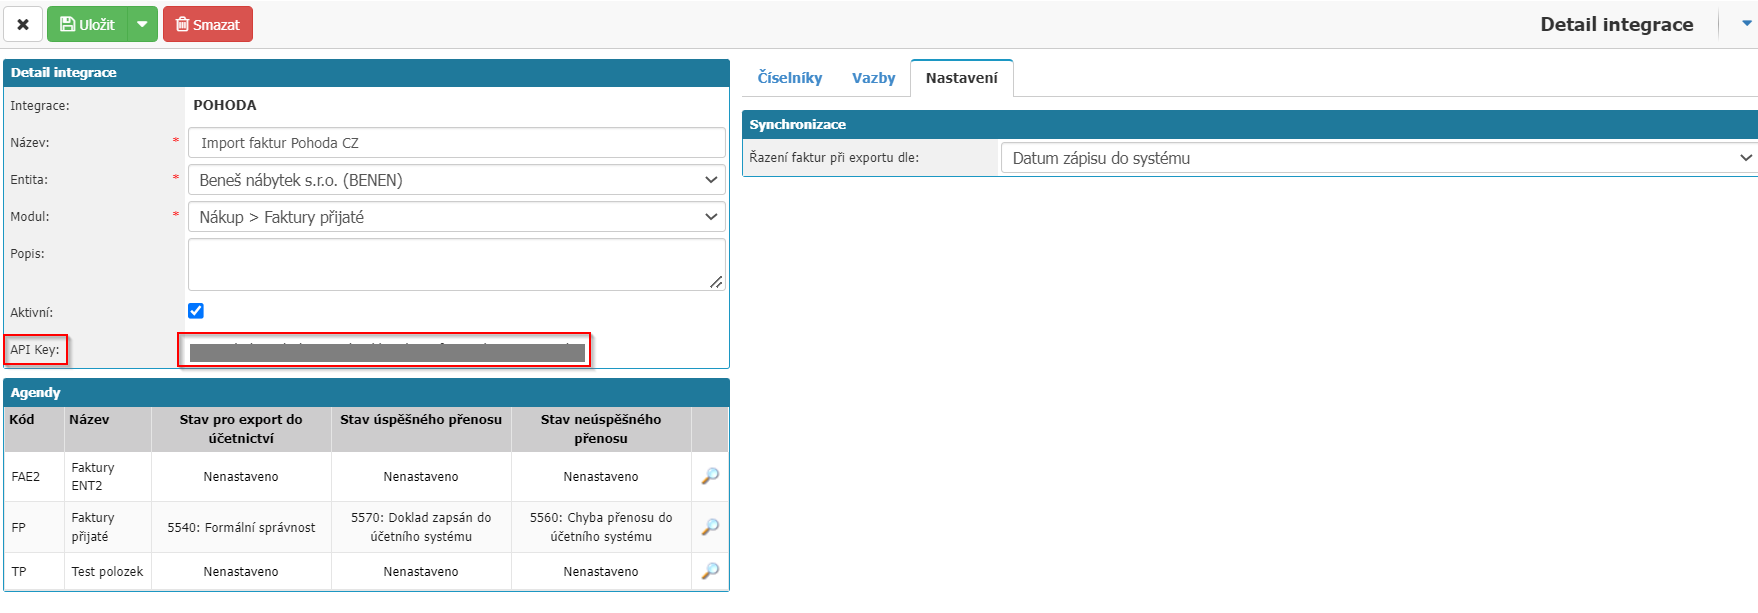
- API Key - Automatically generated for each selected entity after saving.
Confirm the settings with the Save option found above.
Agendas
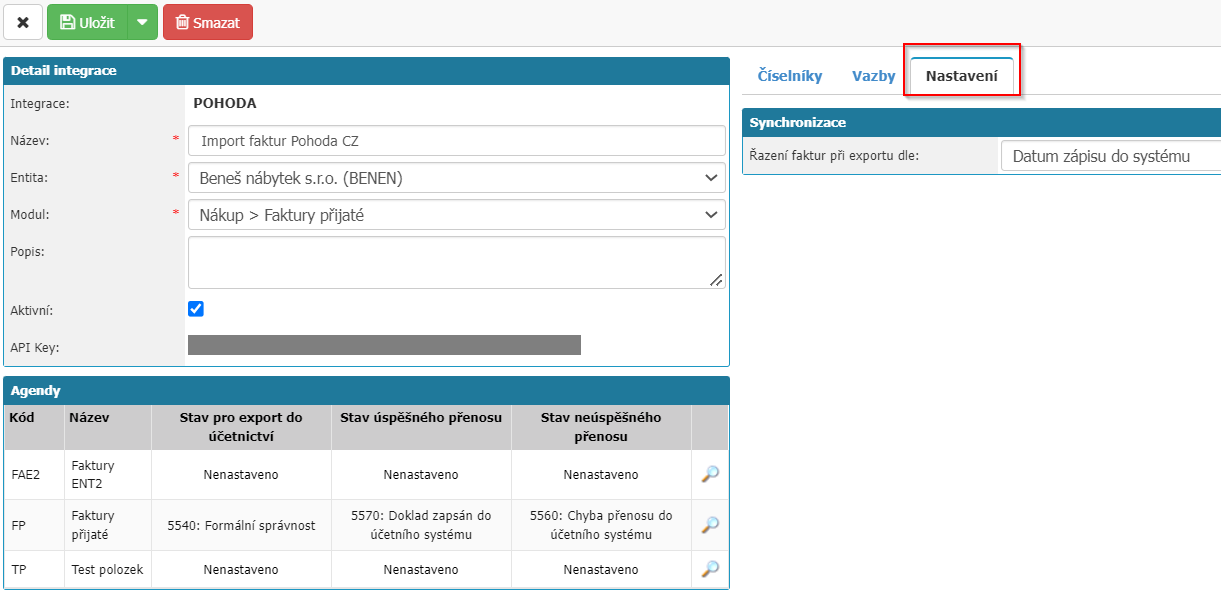
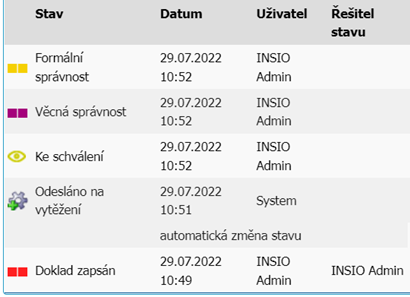
Select the agenda that you want to pair with the Pohoda application, e.g. Invoices received (the menu will display only those agendas from the Invoices received module that are assigned to the selected entity). Use the magnifying glass icon to get to the tab of the given agenda and in the tab Document transfer set State of workflow for export to the accounting system, State of workflow after successful transfer to the accounting system and State of workflow after unsuccessful transfer to the accounting system. See figure below. After setting up, save the agenda and go back to the integration detail tab.

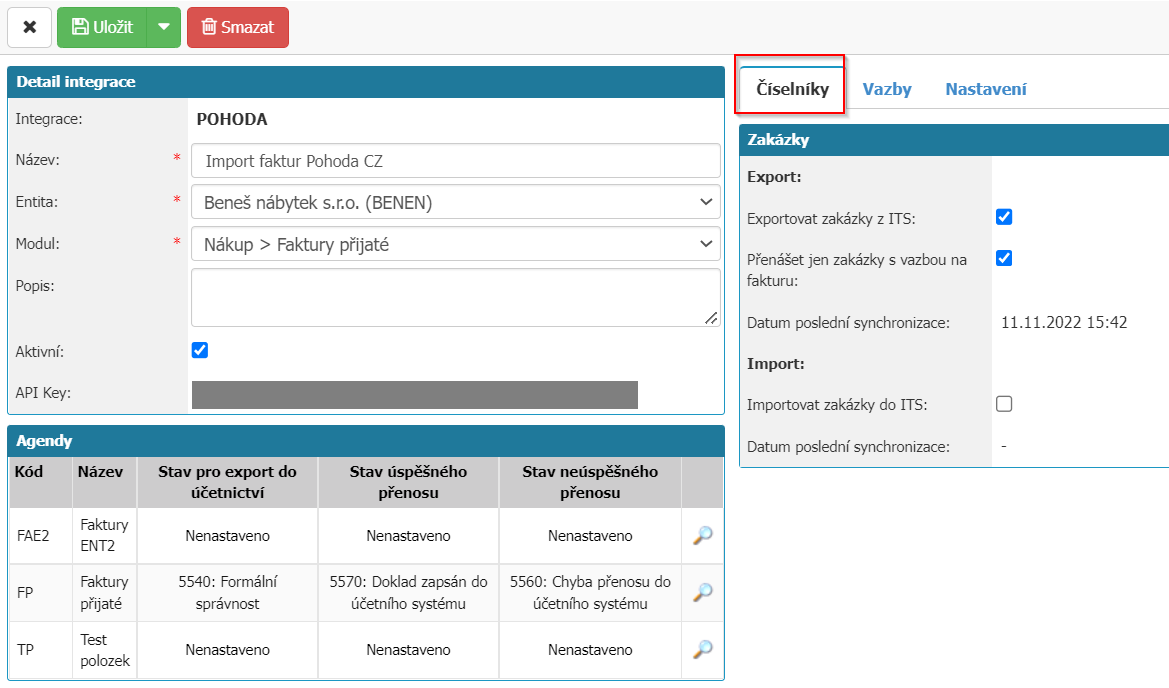
Dials
In the integration settings, it is possible to configure the transfer of orders from INSIO software to Pohoda software, if necessary. Just tick Export orders from ITS. If we do not want to transfer all orders, we can also check "Transfer only orders with a link to invoice" and this will transfer only the order that is paired with the invoice being transferred.
Bonds
In the integration settings in the "Bindings" section, you can configure document matching, payment matching and VAT breakdown matching.
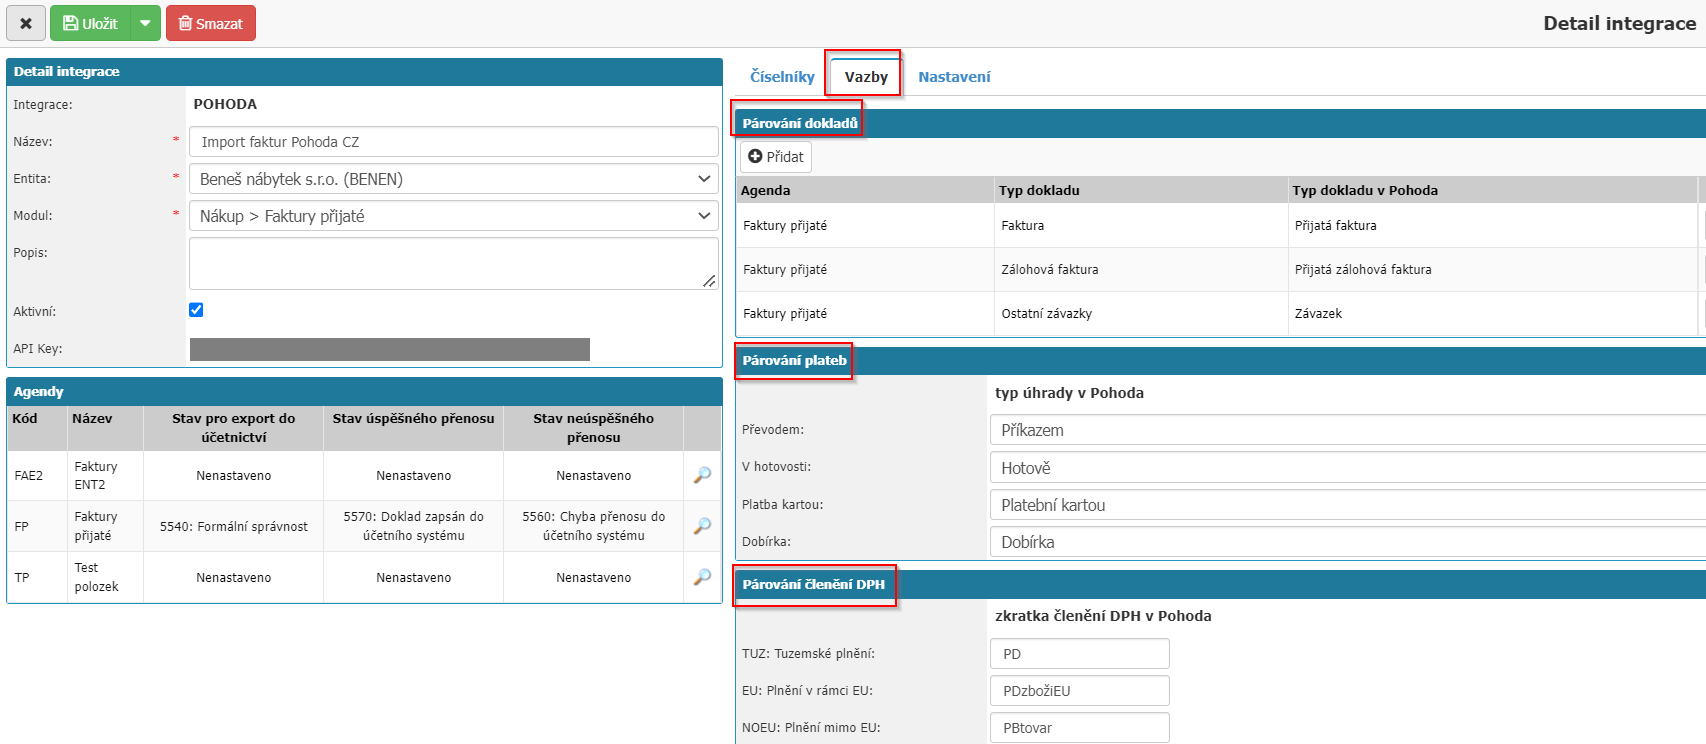
Pairing documents
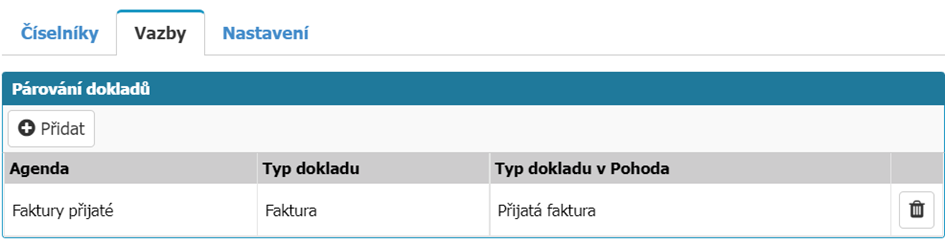
Pairing documents -> Add. Select the relevant agenda (e.g. Invoices received), the type of document you want to transfer to the Pohoda software (e.g. Invoice) and the type of document in Pohoda (e.g. Invoice received). See figure below. If we need to find out what the document is called in Pohoda, we do so as follows. Here we can see how the document type is named in Pohoda application.
Pairing payments
For the correct transfer of payment information, we can assign payment types in the INSIO software to individual payment forms in the Pohoda software. The correct setup is as shown below.
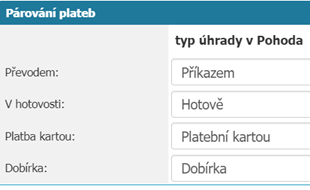
If it is necessary to set up a dial for the type of payment in the Pohoda software, we can do so as follows: in Pohoda, select "Settings" in the top bar, then "Lists" and select "Forms of payment". In the top bar, click on the "New record" icon (or press the Insert key) and fill in the form for the new reimbursement type. Save.
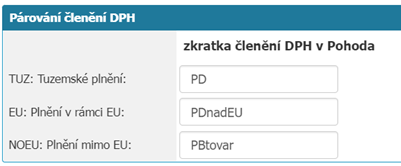
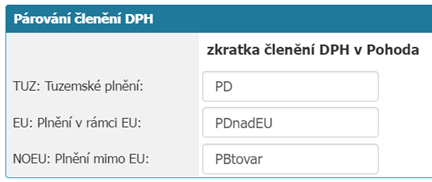
Pairing VAT breakdown
In the same way, we can assign the abbreviations of the VAT breakdowns in the INSIO application to the VAT breakdowns in the Pohoda software. The correct setup can look like the figure below, for example. However, it is necessary to check whether the code list in Pohoda corresponds to the figure. To find out, select "Accounting" in the top bar, then "Value added tax" and "VAT breakdown" on the selected accounting unit. Here we can see what abbreviation is set in Pohoda for the different VAT breakdowns.
Settings
Invoice sorting during export - we can leave the default option "Date of entry into the system" or another suitable alternative.
Installing the Integration Bridge
To make the integration of INSIO and Pohoda software work, you need to download the integration bridge here. Save the file to the computer where the Pohoda software is installed. After unzipping the zip file, find the file with the exe extension Intrasoft.Integration.Client.exe and start the installation of the integration bridge. After successful installation we will see an orange Intrasoft integration icon in the right part of the bottom bar.

Setting up an accounting unit in the Pohoda application
The pairing criterion between INSIO and Pohoda software is the ID number of the internal entity that we have selected or created when configuring the integration in INSIO. The same entity needs to be created in the Pohoda software as an accounting entity.
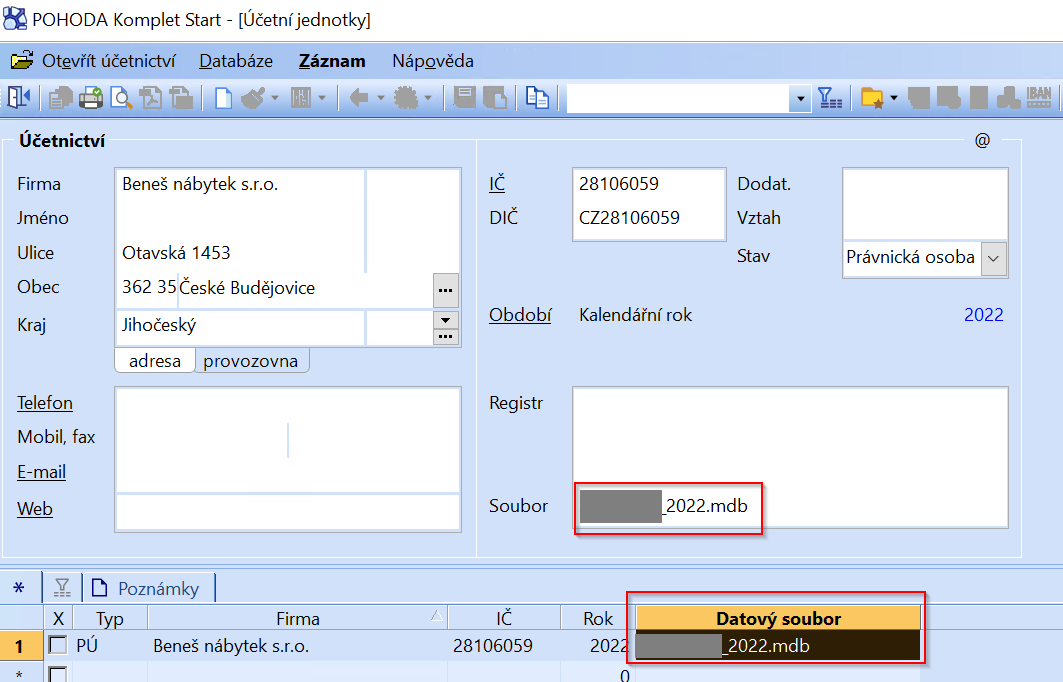
Start the Pohoda software and select File > Accounting Entities in the top bar of the main page. On the page we will see the already created accounting entities. If we want to create a new accounting entity, we can right click in a blank space anywhere on the page, or select the New Entry icon in the top bar of the application. A window will appear with a wizard for setting up a new accounting entity, see figure below.
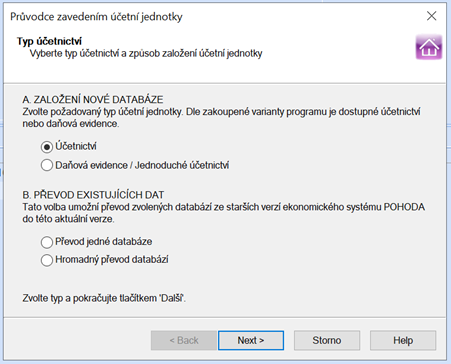
Select whether you want double or simple accounting and press Next and then Finish. Once the new accounting entity has been set up, we fill in the form with the company name, registration number, address and other details as shown in the sample image below. After entering the data, save the record.

Setting up the integration bridge
Right-click on the Intrasoft integration icon. (It should be in the right part of the bottom bar. If it is not, find the integration bridge installation file on your computer and double-click Intrasoft.Integration.Client.exe. After this step, the orange Intrasoft integration icon should appear in the right part of the bottom bar). Select the General Settings option. The report will show the integrations already registered. If we want to create a new integration, we select New. We will see the New Integration settings window on the page.
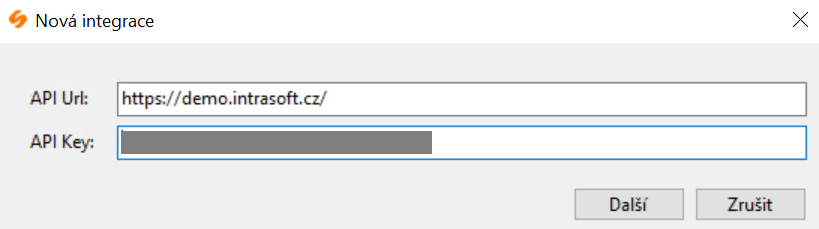
Fill in API Url, i.e. url address of the given INSIO application instance (e.g. https://demo.intrasoft.cz/) and API Key, i.e. automatically generated API Key for the given entity in the INSIO application. It can be found in the INSIO application in the integration details.
After entering API Url and API Key, press Next. We will now see the form for the selected integration.
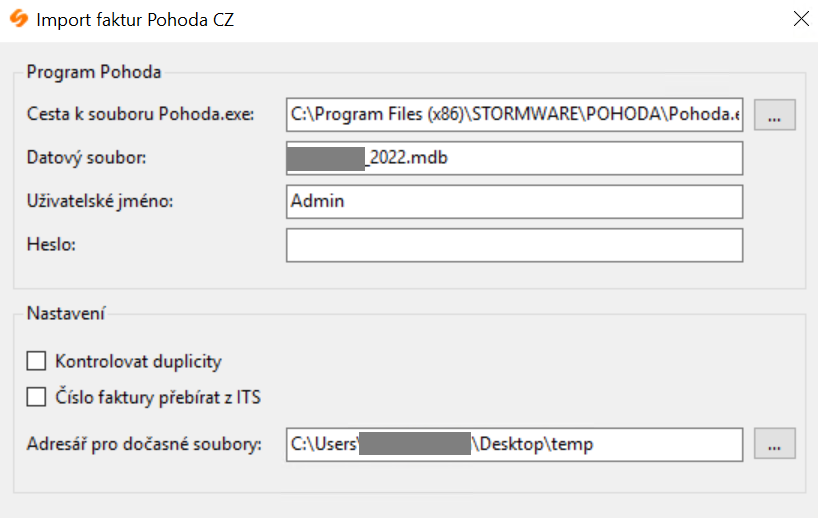
Fill in the Path to the Welcome.exe file. Next, fill in the data file field, which can be found in the Pohoda software - in the top menu, select the file, then the accounting unit and the required data can be found in the list of established accounting units in the column called data file, or in the details of the accounting unit. See picture below.
At this point there is only one difference between the classic version of the Pohoda software and the SQL version. The name of the data file has the extension mdb in the classic version (there is no extension in the SQL version). However, for setup purposes this fact has no effect, in both cases we copy the entire name of the data file (i.e. in the case of the classic version we also copy the extension).
Next, enter the username and password for the Wellness software in the integration form, which has permission to write invoices in the Wellness system, and add the path to the directory for temporary files. The directory is used to store XML files generated by the INSIO software, which are then imported into Pohoda (so you can possibly view the data exchange by opening the XML). The directory for temporary files is created automatically by downloading the installation package. However, it is also possible to create one if required.
Duplicate check - it is possible to check this option. During integration, an invoice that has already been integrated with the Pohoda software in the same form will not be transferred. The check is carried out according to the registration number, which is transferred to the Pohoda software under the document number.
The failure to transfer an invoice due to duplication is indicated by the fact that in the console, when the integration is started, the record The imported record already exists is displayed in red. In the INSIO application, a workflow status will occur on the detail of the invoice in question, referring to the incorrect transfer to the accounting system.
Invoice number to be taken from ITS - it is possible to tick this option. When integrating, the internal invoice number from INSIO is then transferred to the Pohoda software. If the option is not checked, the Pohoda software will automatically generate its own internal number for the invoice.
After completing the integration form, press OK. This step completes the integration setup on both the INSIO and Pohoda software side.
Example
- In the INSIO application, in the Received Invoices module (Received Invoices Overview form), select "New Document"
- Select the appropriate agenda and the customer for which the appropriate integration with the Pohoda software is selected. We will also fill in the document type that we have set during the integration, e.g. Invoice. Fill in other fields that are needed for successful integration:
- supplier details
- supplier's bank details,
- Invoice number - this is only transferred if "Invoice number to be taken from ITS" is checked in the integration setup form (see above),
- registration number,
- variable symbol,
- constant symbol,
- specific symbol,
- date of issue, delivery, taxable transaction, due date,
- form of payment (mandatory field, otherwise the integration will fail),
- VAT group,
- document description and note - optional,
- currency (if not entered, the integration will not transfer the amounts)
- items including VAT (depends on whether the selected customer or supplier are VAT payers).
- Save.
- The document is now in the first workflow state, typically e.g. "Document entered". Since we have set the workflow state for the integration on the Received Invoices agenda to be "Formal correct" for transfer to the accounting system, we click through the approval process to this state. In the "Formal Correct" status, the invoice will be sent via the integration bridge to the Wellbeing software.
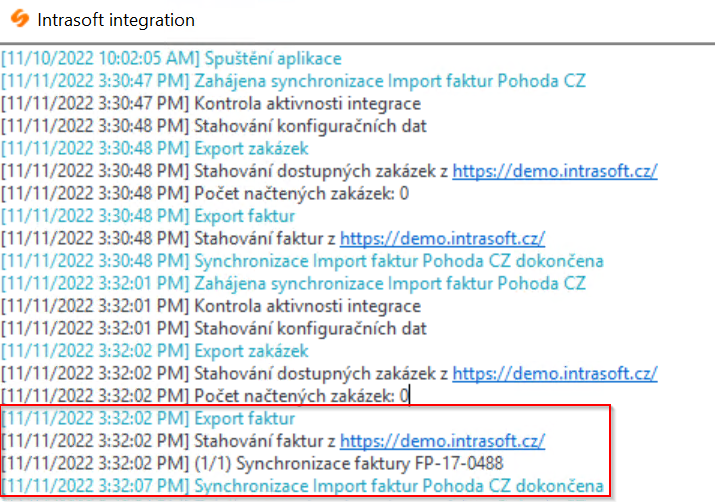
- Now we start the synchronization in the integration bridge. Right-click on the Intrasoft integration icon. (It should be in the lower right side of the bar. If it is not, find the integration bridge installation file on your computer and double click on Intrasoft.Integration.Client.exe. After this step, the orange Intrasoft integration icon should appear in the right part of the bottom bar).
- Select the name of the integration that we have set up in INSIO (e.g. Import Invoices Pohoda).
- Select "Synchronize". (If the "Synchronize" option is missing in the integration bridge launcher for the selected integration, the integration is probably not checked in INSIO as Active and needs to be hardened).
- A record will be displayed in the console to see if the export and import of invoices was successful. After successful synchronization, the console will display a record "Invoice Import Synchronization complete."
- Select the paired accounting unit in the Pohoda software.
- In the top bar select "Invoicing" and choose "Invoices received".
- A list of received invoices for the given accounting unit will be displayed. In the overview we can find the imported invoice from INSIO.
If we select this invoice with the mouse, the invoice form will be displayed with the data filled in.
Explanation of the transferred data on the invoice:
Note on the overview of the transferred data below - the left part is always the name of the field in the Pohoda software, the right part is the name of the field in the INSIO software, or another explanation, e.g. that the attribute is not introduced in the INSIO application, etc.
- Type = Document type
- Number = Depending on the settings, it can be an internal number in the Wellbeing software or an internal invoice number from the INSIO application. (If the option "Take invoice number from ITS" is checked in the integration bridge settings, then the internal invoice number from the INSIO application is transferred when integrating into the Wellbeing software. If the option is not checked, the Pohoda software will automatically generate its own internal number for the invoice.)
- Document = Registration number
- Variable symbol = Variable symbol
- Text = Description of the document (if not filled in the INSIO software, the text Import FA from XML is automatically added here)
- Record date = Date of issue
- Deduction/Delivery Date = Date of delivery
- Date of accounting event = Date of taxable transaction
- Maturity date = Due date
- VAT KH Date = Date of the VAT control declaration. This attribute is not implemented in the INSIO software.
- Pre-accounting - Transfer of pre-accounting from INSIO software to Comfort software is not yet implemented. The pre-contraction value can be set by default in the user settings in Comfort. Select "Settings" on the top bar, then "User Settings" and fill in the Preconfiguration field in the form.
- VAT split - Set in INSIO for the integration as follows:
- Supplier
- When integrating, the company name, company ID, VAT number, address, postal code, account number are transferred from INSIO. Department (not implemented in INSIO software) and name (in INSIO software there is a contact field for the supplier and this is not transferred) are not transferred.
- If a company is already established in the address book in the Pohoda software and "Intelligent entry of document addresses" is checked in the global settings in the address book tab, the integrated document can be paired by supplier ID number.
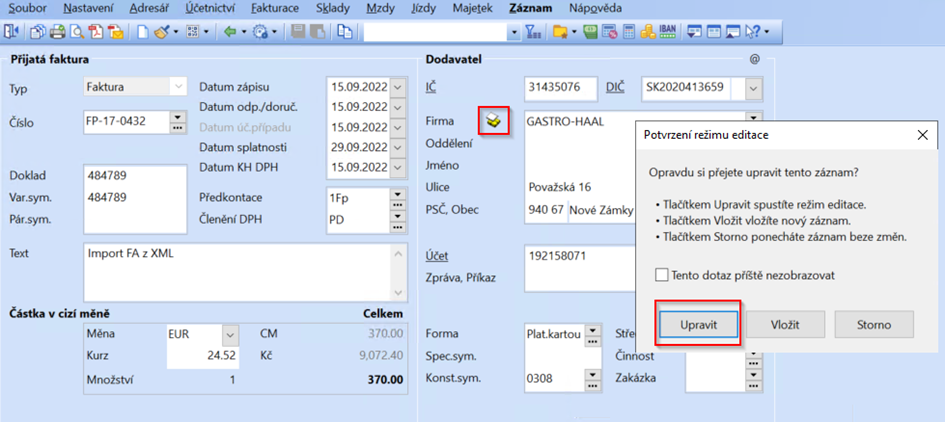
- If the company is not yet established in the Pohoda directory, it is not added to the directory automatically during the integration process. You can add it to the directory as follows. On the detail of the transferred invoice, left-click on the icon next to Company (see picture below) and select "Edit". Then click on the icon again and select "Insert". A warning message will appear "Do you want to insert the address of the invoice into the address book?" and select "Yes". After this step, the company will be saved in the address book.
- Form = Form of payment
- Specific symbol = Specific symbol
- Constant symbol = Constant symbol
- Centre - Not transferable
- Activity - Not transferable
- Order = Order (configuration needed in the integration settings in the INSIO software)
- Total Items - The total data for all items is transferred here, in the following structure:
- total excluding VAT,
- VAT amount
- total with VAT
Note: items with VAT are only transferred if they are entered in accordance with the legislation, e.g. VAT in the Czech Republic is 21% and 15% etc.
The data from individual items are available in the Invoice Items tab (see figure below). For individual items, the code, item, quantity, unit price, VAT and total price are transmitted.
