
User roles and groups are used to manage permissions, authorizations, and other rules for multiple users in a single location. Currently, the only difference between a role and a group in the system is in the solvers section of the workflow, explained below, otherwise all settings and options are identical. Setup options and an overview of existing groups and roles can be found in Administration Menu > Users, Roles and Groups > User Roles / User Groups.

Overview

In the overview you will find a list of existing roles/groups and their categorization.
The list of roles/groups is divided into columns:
- Selected role - select between saved roles/groups. The option is available only when a new role is saved.
- Code - the role/group code defined when the role/group is created.
- Name - the name of the role/group defined when creating the role/group.
- Description - description of the role/group defined when creating the role/group, used for better orientation and help for other application users.
- Column - opens a dialog box for editing the settings of the role/group.
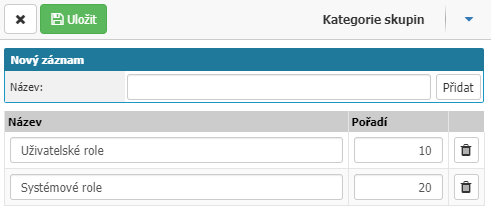
Category

The option opens a dialog box for setting up a new category or editing and deleting existing ones. To set up a new category, simply enter a name in the name field and confirm with Add next to it. You can use the order to specify the order of the categories in the overview, here we recommend to keep the numbering by ten where the lowest number will be the first (10, 20, 30...).
New role/group

The option opens a dialog box for setting up a new role/group.

Basic data
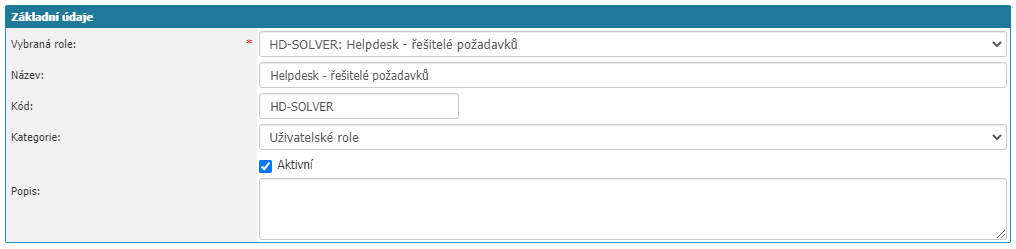
- Name - define the name of the role/group in the field. The value is mandatory.
- Code - define the code of the role/group in the field. The value is mandatory.
- Category - select the category of the role/group. The value is mandatory, if you select --no selection--, the application automatically assigns the first category from the list.
- Description - option to write a description of the role/group for better orientation.
LDAP/Active directory

This section stores settings if the role is synchronized with the active directory.
It is a member of

This section provides an overview of the roles/groups to which the role/group has been selected. It is not possible to assign a group to a role and vice versa.
Via the Add option you have the possibility to select the role or group to which you want to add the selected role or group. This will open a dialog box with an overview of all roles or groups in the system, the selection is made by clicking on the name of the role or group.
Members
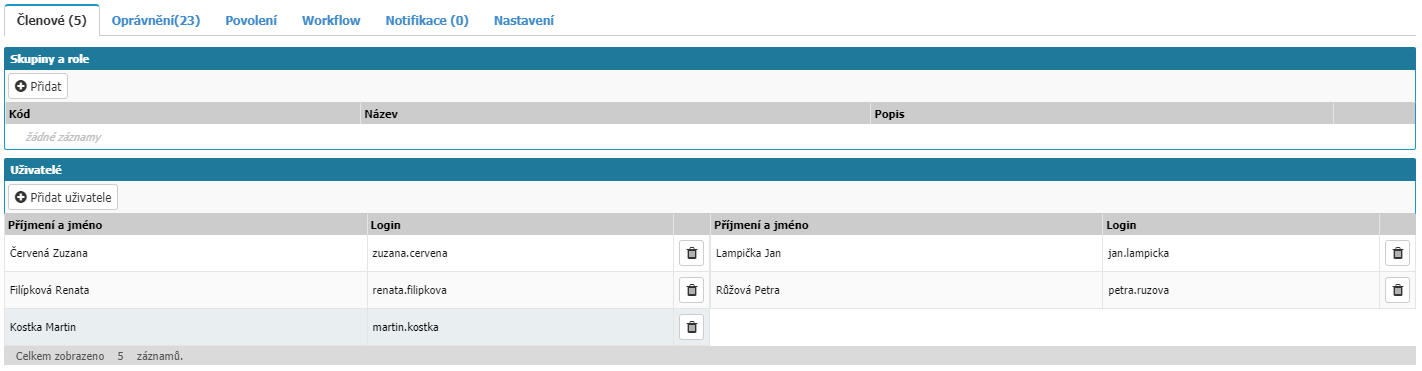
On the tab, you will find a list of assigned roles or groups and a list of users assigned to the selected role/group.
In the Groups and Roles section, via the Add option you have the option to select the role or group to which you want to add the selected role or group. This will open a dialog box with an overview of all roles or groups in the system, click on the name of the role or group to make a selection.

In the Users section, via the Add User option, you have the option to add a user to a role/group. The option opens a dialog box with an overview of the users in the application.

In the report, you have the option to filter and sort the list by whether they are active and by column:
- ID - User ID.
- Surname - last name of the user.
- First Name - User's first name.
- Login - user's login.
- Email - the email that the user has set up.
- Partner - the partner to which the user is assigned.
- Note - according to the note the user has filled in the settings.
- Block - flag if the user is blocked in the application.
You can either make the selection individually by clicking on one of the values of a specific user or in the first column select all users you want to add to the role/group and then confirm the selection by selecting Confirm selection in the top bar of the user overview.
Permissions
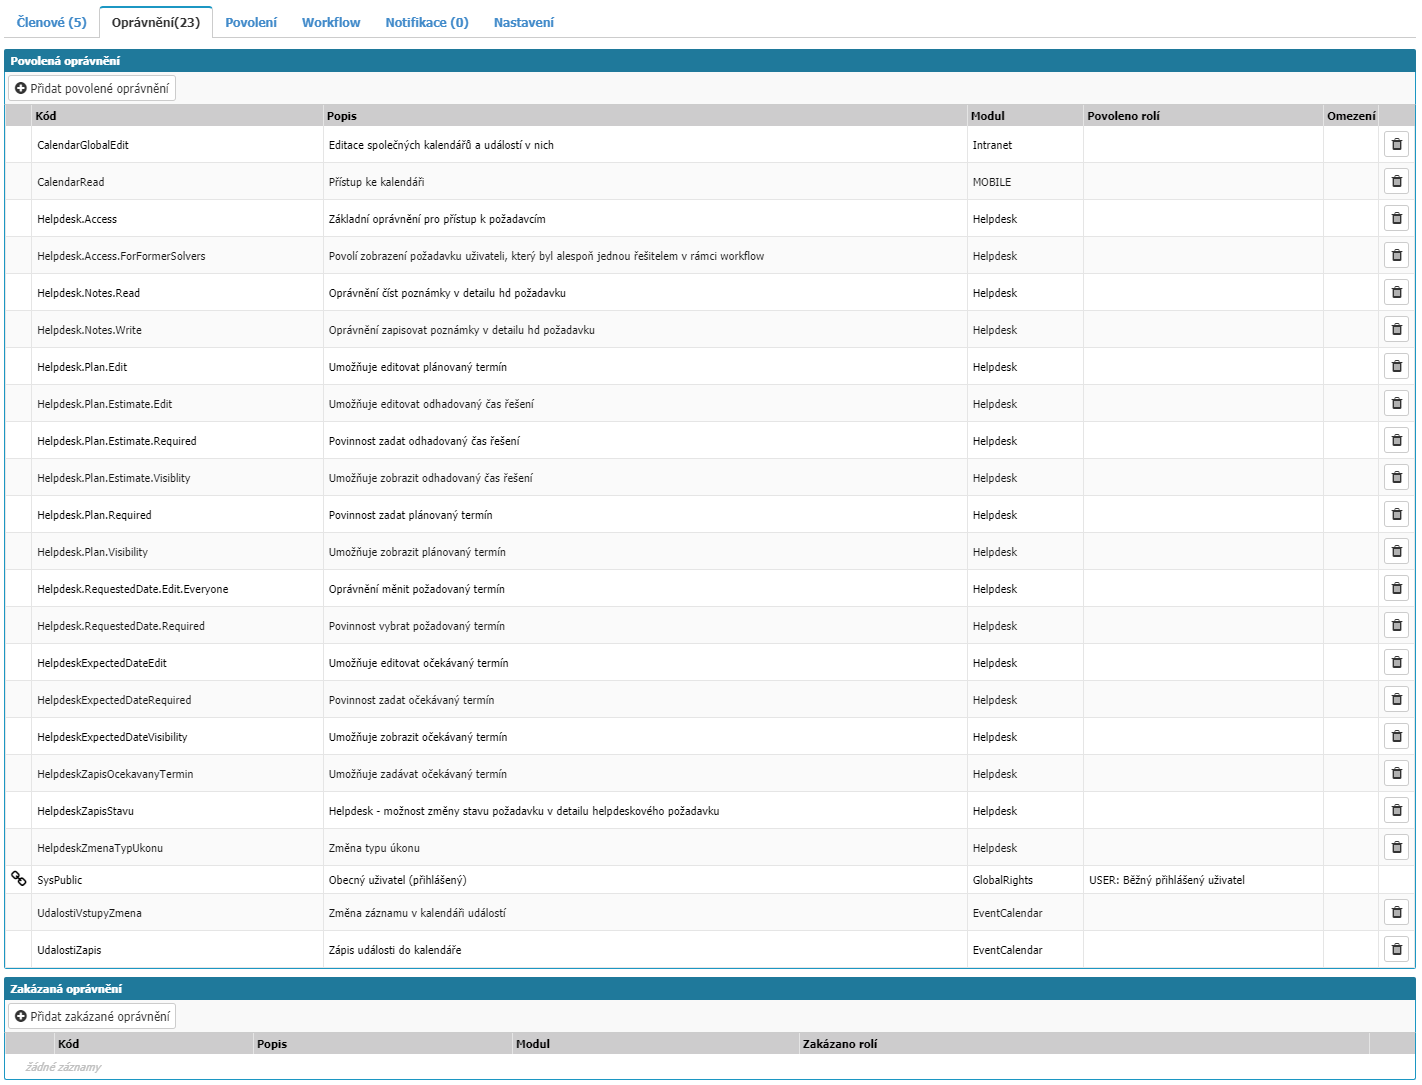
The tab provides options for adding enabled or disabled permissions, managing them, and a list of all inherited or assigned permissions.
The list is divided into columns:
- Code - permission code.
- Description - description of the permission for better orientation.
- Module - the module to which the permission belongs in the system.
- Permission by role - if the permission is inherited from another role, the name of the role or group will be here. Such permission is additionally marked in the first column with a chain icon.
- Restrictions - some permissions may have additional restrictions on the Entity.
- Basket - an option to remove an agenda permission.
The Add Permissions Enabled/Disabled option will open a dialog box with all the permissions you can add to a role or group. In the overview, you can filter and sort the list by module selection or by column:
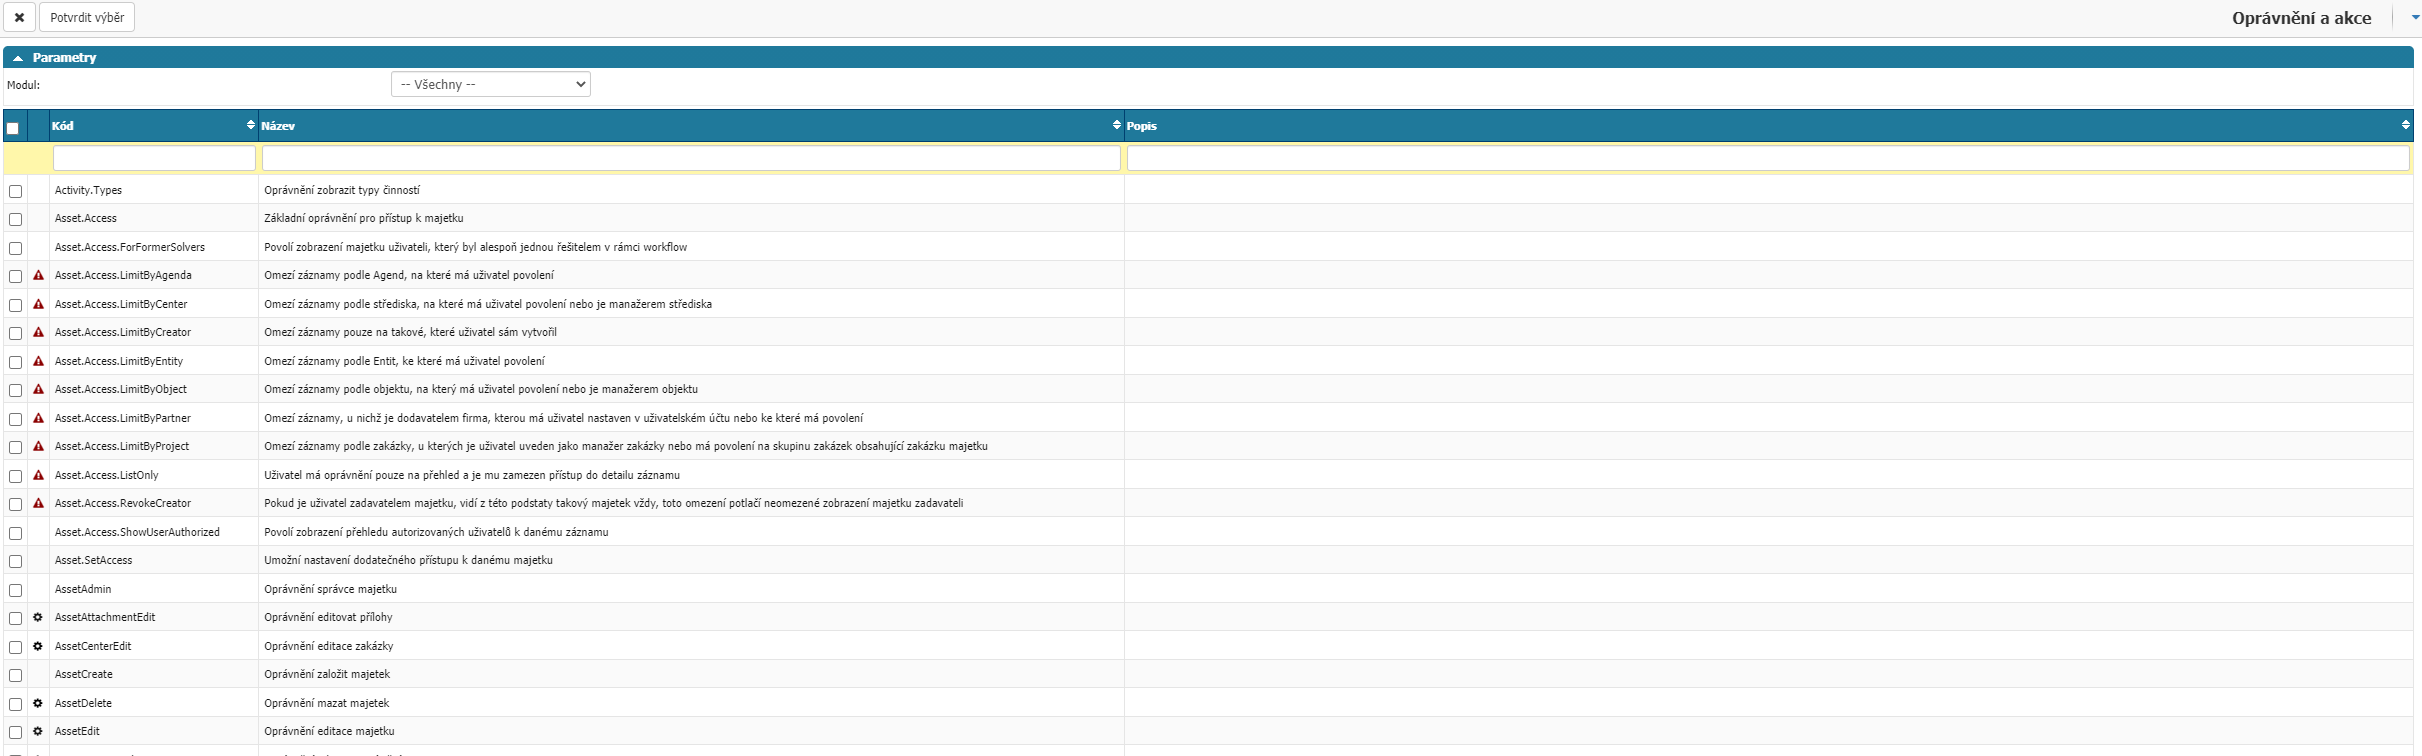
- Code - permission code.
- Name - permission description for better orientation.
Further in the overview in the first column you can select multiple permissions and then assign them all to a role or group via the Confirm selection option. In the second column you can see whether the permission is restrictive - the warning triangle icon or whether it is a permission for an allowed action in relation to the workflow - the gear icon.
If you want to select only one permission you can click on its code to select it directly.
Permission

In the tab you will find a list and options to add enabled Agencies, Centers, Objects, Technologies, Partners and Other.
Agendas

On the Agendas tab, you will find a list of enabled agendas divided into columns:
- Module - the module for which the agenda is created.
- Code - the code of the agenda.
- Name - name of the agenda.
- Role Enabled - if the agenda is enabled by the assigned role or group then the name of the role or group will be here. In the first column the permission inherited this way has a chain icon.
- Read - option whether the agenda document is allowed to be read.
- Write - option whether writing of the agenda document is allowed.
- Basket - option to remove the agenda permission.
Via the option to add an agenda opens a list of all agendas in the application that you can add among the enabled ones.

In the report, you can filter by module, whether the agenda is active, and by column:
- ID - Agenda ID.
- Code - agenda code.
- Module - module to which the agenda belongs.
- Entity - the entity to which the agenda belongs.
- Numbering - numbering that is set in the agenda.
- Workflow - workflow that is set in the agenda.
- Default state - the default state of the workflow that is set in the agenda.
- Active - flag whether the agenda is active.
Select the agendas that you want to enable by selecting the option in the first column and then confirm by selecting Confirm selection. If you want to select only one agenda, you can make the selection by clicking on the name of the agenda.
Centres

On the Centres tab you will find a list of allowed centres divided into columns:
- Code - centre code.
- Name - name of the centre.
- Role enabled - if the centre is enabled by an assigned role or group then the name of the role or group will be here. In the first column the permission inherited this way has a chain icon.
- Restrictions - option to define in which modules the center will be enabled.
- Basket - option for removing the permission on the center.
Via the Add Center option opens a list of centers in the application that you can add to the allowed ones.

In the report, you can filter by entity, whether the center is active, and across columns:
- ID - Center ID.
- Code - centre code.
- Name - the name of the centre.
- Type - type of centre.
- Superordinate Centre - if the centre has a superordinate centre, the name of the superordinate centre will appear here.
- Manager - the name of the manager of the centre.
- Entity - the code of the entity to which the centre is assigned.
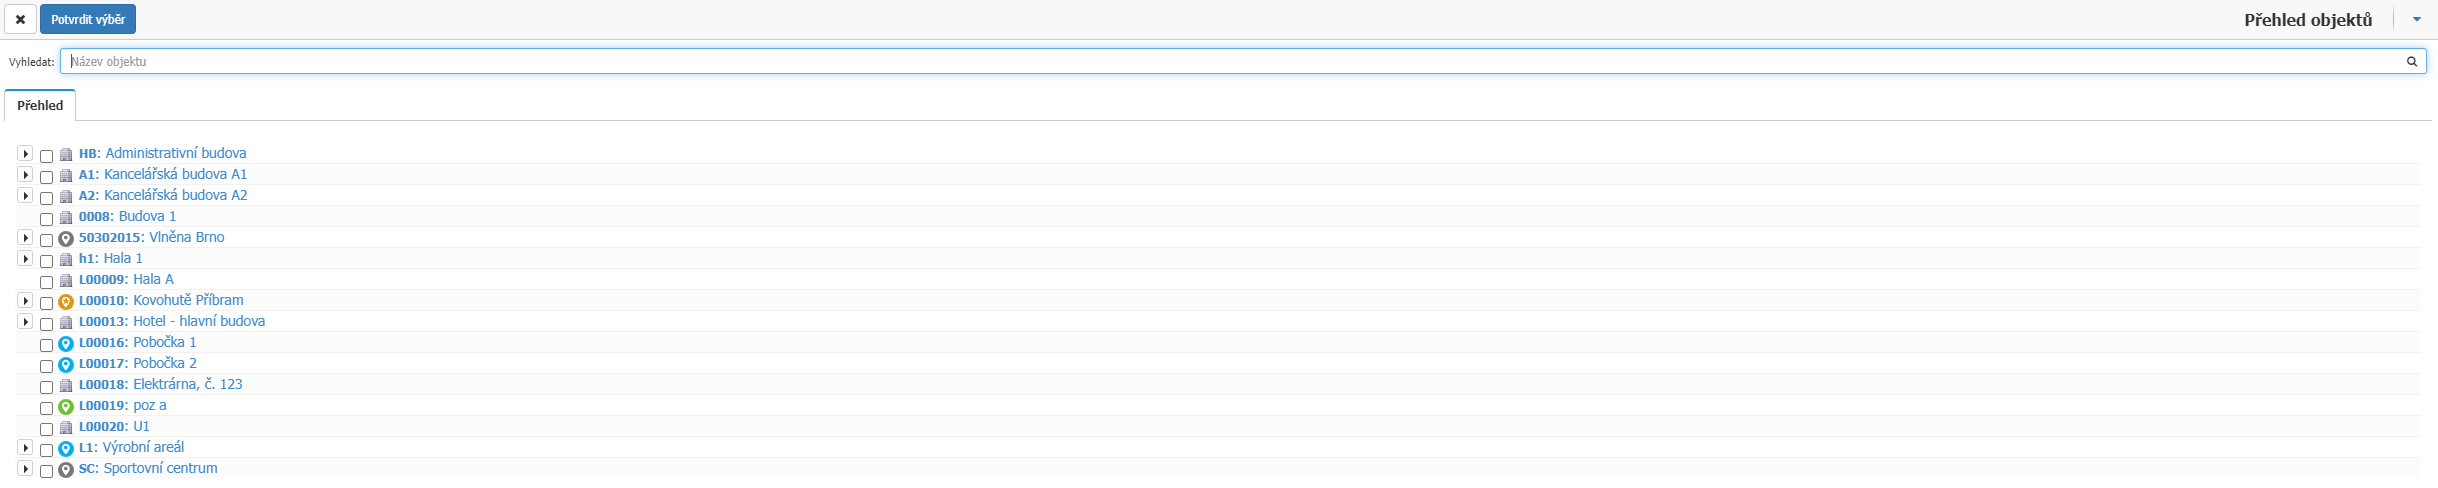
Objects

On the Objects tab, you will find a list of allowed objects divided into columns:
- Name - name of the object.
- Role Enabled - if the object is enabled by an assigned role or group then the name of the role or group will be here. In the first column the permission inherited in this way has a chain icon.
- Basket - option to remove permission on the object.
The Add objects option will open a list of objects in the application that you can add to the permissions. In the overview you can search for the name of the object.
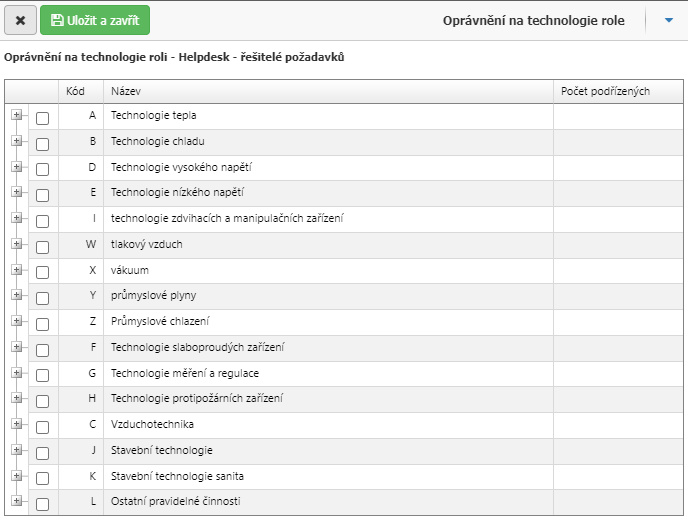
Technology

On the Technologies tab, you will find a list of enabled technologies divided into columns:
- Name - the name of the technology.
- Role Enabled - if the technology is enabled by an assigned role or group then the name of the role or group will be here. In the first column the permission inherited in this way has a chain icon.
- Basket - option to remove permission on the technology.
The Add Technology option will open a list of technologies that you can add to the permissions. Select the technologies from the overview by selecting the option in the first column and then confirm the selection by selecting Save and Close.
Partners

On the Partners tab you will find a list of allowed partners divided into columns:
- Code - partner code.
- Name - name of the partner.
- Role Enabled - if the partner is enabled by an assigned role or group then the name of the role or group will be here. In the first column the permission inherited this way has a chain icon.
- Basket - option to remove permission on the partner.
The Add partners option will open a list of partners you can add to the permissions.
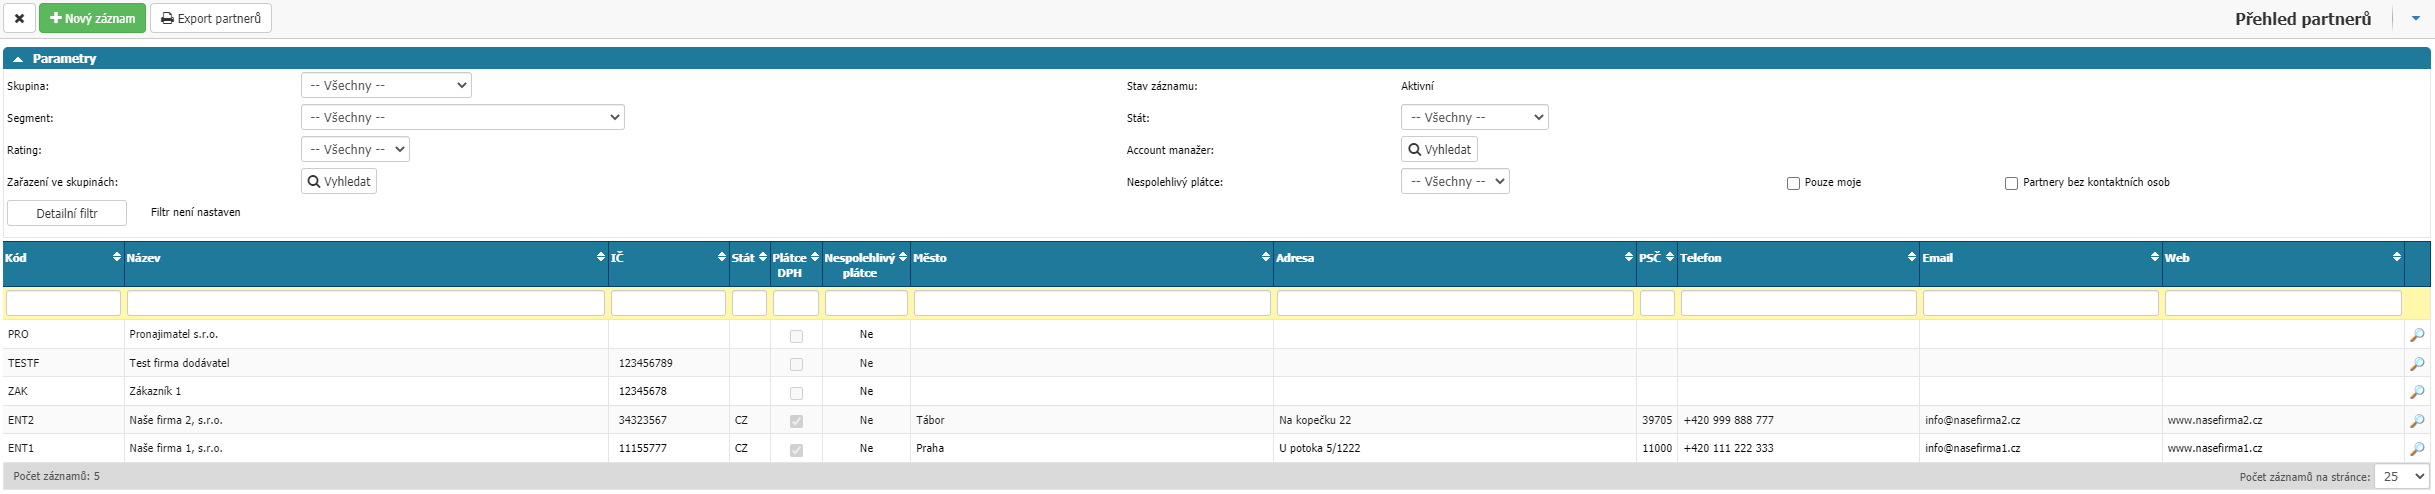
In the report, you can search via Group, Segment, Rating, Group Classification, whether the partner is active, State, Account manager, Unreliable payer, Only my option will show partners where you are assigned as an employee in contact with the partner, Partners without contact persons, Detail filter if you have set user attributes and via columns:
- Code - partner code.
- Name - Partner name.
- Number - Partner ID number.
- Country - Partner's country code.
- VAT payer - indication whether the partner is a VAT payer.
- Unreliable taxpayer - note whether the partner is an unreliable taxpayer.
- City - city from the partner's address.
- Address - address with descriptive number from the partner's address.
- Zip code - zip code from the partner's address.
- Phone - telephone from the partner's contact details.
- Email - email from the partner's contacts.
- Web - website from the partner's contacts.
To select a partner, click on the partner name in the overview.
Other

On the Other tab, you can find a list of enabled options for User Attributes of the tilt box type. Via the option in the last column you have the possibility to enable or disable the options for the user attribute.

Workflow
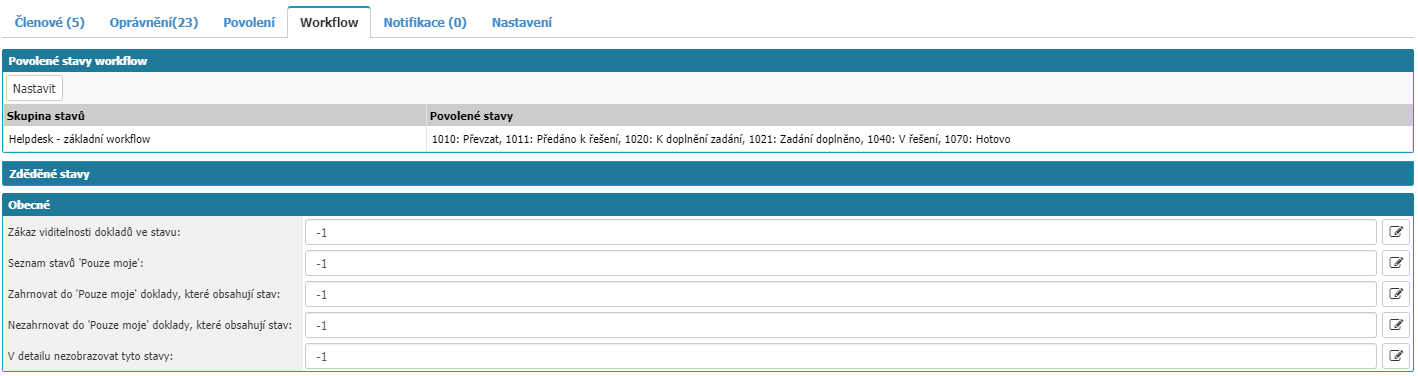
On the workflow tab, you can define the allowed workflow states and other settings related to workflow.
Allowed workflow states

In the list, you can see the enabled workflow states for the role/group. In the State Group column is the name of the workflow, and in the Allowed States column is the ID and name of the specific workflow states.
To add new enabled states, use the Set option.
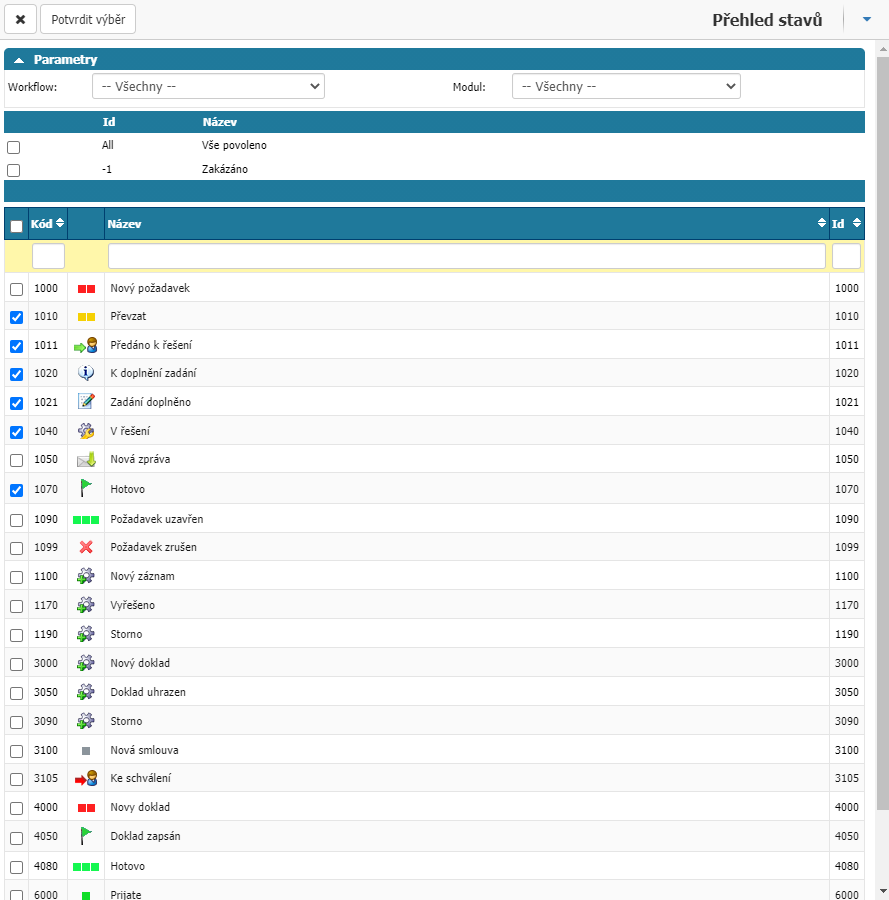
A dialog box opens listing all workflow status in the application. You can filter by a specific Workflow, by selecting the module to which the Workflow belongs, or by columns:
- Code - numeric code of the workflow status.
- Name - the name of the workflow state.
- Id - workflow state ID.
You can make the selection by selecting the option in the first column and then confirm the selection via the Confirm Selection option.
General

In the settings you have the option to define:
- Disable visibility of documents in a state - documents will not be visible in selected states for users in a role/group.
- List of states "Only mine " - the setting is used to allow users to see documents in the document overview where they are not directly current solvers in the workflow.
- Include in "Mine only" documents that contain a status - setting the same as the Status List Mine only but with the difference that with this setting the document does not have to be currently in the selected workflow status, but it is enough that it is sometimes in the selected workflow status.
- Do not include documents that contain status in "My Only" - setting the same as Include in My Only with the difference that the document is not yet in the selected workflow status.
- Don't show these statuses in detail - the setting will prevent the visibility of the workflow status in the document detail.

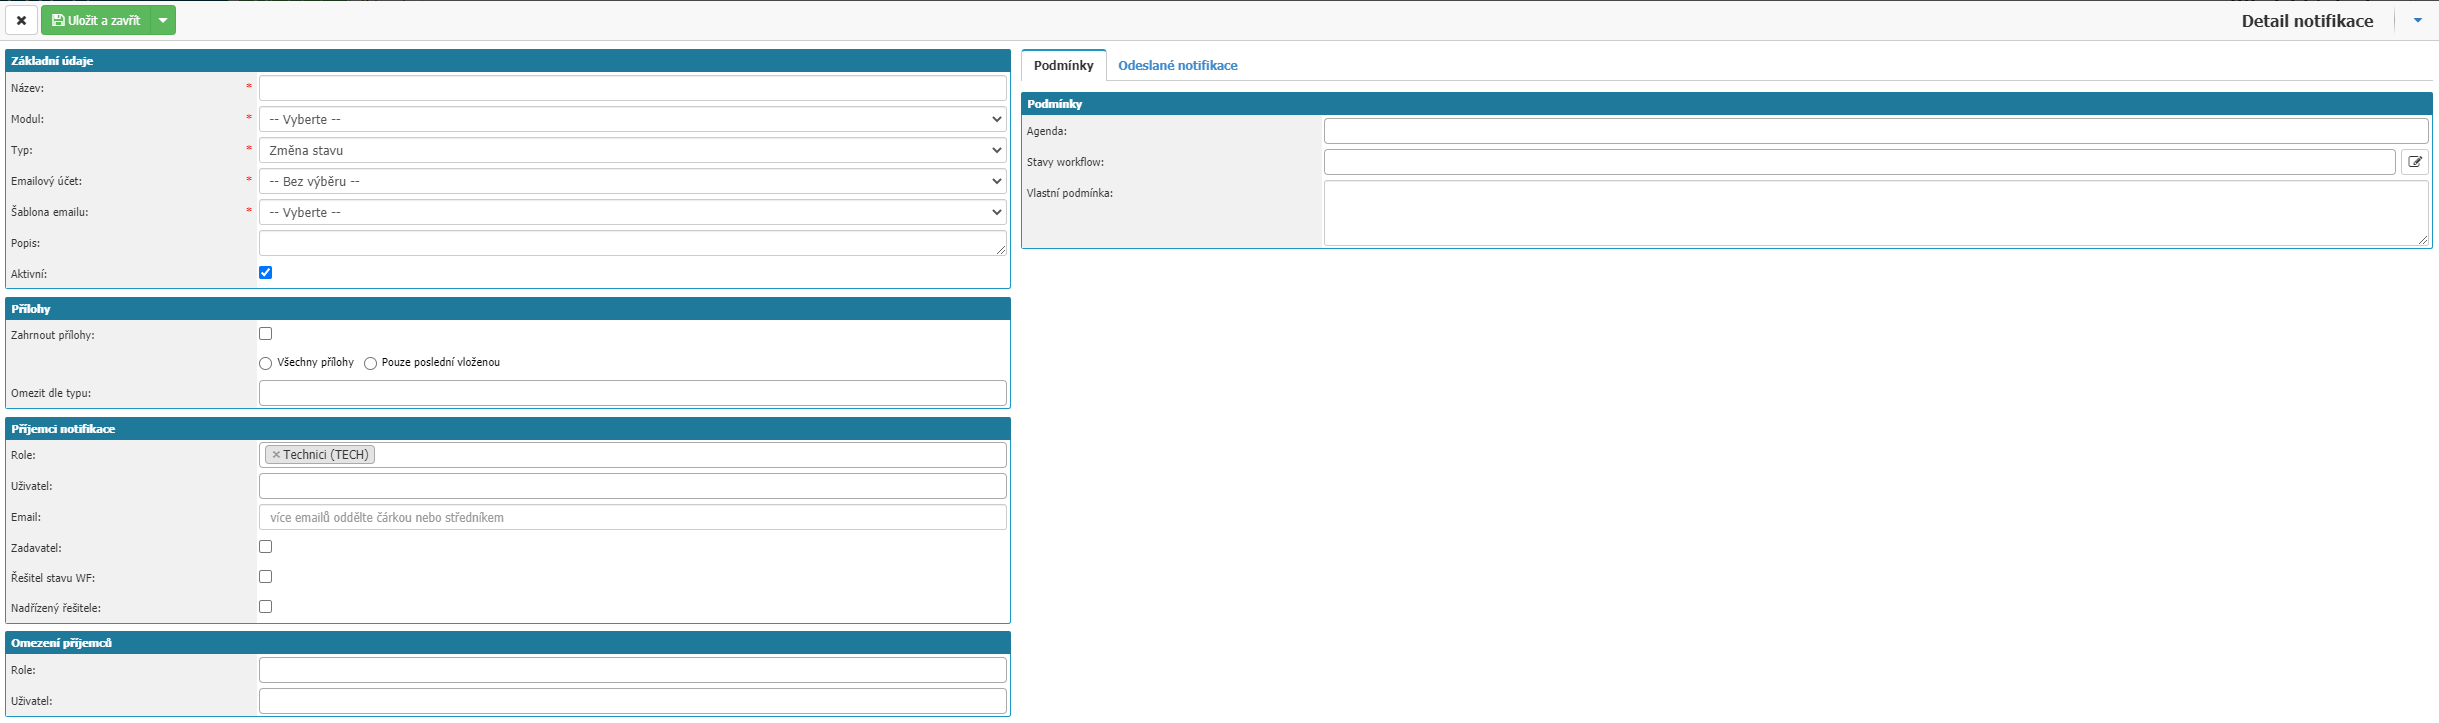
On the Notifications tab, you can find all notifications in which the role/group is set as the notification recipient. Use the Add Notification option to open a dialog for creating a new notification where the selected role is pre-populated in the Notification Recipients section.
Settings

In the Settings tab you can find several settings, applicable are:
- Default profile - the ability to define a default application profile on a role or group. Priority is given to the settings on the user.
- Public Group - option that allows to see the group in the Users setting in the workflow.
- Enable Key Management - Option to enable key management for the role/group.
Top bar

Here you will find options to close settings without saving changes - Cross, save settings - Save, delete a role or group from the application - Delete and create a new role or group - New Role.