
The portal is the entry point to the application. At least one portal must be registered in the application for the application to be available at the address listed in the portal. The purpose of defining a portal is to be able to distinguish between different entry addresses to the application (although there may be multiple entry addresses within a portal) and to define rules that will bind to these addresses or portals. Thus, you can define a single entry address and portal for internal users in the system, within which authentication against Active Directory will take place, and other portals with customer URLs for customers, where you will have form authentication (i.e. through a simple name and password) and where each portal will have a personalized customization of appearance (logos, colors) for a specific customer. Portal settings can be found in Administration Menu > Portal > System Portals.
Overview

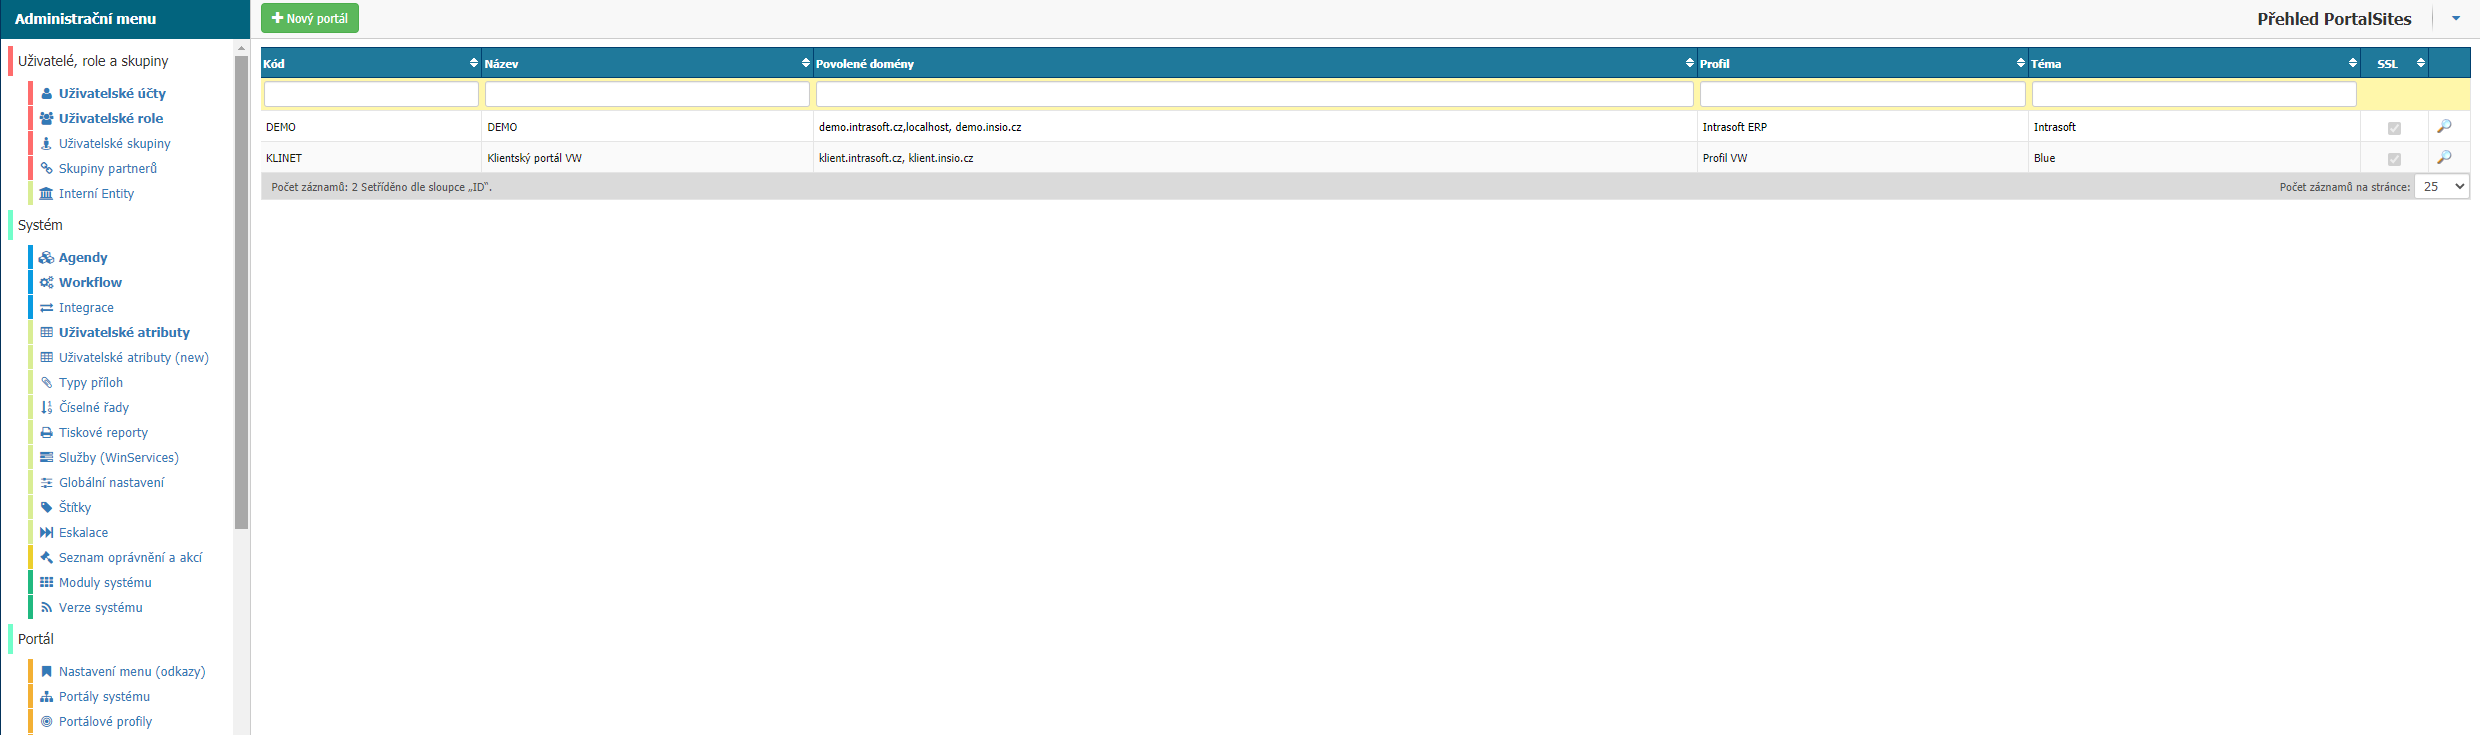
In the overview you can find all the portals set up in the application. You can filter by columns:
- Code - portal code.
- Name - name of the portal.
- Permitted domains - domains that the portal has set in the permitted domains.
- Profile - the profile that the portal has assigned.
- Theme - the theme that the profile has set.
- SSL - the SSL security settings flag.
- Sheet - option for editing portal settings.
New portal
The option opens a window for setting up a new portal in the application. The portal settings are divided into general and security settings.
General
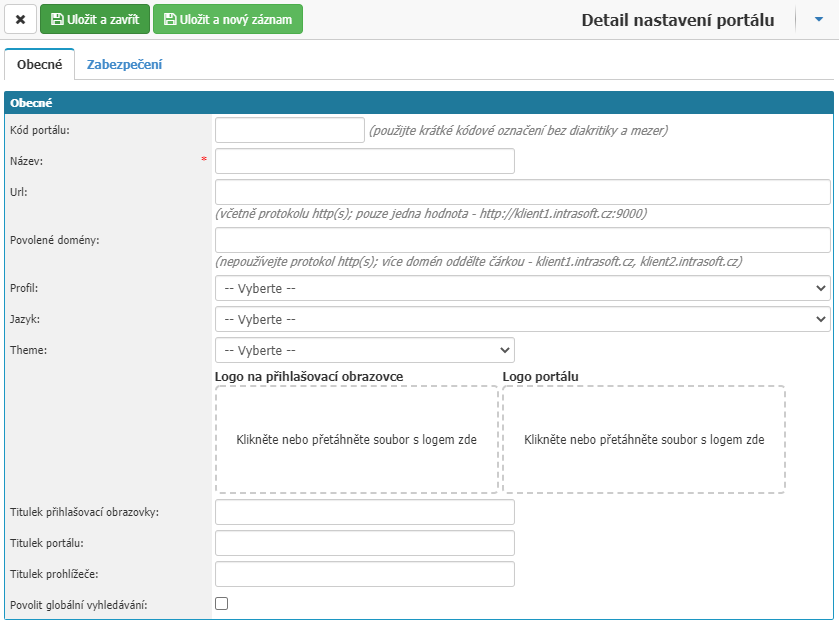
- Portal Code - define the portal code.
- Name - define the name of the portal. Required value.
- URL - define the URL of the portal. Enter the value including the http(s) protocol. Enter only one value here.
- Domains allowed - all allowed domains. Enter without http(s). Separate multiple domains with a comma.
- Profile - select the profile the portal will use.
- Language - select the language that will be preset for the portal.
- Theme - select the theme that the portal will use.
- Logo on login screen - option to upload a logo that will be displayed on the login screen. The image should be in .png format and the width of the image should be 280px maximum.
- Portal Logo - option to upload a logo that will be displayed in the top left corner of the application. The image should be in .png format and the image width should be 180px maximum.
- Login screen title - option to set the text that will be displayed on the login screen.
- Portal Caption - option to set the text that will be displayed in the upper left corner of the application.
- Browser Title - option to set the text that will be displayed in the browser.
- Enable global search - option that will allow users to search the portal via the search box found at the top of the application.
Security
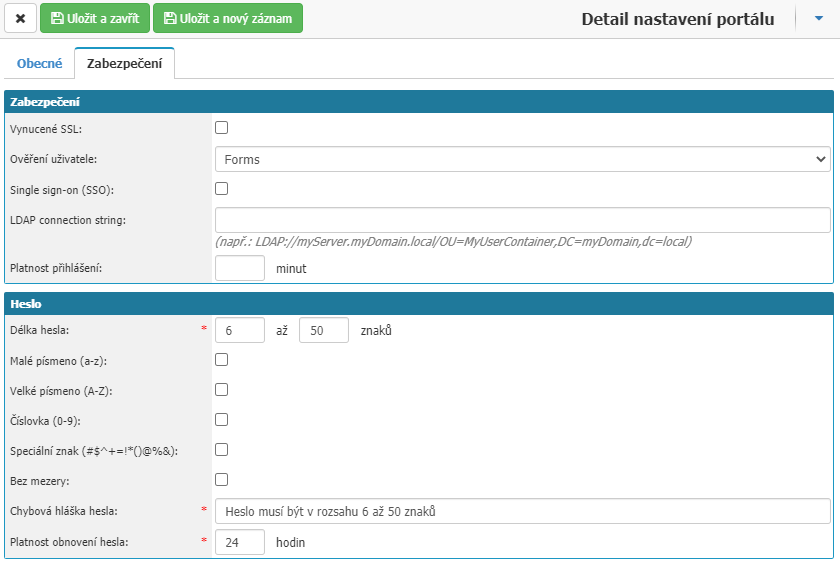
Under the security tab, you will find options for:
- Forced SSL - this option sets up forced SSL.
- User Authentication - option to set allowed user authentication methods. You have the option to set the Forms option, classic authentication using the name and password the user has set in the application. Or the Windows option, is to authenticate the user using LDAP, you must have LDAP synchronization set up in the application. Or the Mixed option, where the user will first try to authenticate using AD and if authentication fails will be redirected to authenticate using name and password.
- Single sign-on (SSO) - this option enables SSO. The option only works with LDAP set up in the application.
- LDAP connection string - the value is used to define the LDAP connection string.
- Sign-in validity - option to set the interval for which the sign-in will be valid. The value is set in minutes.
- Password length - set the password length rule for the user in the application. Required values.
- Lowercase - setting the password rule that it must contain a lowercase letter.
- Capital letter - setting the password rule that it must contain a capital letter.
- Number - set the password rule that it must contain a number.
- Special Character - set the password rule to contain a special character. Allowed special characters are: #$^+=! * ()@%&
- No space - set the password rule that it cannot contain a space.
- Password error message - set the text that will be displayed to users if they do not meet the password format conditions when creating a password. The option is mandatory.
- Password reset validity - setting how long the password reset or change link generated from the application should be valid. The value is set in hours.
Portal security related to Azure Active Directory
For proper synchronization and authentication functionality through Azure Active Directory (see the Services (WinServices) section for a more detailed description of the service), you need to create/modify portal security settings with respect to Azure server settings.
AAD user authentication modes:
- Microsoft Open ID Connect - This mode is useful when the Insio instance is publicly accessible from the Internet (no matter if it is an "on-premise" or "cloud" solution).
- AAD Application Proxy - This is where the Insio application will not be directly publicly accessible from the internet, but should still be integrated with Office 365. One can imagine this as Insio acting as one of the Office 365 apps and using the same authentication/session as the rest of these apps.
Od módu autentizace se dále odvozuje nastavení zabezpečení portálu v konfiguraci INSIO:
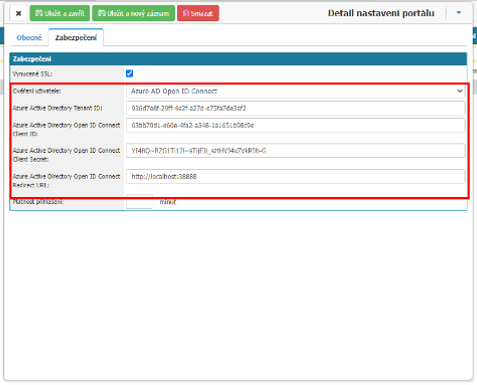
Mód: Azure AD Open ID Connect
Je nutné vyplnit všechna tyto pole:
- Ověření uživatele: Azure AD Open ID Connect
- Azure Active Directory Tenant ID – Tenant ID z konfigurace Azure AD
- Azure Active Directory Open ID Connect Client ID – Application/Client ID aplikace registrované v konfiguraci Azure AD
- Azure Active Directory Open ID Connect Client Secret – Hodnota client secret vytvořená z konfigurace Azure AD
- Azure Active Directory Open ID Redirect URL – Veřejná URL pod, kterou běží Insio intance (stejná hodnota, která se vyplňovala do registrace aplikace v nastavení Azure AD). Např. tedy http://demo.instance.cz/

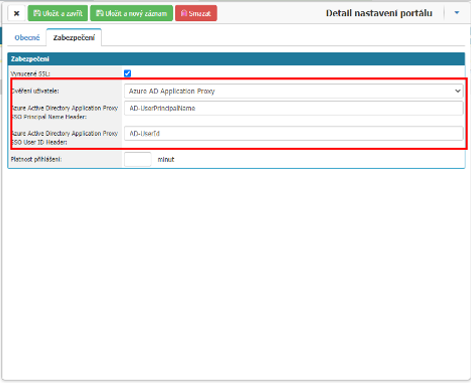
Mode: Azure AD Application Proxy
- Azure Active Directory Application Proxy SSO Principal Name Header - the name of the header in which the Connector sends the principal name information according to the SSO settings in AAD.
- Azure Active Directory Application Proxy User ID Header - the name of the header in which the Connector sends User ID information according to the SSO settings in AAD.
Top bar

Here you will find an option to close the window without saving changes to the settings - Cross, an option to save the settings and close the window - Save and Close, an option to save the settings and open a new window to set up a new portal - Save and New Record and an option to delete the portal from the application - Delete.